

Il y a quelques semaines, j'ai commandé un alternateur.
Quelques raisons pour lesquelles je l'ai commandé, principalement:
A) J'ai commandé un 220AMP "amélioré" car j'ai un amplificateur de rechange assez puissant.
B) J'ai remarqué que lorsque mon véhicule est chauffé à 100%, ma température de ralenti ne reste pas à 550/600. Il rebondira jusqu'à 800 tours après environ 10 secondes. Je sais à coup sûr que ce n'est pas ma batterie car elle est presque neuve (environ 8 mois). J'ai également effectué quelques tests tool32 et le système IGR dit qu'il retombe assez rapidement à "IGR-Medium".
C) Sur les démarrages à froid, j'ai un bruit de sondage rugueux que j'ai tracé à l'embrayage de l'alternateur. Je suis sûr à 100% que c'est lié à l'embrayage de l'alternateur car j'ai apporté quelques changements aux modules JBE et CAS et j'ai pu retarder ce bruit de 0,5 à 1,0 seconde.
De toute façon, la procédure est assez simple. Je ne publierai pas d'instructions détaillées sur la façon de faire chaque étape car la plupart sont déjà ici, mais:
Étape 0) Débranchez votre câble négatif de la batterie. Essentiel car vous aurez un câble + lâche une fois l'alternateur sorti.
A) Retirez le boîtier du filtre à air. Pas le plène. Juste le couvercle et le fond du filtre à air et le tuyau qui le relie au plène. Vous devriez maintenant être en mesure de voir l'alternateur assez bien.
B) Retirez le ventilateur du radiateur. Il est fixé par une vis torx sur le côté gauche. Il y a aussi un tuyau "clippé" au fond du ventilateur. Vous pouvez déclipser ce tuyau en posant votre main par l’entrée d’air située tout au bas du véhicule (sous la voiture). C'est du côté des passagers. Sentez-vous autour, c'est là. Enlever le ventilateur sera un peu impossible pour quiconque novice dans ce bricolage de véhicule. a ira. Il a besoin d'un peu de force, et vous devez faire de votre mieux pour obtenir le tuyau du radiateur gras pour vous permettre de le sortir. Assurez-vous également de (duh) déclipser la connexion électrique au ventilateur du côté passager.
C) Donc, à ce stade, vous avez une vue très claire de l'alternateur. Ensuite, vous devez enlever la ceinture de l'alternateur. Tout ce que vous avez à faire est d'utiliser un 14mm pour rétracter le tendeur et glisser la ceinture. Une fois que c'est éteint, mettez-le de côté et hors du chemin. C'est tout ce qu'il y a à faire pour la ceinture.
D) Ensuite, vous devez retirer 2 boulons de 16 mm tenant l'alternateur. Vérifiez qu'ils sont 16mm car je ne me souviens pas s'ils étaient 14mm ou 16mm. L'un est juste en haut très visible, le prochain est caché sur le fond de l'alternateur juste autour de la roue du tendeur de ceinture. Sentez-vous autour de vous avec votre doigt, c'est là. Dévissez et retirez les deux boulons.
E) Décrochez ensuite le câble électrique 2 broches branché à l'arrière de l'alternateur.
F) Il est maintenant temps de déplacer l'alternateur. Oui, laissez le câble B+ attaché pour le moment. Il n'y a pas assez de place pour y accéder avec l'alternateur en place.
G) Donc, à ce stade l'alternateur devrait être hors de sa place, mais toujours assis au fond du compartiment moteur. Dévissez le câble B+ à l'arrière. C'est un boulon de 17mm de ce dont je me souviens.
H) L'alternateur est prêt à être retiré. Un peu d'espace pour le sortir, vous n'aurez aucun problème.
C'est aussi loin que je suis en ce moment (en faisant une pause entre la suppression / réinstallation) mais réinstaller semble opposé à la suppression. Quelques choses que je vais faire avant de réinstaller :
A) Donnez au câble B+ et à son boulon un bon ponçage pour assurer une bonne connexion.
B) Les "fentes" qui tiennent l'alternateur, je vais probablement nettoyer avec WD40 et donner un tout petit gave juste pour le faire glisser plus facilement (c'est ce qu'elle a dit!).
Notes finales:
A) Le couple sur la sonde B+ devrait être de 19NM selon BMW.
B) La BMW TIS stipule que la protection du soubassement doit être retirée. J'ai trouvé qu'il n'y avait absolument pas besoin de faire ça.
C) publiera si un nouvel alternateur résout certains des problèmes mentionnés au début de ce post.
66,9 kVIEWS
77REPLIES
35APPRECIATES
13/01/2025LAST POST
anom3 a écritIl y a quelques semaines, j'ai commandé un alternateur.
Quelques raisons pour lesquelles je l'ai commandé, principalement:
A) J'ai commandé un 220AMP "amélioré" car j'ai un amplificateur de rechange assez puissant.
B) J'ai remarqué que lorsque mon véhicule est chauffé à 100%, ma consommation de ralenti ne reste pas à 550/600. Il rebondira jusqu'à 800 tours après environ 10 secondes. Je sais à coup sûr que ce n'est pas ma batterie car elle est presque neuve (environ 8 mois). J'ai également effectué quelques tests tool32 et le système IGR dit qu'il retombe assez rapidement à "IGR-Medium".
C) Sur les démarrages à froid, j'ai un bruit de sondage rugueux que j'ai tracé à l'embrayage de l'alternateur. Je suis sûr à 100% que c'est lié à l'embrayage de l'alternateur car j'ai apporté quelques changements aux modules JBE et CAS et j'ai pu retarder ce bruit de 0,5 à 1,0 seconde.
De toute façon, la procédure est assez simple. Je ne publierai pas d'instructions détaillées sur la façon de faire chaque étape car la plupart sont déjà ici, mais:
Étape 0) Débranchez votre câble négatif de la batterie. Essentiel car vous aurez un câble + lâche une fois l'alternateur sorti.
A) Retirez le boîtier du filtre à air. Pas le plène. Juste le couvercle et le fond du filtre à air et le tuyau qui le relie au plène. Vous devriez maintenant être en mesure de voir l'alternateur assez bien.
B) Retirez le ventilateur du radiateur. Il est fixé par une vis torx sur le côté gauche. Il y a aussi un tuyau "clippé" au fond du ventilateur. Vous pouvez déclipser ce tuyau en posant votre main par l’entrée d’air située tout au bas du véhicule (sous la voiture). C'est du côté des passagers. Sentez-vous autour, c'est là. Enlever le ventilateur sera un peu impossible pour quiconque novice dans ce bricolage de véhicule. a ira. Il a besoin d'un peu de force, et vous devez faire de votre mieux pour obtenir le tuyau du radiateur gras pour vous permettre de le sortir. Assurez-vous également de (duh) déclipser la connexion électrique au ventilateur du côté passager.
C) Donc, à ce stade, vous avez une vue très claire de l'alternateur. Ensuite, vous devez enlever la ceinture de l'alternateur. Tout ce que vous avez à faire est d'utiliser un 14mm pour rétracter le tendeur et glisser la ceinture. Une fois que c'est éteint, mettez-le de côté et hors du chemin. C'est tout ce qu'il y a à faire pour la ceinture.
D) Ensuite, vous devez retirer 2 boulons de 16 mm tenant l'alternateur. Vérifiez qu'ils sont 16mm car je ne me souviens pas s'ils étaient 14mm ou 16mm. L'un est juste en haut très visible, le prochain est caché sur le fond de l'alternateur juste autour de la roue du tendeur de ceinture. Sentez-vous autour de vous avec votre doigt, c'est là. Dévissez et retirez les deux boulons.
E) Décrochez ensuite le câble électrique 2 broches branché à l'arrière de l'alternateur.
F) Il est maintenant temps de déplacer l'alternateur. Oui, laissez le câble B+ attaché pour le moment. Il n'y a pas assez de place pour y accéder avec l'alternateur en place.
G) Donc, à ce stade l'alternateur devrait être hors de sa place, mais toujours assis au fond du compartiment moteur. Dévissez le câble B+ à l'arrière. C'est un boulon de 17mm de ce dont je me souviens.
H) L'alternateur est prêt à être retiré. Un peu d'espace pour le sortir, vous n'aurez aucun problème.
C'est aussi loin que je suis en ce moment (en faisant une pause entre la suppression / réinstallation) mais réinstaller semble opposé à la suppression. Quelques choses que je vais faire avant de réinstaller :
A) Donnez au câble B+ et à son boulon un bon ponçage pour assurer une bonne connexion.
B) Les "fentes" qui tiennent l'alternateur, je vais probablement nettoyer avec WD40 et donner un tout petit gave juste pour le faire glisser plus facilement (c'est ce qu'elle a dit!).
Notes finales:
A) Le couple sur la sonde B+ devrait être de 19NM selon BMW.
B) La BMW TIS stipule que la protection du soubassement doit être retirée. J'ai trouvé qu'il n'y avait absolument pas besoin de faire ça.
C) publiera si un nouvel alternateur résout certains des problèmes mentionnés au début de ce post.
Je pensais que c'était le ralenti - 800 tr/min. Pour moi, c'est tout à fait normal, et ça a été comme ça depuis le premier jour. 
anom3 wroteThanks for the write up and the torque spec! Have your issues been fixed?Final notes:
A) The torque on the B+ lead should be 19NM according to BMW.
B) The BMW TIS states that the underbody protection needs to be removed. I found there is absolutley no need to do this.
C) Will post if a new alternator fixes some of the issues mentioned at the start of this post.
I believe the TIS underbody protection removal is to allow for reattachment of all the hose clips to their respective hoses after re-installing the fan shroud. There are quite a few connection points that are very difficult to reconnect otherwise. Here is a photo that shows some, but not all of those hose clip connection points:
I think my alternator just went out on me... Was looking for a DIY! Thanks
Same here, pretty sure my alternator went bad also. Good source for a alternator? Any Tips on testing the alternator?
Thanks so much for this guide.
When I get the bolts out and it comes time to wiggle the alternator out, is it supposed to be ridiculously hard to get out? I've been trying to get it out for the past two days by wiggling it or using a 2x4 to pry it. I've had about ten different people try to get it out but it seems to just be pivoting around where the bottom bolt goes in (I've already taken out both bolts). It's really stuck in there.
When I get the bolts out and it comes time to wiggle the alternator out, is it supposed to be ridiculously hard to get out? I've been trying to get it out for the past two days by wiggling it or using a 2x4 to pry it. I've had about ten different people try to get it out but it seems to just be pivoting around where the bottom bolt goes in (I've already taken out both bolts). It's really stuck in there.
Bumping this thread. What were some indicators that you all receive to make you decide to replace your altenators? I'm Thinking about replacing mine. I have an 08 with 73k.
BLKLYZ wroteIf an 08 I'd definitely replace it.Bumping this thread. What were some indicators that you all receive to make you decide to replace your altenators? I'm Thinking about replacing mine. I have an 08 with 73k.
Mine was feeling strange for a week or two. Couldn't pick what it was but knew my car wasn't the same. It's a daily btw so it makes it a it easier to tell any subtle changes.
First started with a very very subtle weird noice on start up followed by slightly lower idles. This was all coupled with me feeling as though the car felt different when driving but couldn't pick what it was. This all lasted a week.
Then all in one day; seat warmers stop working in the morning. Came night time to go home, slowly slowly every single light started to go on. Engine light, abs, punctured tire, air bag, dampening shocks etc etc and finally the car lost power and turned off.
Replaced the battery and the car turned on beautifully.
Drove it to work today (this all happened yesterday) only to return home now with the 'low battery' signal coming up as I entered the drive away.
Alternator it is.
Taking it in tomorrow
J89 wroteThanks. I guess my alternator is going on it's way out. My wife was driving my car a week ago and experienced multiple symptoms similar to yours. The Windows stopped working, the A/C quit working, the belt restraint error displayed along with dynamic stability error. She was able to get it back to the house and had her slap the battery tender on it. Once the battery was fully charged, she started the car up and all the earlier symptoms had gone away. This was after letting the car charge for 48hrs before starting. I'm out of country so I could not investigate further.BLKLYZ wroteIf an 08 I'd definitely replace it.Bumping this thread. What were some indicators that you all receive to make you decide to replace your altenators? I'm Thinking about replacing mine. I have an 08 with 73k.
Mine was feeling strange for a week or two. Couldn't pick what it was but knew my car wasn't the same. It's a daily btw so it makes it a it easier to tell any subtle changes.
First started with a very very subtle weird noice on start up followed by slightly lower idles. This was all coupled with me feeling as though the car felt different when driving but couldn't pick what it was. This all lasted a week.
Then all in one day; seat warmers stop working in the morning. Came night time to go home, slowly slowly every single light started to go on. Engine light, abs, punctured tire, air bag, dampening shocks etc etc and finally the car lost power and turned off.
Replaced the battery and the car turned on beautifully.
Drove it to work today (this all happened yesterday) only to return home now with the 'low battery' signal coming up as I entered the drive away.
Alternator it is.
Taking it in tomorrow
I've noticed that I could only find a refurbished Genuine BMW alternator or a brand new Valeo alternator. The valeo is literally half the price of the original BMW unit. Would anybody have any info if Valeo is reputable or am I better off buying the refurb BMW original?
BLKLYZ wroteThe "BMW original" alternator is made by Valeo, so its the same quality product without the BMW stamp on the label.I've noticed that I could only find a refurbished Genuine BMW alternator or a brand new Valeo alternator. The valeo is literally half the price of the original BMW unit. Would anybody have any info if Valeo is reputable or am I better off buying the refurb BMW original?
deansbimmer wroteI appreciate the info. Thanks!!!BLKLYZ wroteThe "BMW original" alternator is made by Valeo, so its the same quality product without the BMW stamp on the label.I've noticed that I could only find a refurbished Genuine BMW alternator or a brand new Valeo alternator. The valeo is literally half the price of the original BMW unit. Would anybody have any info if Valeo is reputable or am I better off buying the refurb BMW original?

BLKLYZ wrotedid anyone have any codes scanned?I appreciate the info. Thanks!!!
I had my car turn off on me not too long ago...
I started getting EDC error then ABS, low washer fluid, transmission and everything lit up and car died... I waited 5 min and started up with no issues... I replaced thermostat and coolant sensor but now I have 278D error with one source says its: Generator communication. Error will not cause a warning light
and other: radiator outlet temp sensor.
Should I be replacing my alternator now?
BLKLYZ wroteI just checked my battery and when car was off it says 12V and when turned on 14V so that means that alternator is charging...Thanks. I guess my alternator is going on it's way out. My wife was driving my car a week ago and experienced multiple symptoms similar to yours. The Windows stopped working, the A/C quit working, the belt restraint error displayed along with dynamic stability error. She was able to get it back to the house and had her slap the battery tender on it. Once the battery was fully charged, she started the car up and all the earlier symptoms had gone away. This was after letting the car charge for 48hrs before starting. I'm out of country so I could not investigate further.
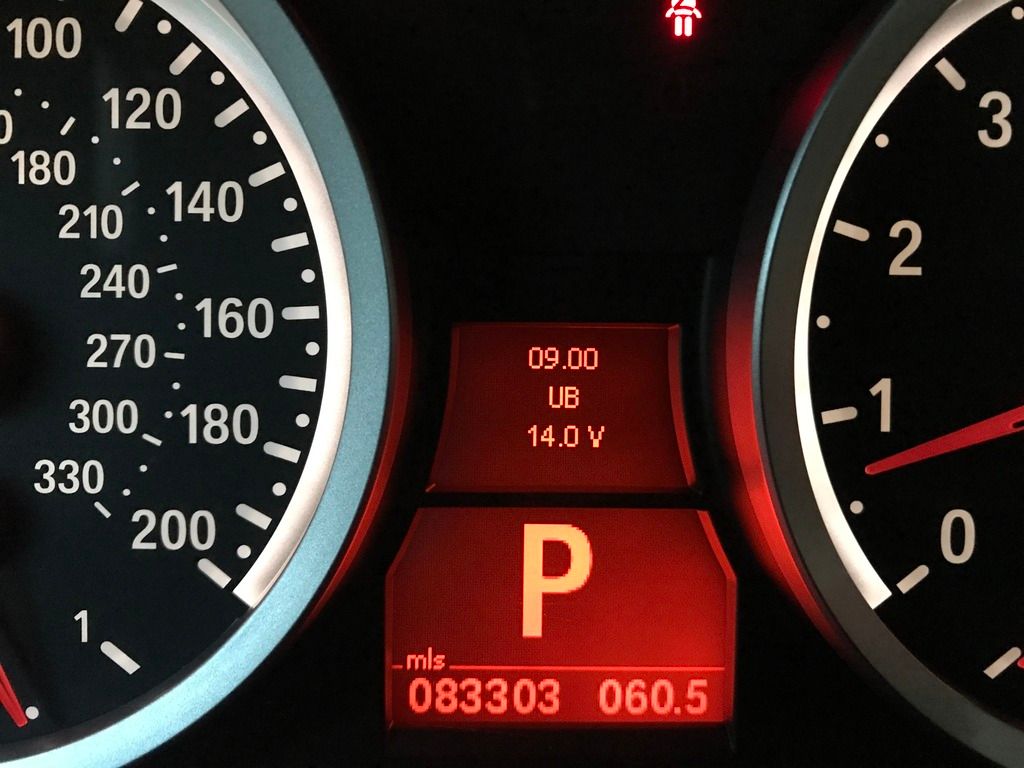
I'm driving a 2013 e93 M3 and have had all sorts of warnings flashing over the last several months. I replaced the battery and the warnings keep coming, now with even more weirdness. I think there's a voltage issue, and am going to replace the alternator.
I've previously replaced spark plugs and an ignition coil on an e46 m3, removed the throttle limiter, that kind of thing.
Anybody done an alternator replacement who can point me towards tricky things to look out for? I understand there's a number of clips invovled that could snap - is that pretty much it?
So it seems to me it's disconnect neg battery terminal in trunk; remove air filter cover; remove radiator fan; unplug alternator and remove it.
Seems from what I've read that the clips under the fan are a pia (I do not plan on removing the splash guard). Is the fan tricky to get out?
also the alternator itself sounds like it can be tricky to remove.
I'm concerned I'll get to the middle of this and not be able to finish it - this is my one and only car....
I've ordered a new alternator and an aluminum bolt replacement kit for the bolts, I read they should be replaced when performing this change.
Thanks.
I've previously replaced spark plugs and an ignition coil on an e46 m3, removed the throttle limiter, that kind of thing.
Anybody done an alternator replacement who can point me towards tricky things to look out for? I understand there's a number of clips invovled that could snap - is that pretty much it?
So it seems to me it's disconnect neg battery terminal in trunk; remove air filter cover; remove radiator fan; unplug alternator and remove it.
Seems from what I've read that the clips under the fan are a pia (I do not plan on removing the splash guard). Is the fan tricky to get out?
also the alternator itself sounds like it can be tricky to remove.
I'm concerned I'll get to the middle of this and not be able to finish it - this is my one and only car....
I've ordered a new alternator and an aluminum bolt replacement kit for the bolts, I read they should be replaced when performing this change.
Thanks.
What is the part number for this 220A version?
I want to make a correction for this DIY for anyone in the future. If you follow the steps per the op (which his diy was a great help), on step E where he states to take off the 2 pin electrical connector first, is pretty much impossible if your car is older, as the clip is stuck on their pretty good. I would wiggle the alternator out FIRST (it took a great deal effort as it finally came out, using a long flat head screw driver) then take off the electrical connector and the B+ cable.
Also, the two alternators bolts are 16mm and the B+ nut is a 17mm
Also, the two alternators bolts are 16mm and the B+ nut is a 17mm
anom3 wroteI have been looking for a software tool to be able to read/write modules, preferably free, what are you using and do you need any special tool ?I am 100% sure its related to the alternator clutch as I have made some changes in the JBE and CAS modules and been able to delay this noise by 0.5 to 1.0 seconds.
C) Will post if a new alternator fixes some of the issues mentioned at the start of this post.
anom3 wroteIs there a downloadable TIS available ? I can access it online allright but it is very slow and they made it very unfriendly to browse through.The BMW TIS states
If anyone in the future needs to replace their alternator, i would get it tested first at autozone on the car and see what has failed first. The voltage regulator failed on mine, everything else passed on the alternator. When i took apart the alternator, and took of the plastic housing in the back (it pops out, using a flathead screwdriver). Than there is 3 8mm bolts holding the voltage regulator. Once i took that apart, i inspected the brushes and they were really short and worn out. I had the option of replacing the brushes or putting on a diff work ing volt regulator with good brushes (i took this step). I installed everything back, ran some tests with multimetere and everything looked good. I also went to autozone they tested the alternator once again and it passed everything including the volt regulator..
For the original DIY: I just replaced this and I am not sure how the OP did it, but there was no way that I could it....here is a quick update on the steps I would add.
Add-in: I would release the belt tesioner (the middlle one) by loosening bolt directly above it. This will release the tension on the belt.
D) Next you need to remove 2 16mm bolts holding the alternator. Double check they are 16mm as I don't recall if they were 14mm or 16mm. One is right at the top very visible, the next one is hidden on the bottom of the alternator right around where the belt tensioner wheel is. Feel around with your finger, its there. Unscrew and pull out both bolts.
Add-in: Wiggle out the alternator prior to un-clipping the connector and removing the nut.
E) Next unclip the 2 pin electrical cable plugged to the back of the alternator.
F) Now its time to wiggle the alternator out. Yes, leave the B+ cable attached for the time being. There is just not enough room to get to it with the alternator in place.
G) So at this point the alternator should be out of its place, but still sitting at the bottom of the engine bay. Unscrew the B+ cable at the back. Its a 17mm bolt from what I recall.
H) The alternator is ready to be pulled out. Quite a bit of room to get it out, you will have no trouble.
This is as far as I am right now (taking a break between removal / reinstall) but reinstall looks opposite of removal. A couple of things I will do before reinstalling:
A) Give the B+ cable and its bolt a good sanding to ensure a good connection.
B) The "slots" that hold the alternator I will probably clean with WD40 and give a tiny tiny greesing just to make it slide in there easier (thats what she said!).
Add-in: Reinstall the alternator first, starting with the lower bolt, making sure the lower bolt passes thru the hole on the block. then screw in the upper bolt.
Add-in: Place the belt in the correct postion, put the screw back into the tensioner, once this is complete, remove the cap from the tensioner pulley with a screw driver, you should see a 14mm bolt. For this step I recommended getting someone to help you with this. I used a short extension attached to a 14mm socket, placed it on the 14mm bolt and rotated it clockwise, this will release the tension on the belt...this is where your helper comes in, while i was holding the pulley in position, your helper wiggled the belt into place (this was tedious), once in place release the tensioner and your done. now you just reinstall the fan, clip the hoses from the bottom and reassemble the air intake....
Final notes:
A) The torque on the B+ lead should be 19NM according to BMW.
B) The BMW TIS states that the underbody protection needs to be removed. I found there is absolutley no need to do this.
C) Will post if a new alternator fixes some of the issues mentioned at the start of this post.
Add-in: I would release the belt tesioner (the middlle one) by loosening bolt directly above it. This will release the tension on the belt.
D) Next you need to remove 2 16mm bolts holding the alternator. Double check they are 16mm as I don't recall if they were 14mm or 16mm. One is right at the top very visible, the next one is hidden on the bottom of the alternator right around where the belt tensioner wheel is. Feel around with your finger, its there. Unscrew and pull out both bolts.
Add-in: Wiggle out the alternator prior to un-clipping the connector and removing the nut.
E) Next unclip the 2 pin electrical cable plugged to the back of the alternator.
F) Now its time to wiggle the alternator out. Yes, leave the B+ cable attached for the time being. There is just not enough room to get to it with the alternator in place.
G) So at this point the alternator should be out of its place, but still sitting at the bottom of the engine bay. Unscrew the B+ cable at the back. Its a 17mm bolt from what I recall.
H) The alternator is ready to be pulled out. Quite a bit of room to get it out, you will have no trouble.
This is as far as I am right now (taking a break between removal / reinstall) but reinstall looks opposite of removal. A couple of things I will do before reinstalling:
A) Give the B+ cable and its bolt a good sanding to ensure a good connection.
B) The "slots" that hold the alternator I will probably clean with WD40 and give a tiny tiny greesing just to make it slide in there easier (thats what she said!).
Add-in: Reinstall the alternator first, starting with the lower bolt, making sure the lower bolt passes thru the hole on the block. then screw in the upper bolt.
Add-in: Place the belt in the correct postion, put the screw back into the tensioner, once this is complete, remove the cap from the tensioner pulley with a screw driver, you should see a 14mm bolt. For this step I recommended getting someone to help you with this. I used a short extension attached to a 14mm socket, placed it on the 14mm bolt and rotated it clockwise, this will release the tension on the belt...this is where your helper comes in, while i was holding the pulley in position, your helper wiggled the belt into place (this was tedious), once in place release the tensioner and your done. now you just reinstall the fan, clip the hoses from the bottom and reassemble the air intake....
Final notes:
A) The torque on the B+ lead should be 19NM according to BMW.
B) The BMW TIS states that the underbody protection needs to be removed. I found there is absolutley no need to do this.
C) Will post if a new alternator fixes some of the issues mentioned at the start of this post.
^ thank you!
I've been having some battery issues for a few weeks now. Every now and again I get in the car and it gives me the battery discharge warning. It seems to very with the cold weather which has been an issue since I am in Philly. One day its 60 then next thing you know its 10. Anyway today I was driving on my way home from work and started to get all sorts of messages on my dash, immediately thought it was the battery. Well then everything just dies out, and I sit for 25 mins waiting for a jump but out of the blue it started up without needing it..... Worried to drive it as I don't want to be stranded. I went out and checked the battery and the alternator and both seem to be at the right numbers(12.3V and 14.5V respectfully), also the car started up without a hitch. I found this video that was really helpful, no need to have a voltmeter. Apparently the car has that function built in. Anyway I am not sure what to check next. I have read about the plug-in contact of the battery positive cable on the front power distributor being loose in the E92 M3, but not sure if that the culprit or not. Any recommendations?
Voltage display on dashboard video:
Voltage display on dashboard video:
