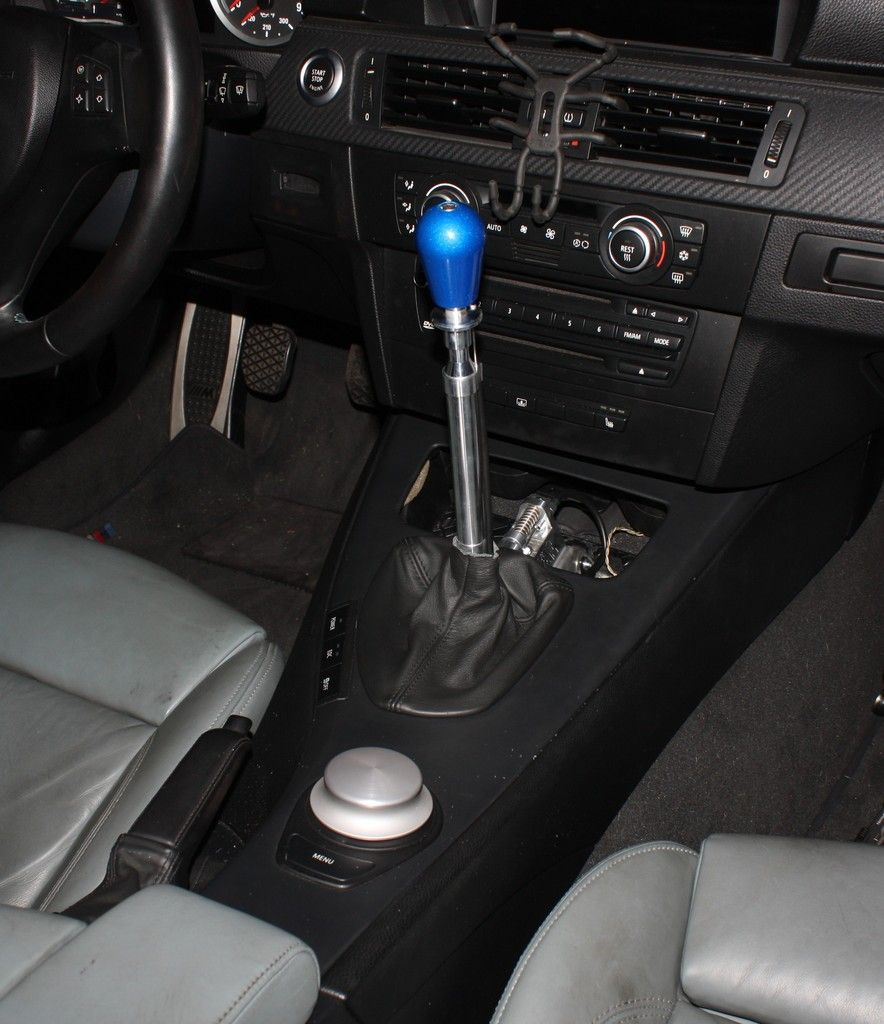
Je veux donc commencer par dire qu'il était plus facile d'installer mon kit de compresseur ESS que ce levier de vitesses magnifiquement construit, principalement parce que je devais tout faire moi-même. Je ne suis en aucun cas un expert ou certifié. Faites-le à vos risques et périls. JE NE SUIS PAS RESPONSABLE DES PARTIES SUPPLÉMENTAIRES, DES PICES COURTES OU DES SENTIMENTS COURTS.
J’adore apprendre, alors j’ai décidé de le faire seul et de partager mon expérience avec vous. Le manque de bricolage pour cette installation a été ce qui m'a empêché d'en acheter un il y a longtemps. J'ai finalement franchi le pas et je ne pourrais pas être plus heureux. J'installe également un DSSR au lieu de la liaison OEM, je ne l'ai pas testé mais je suis certain que la liaison OEM conviendra.
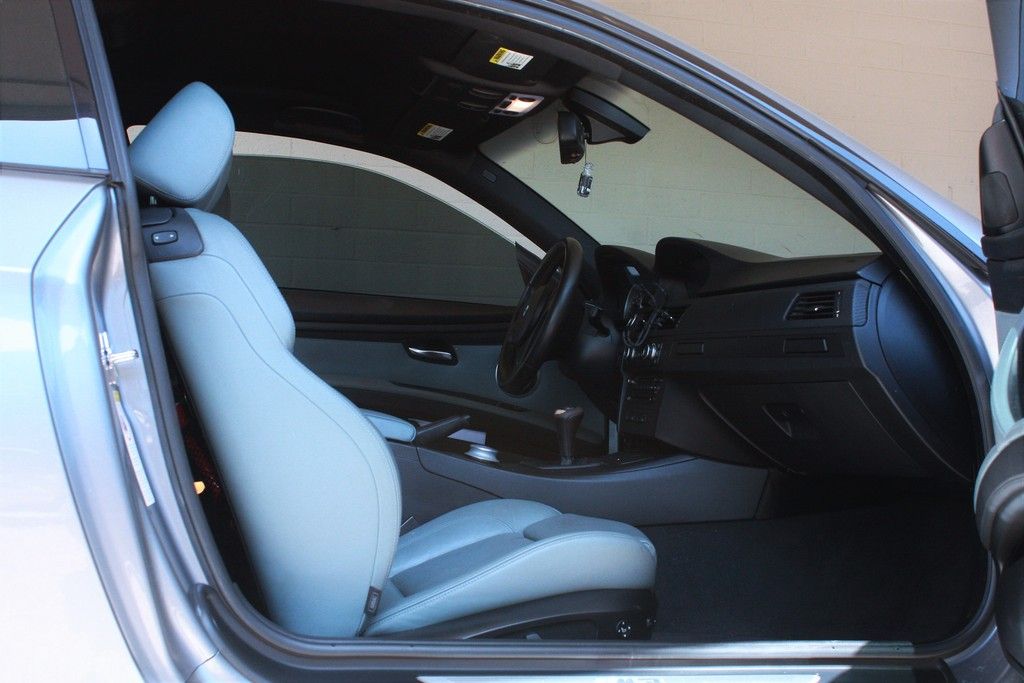
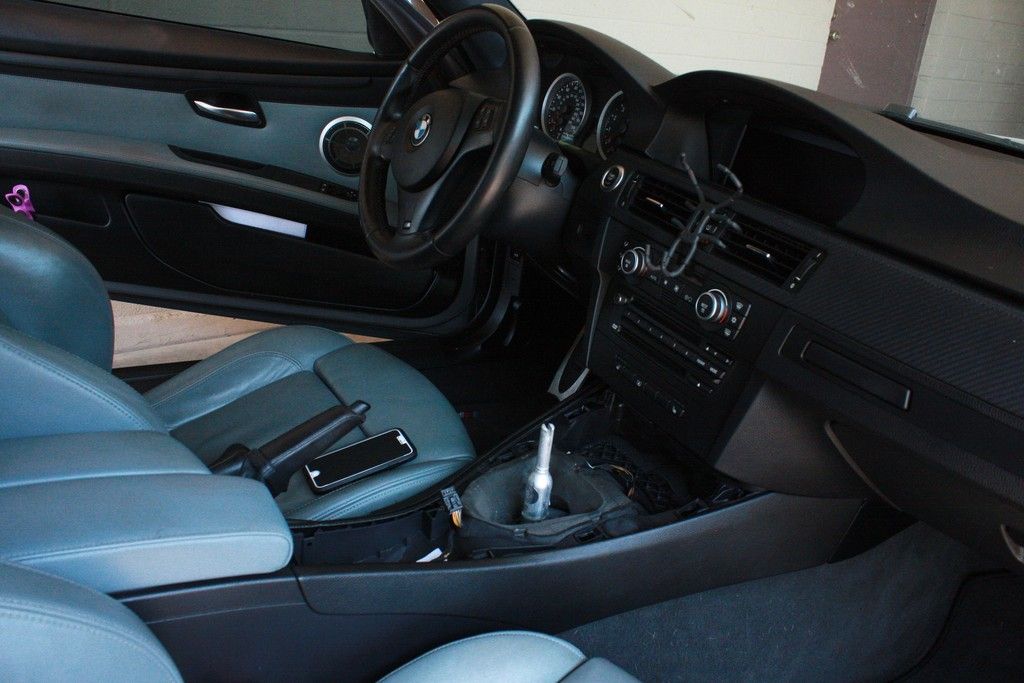
Le "avant" 
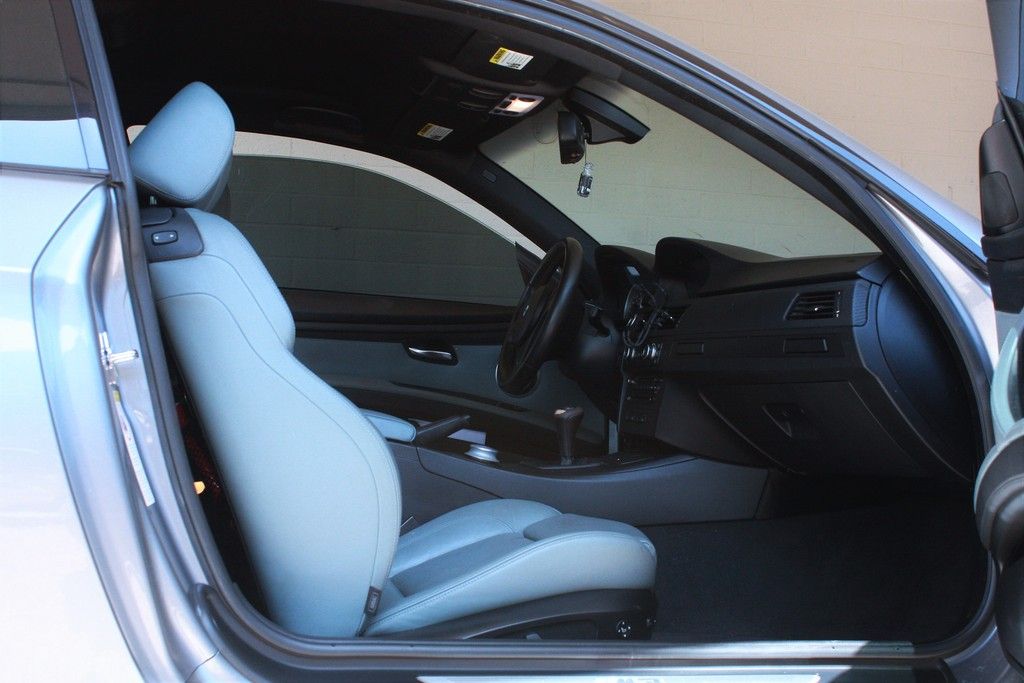
Nous y voilà
Grand merci à :  wrh3 son bricolage pour un UUC SSK m'a beaucoup aidé à descendre au transporteur de changement. Lien vers son DIY http://www.billswebspace.com/M3UUCEvo3DIY.htm
Vous pouvez suivre la majorité de ses pas jusqu'à ce qu'il démonte le levier de vitesses du transporteur. Il a utilisé deux tournevis, faisant tourner le mécanisme de verrouillage dans le sens des aiguilles d'une montre. BUTTT Enlevez vos boucliers d'échappement et de chaleur, vous allez vouloir tout l'espace pour le faire.
Toutes les bottes en mousse et caoutchouc seront jetées. Vous devrez également couper la mousse qui se trouve dans la voiture et couper une partie du plastique. J'ai utilisé un dremel sans fil pour faire la coupe et le ponçage. Je vais vous montrer ce que j'ai fait dans des posts ultérieurs.
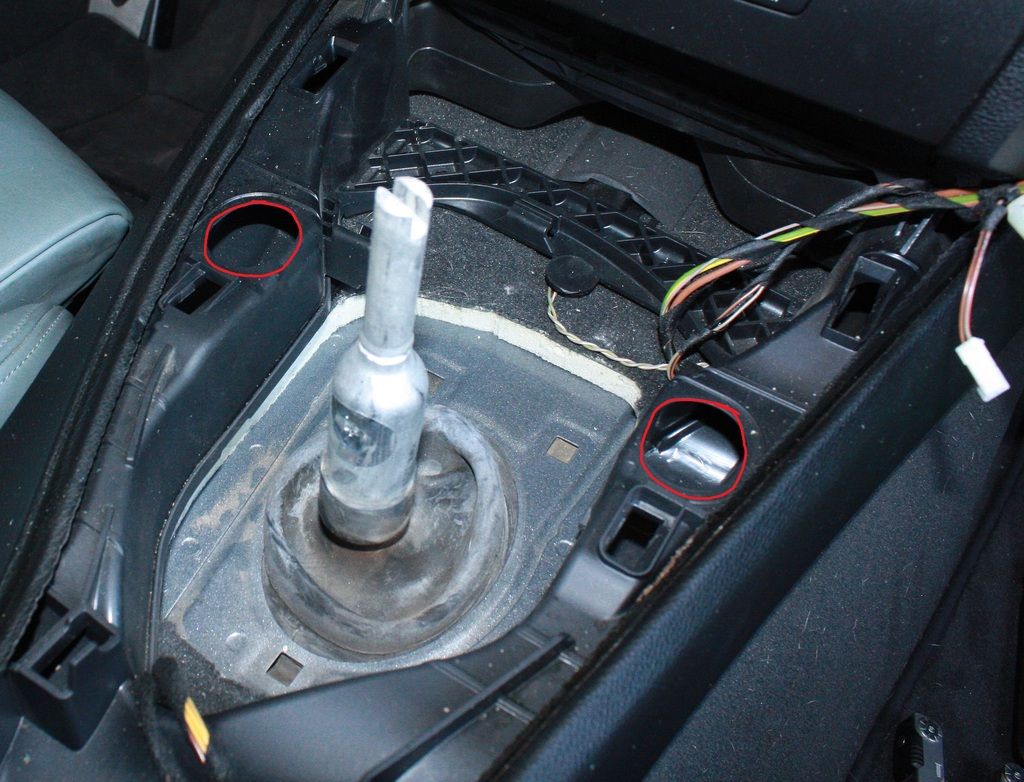
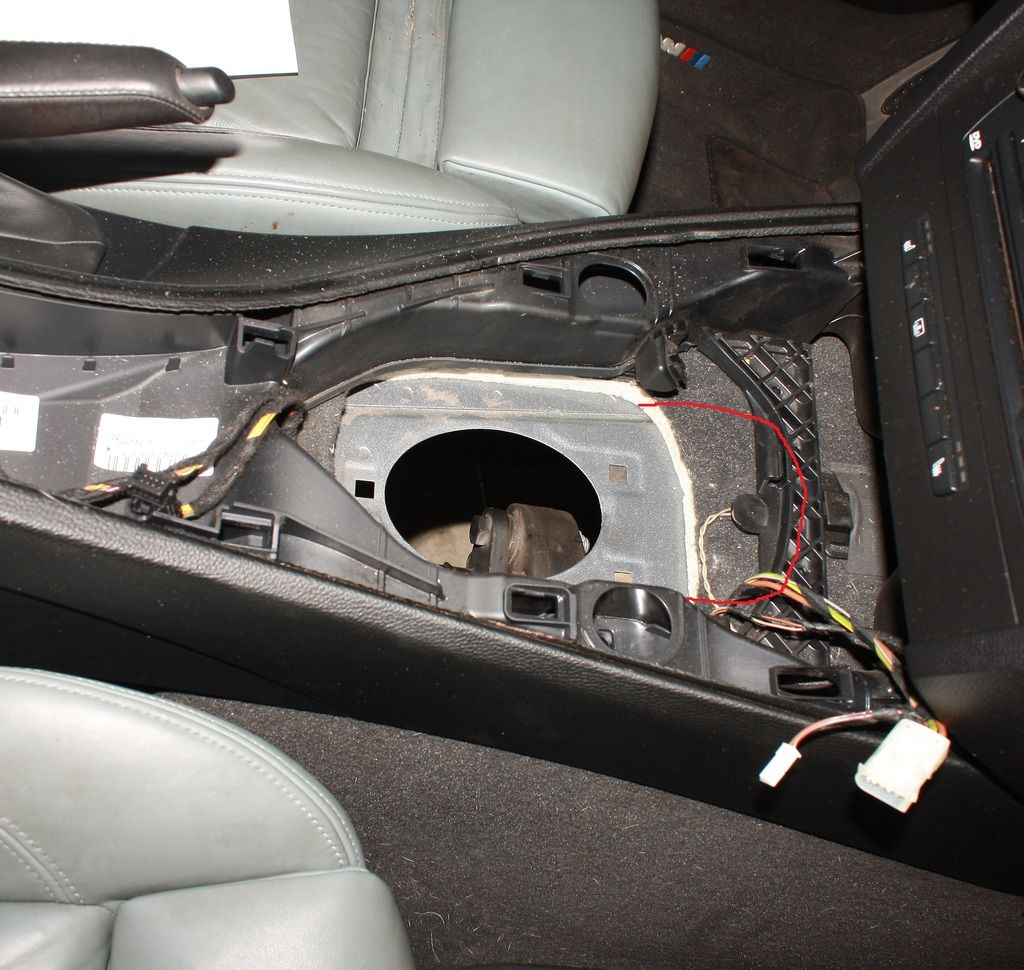
Pour cette installation, vous devrez enlever le couvercle de la console centrale (les instructions appellent à l'enlèvement de toute la console centrale mais je n'ai pas pu trouver un bricolage, et ne pouvais pas le comprendre, alors je l'ai laissé allumé. Ce qui s’est avéré pour le mieux, car il a éliminé les devinettes en matière de coupe et de taille.
Le couvercle est maintenu par quelques clips de pression afin qu'il tire juste vers le haut avec une certaine pression. J'ai commencé par le front et je suis revenu.
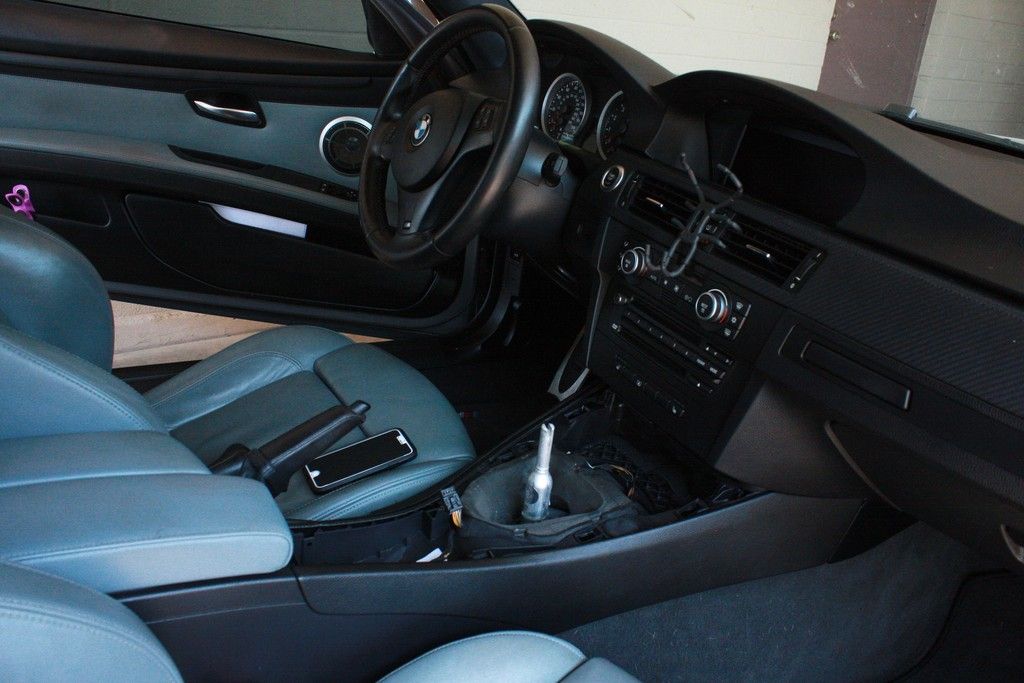
Il y a aussi deux boulons que j'ai décidé de retirer qui maintient la console centrale vers le bas. il donne un peu de "jambe" supplémentaire pour travailler avec.
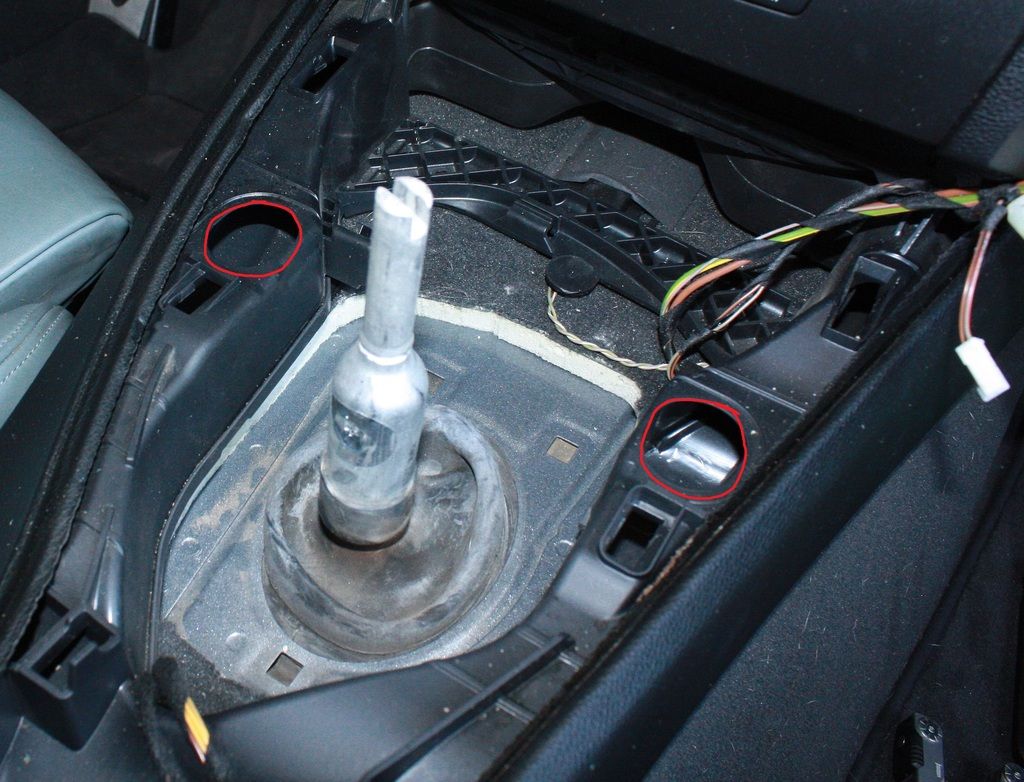
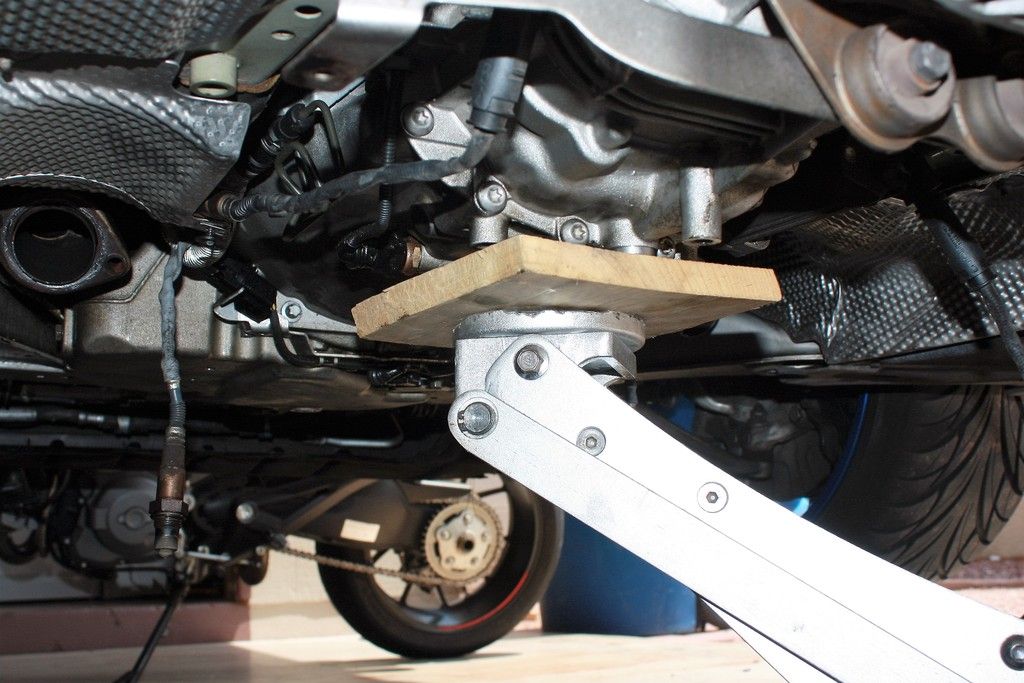
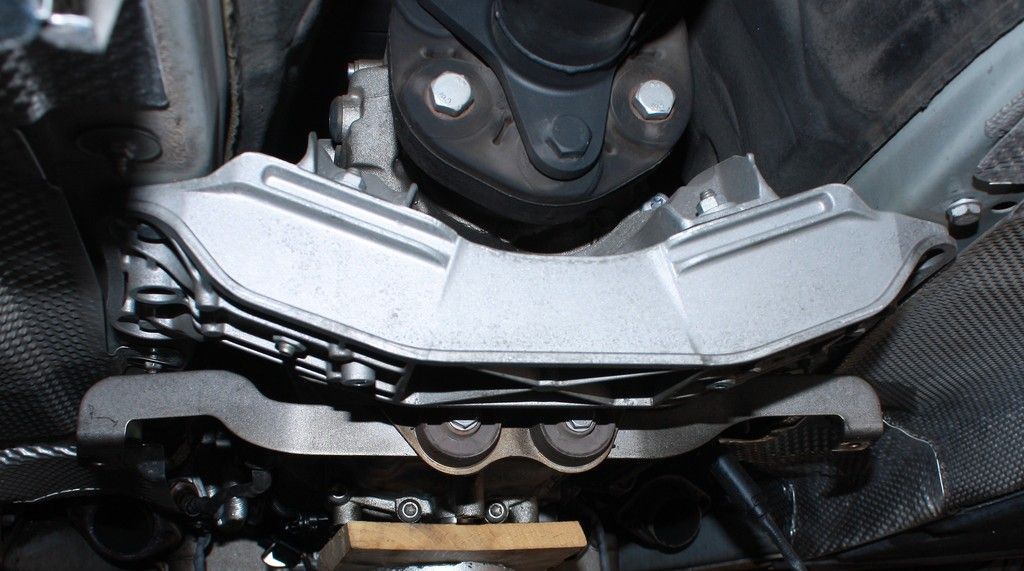
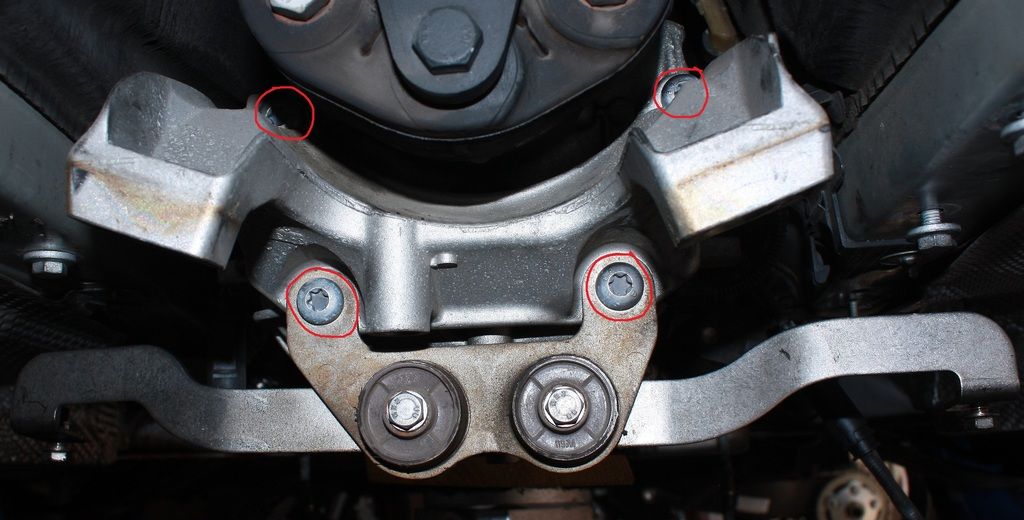
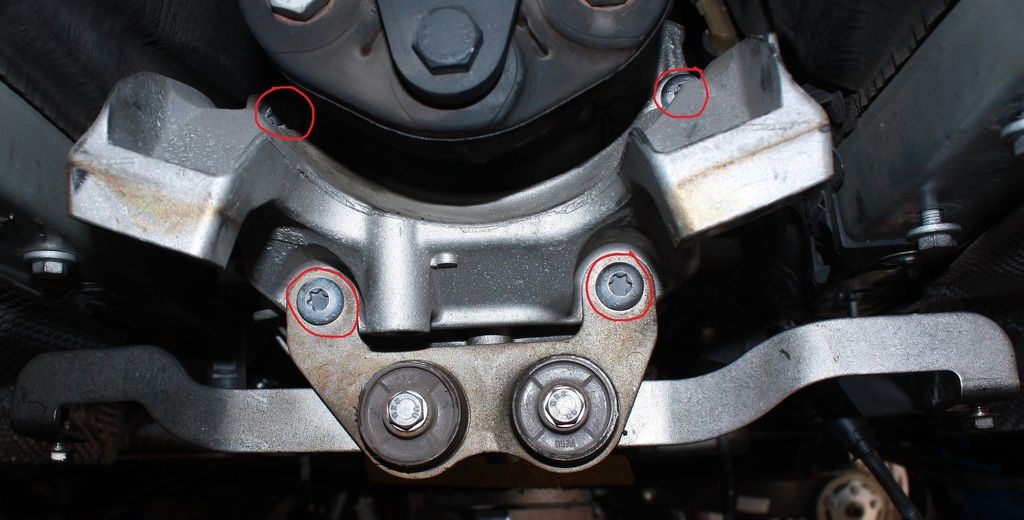
Retour au fond de la voiture; d'abord, vous devez soutenir la transmission avec une prise de transmission si vous en avez une. Je ne l'ai pas fait, alors j'ai utilisé un morceau de bois avec mon cric habituel. Une fois pris en charge, vous devrez retirer la traverse de transmission et le cintre d'échappement qui est boulonné à la transmission avec des boulons torx.

Transmission transversale
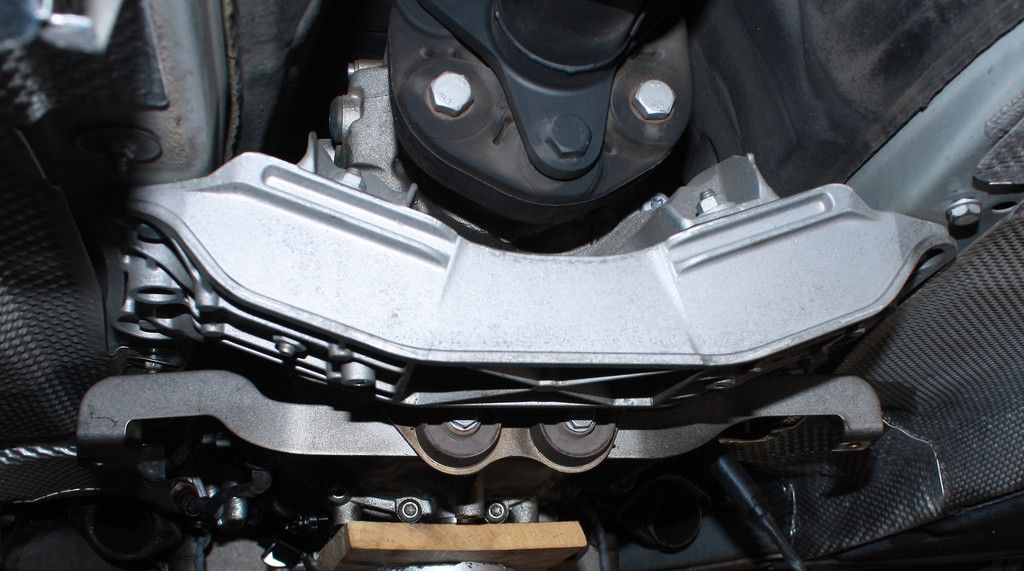
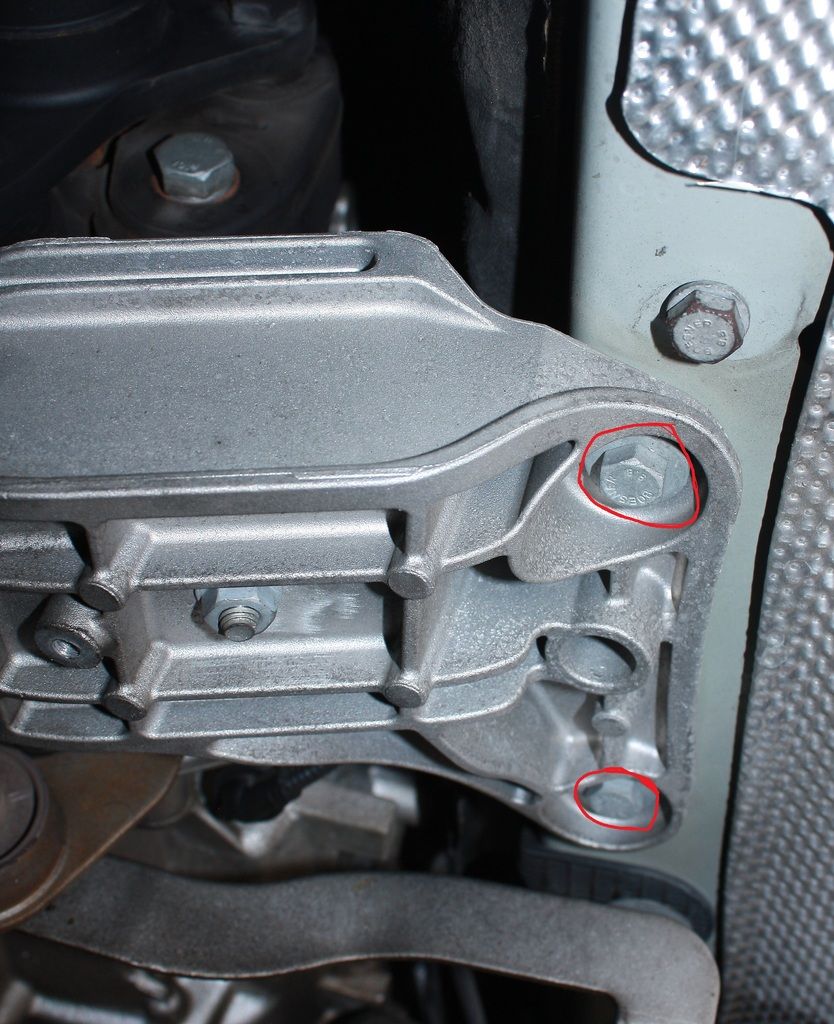
Deux boulons sur la droite vissé au cadre
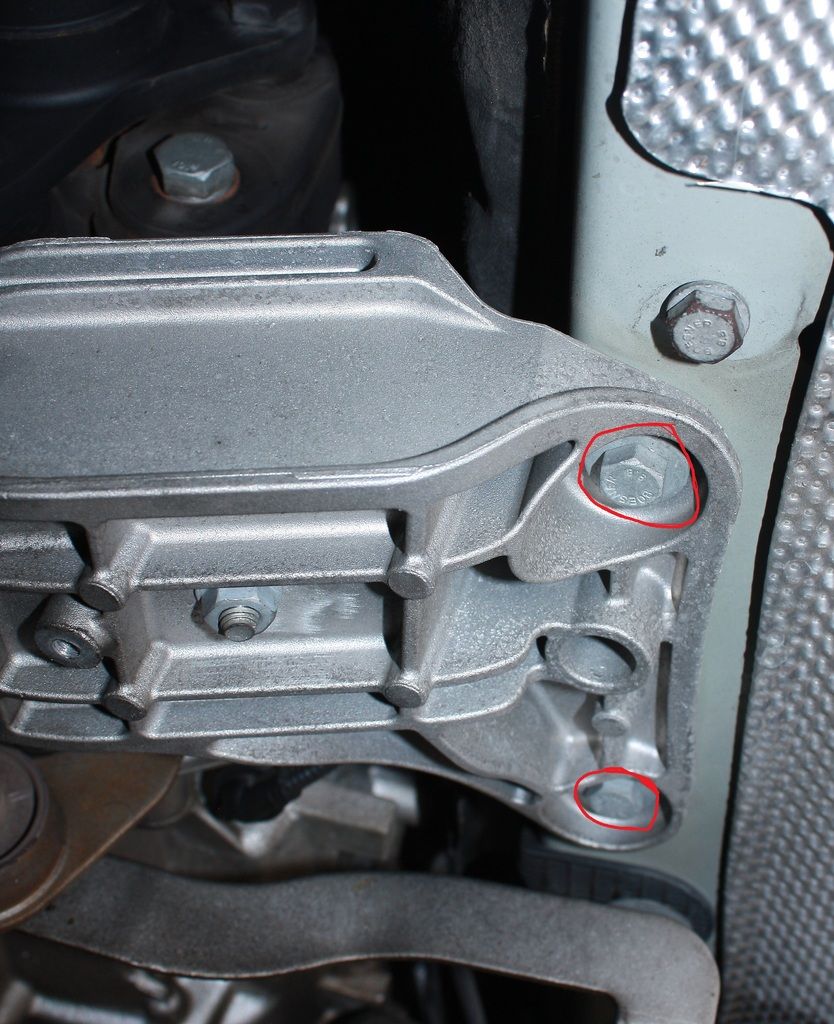
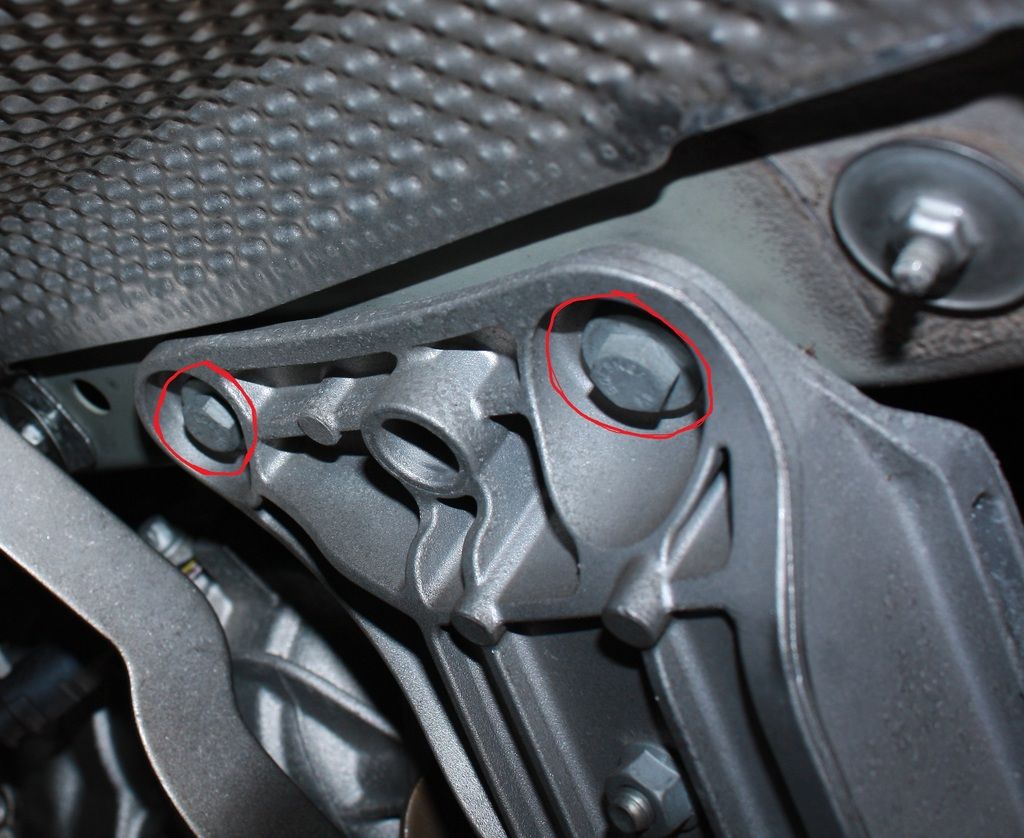
Deux boulons sur la gauche boulonnés au cadre
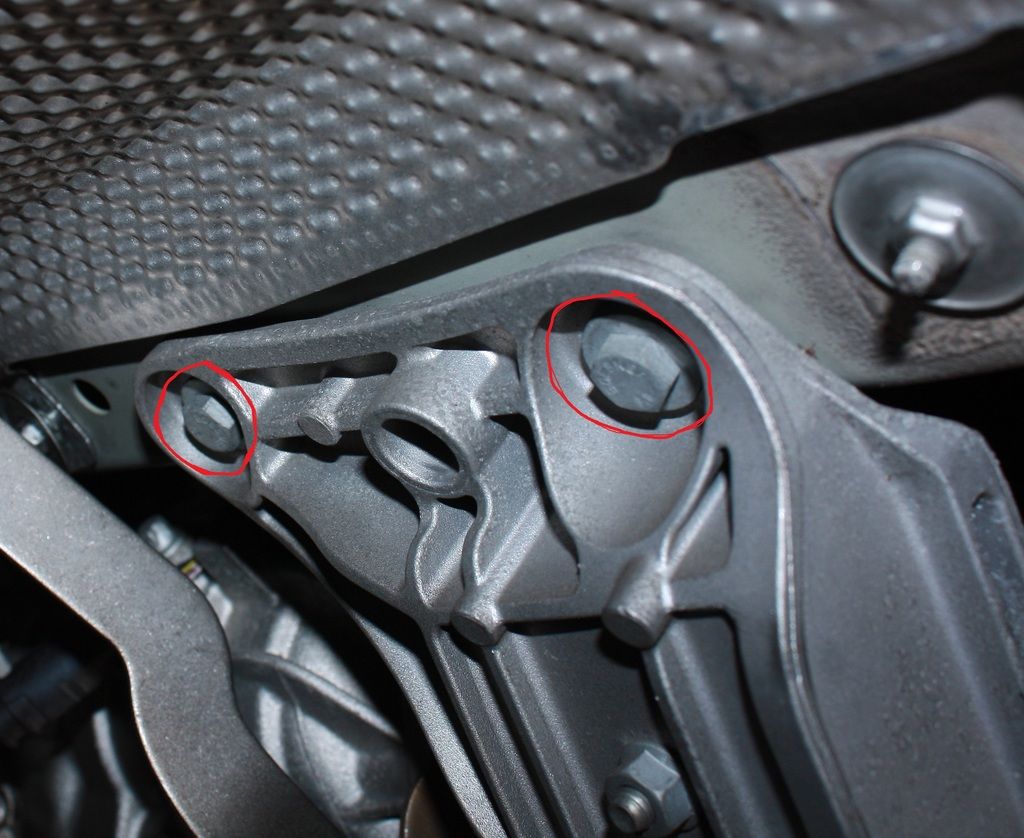
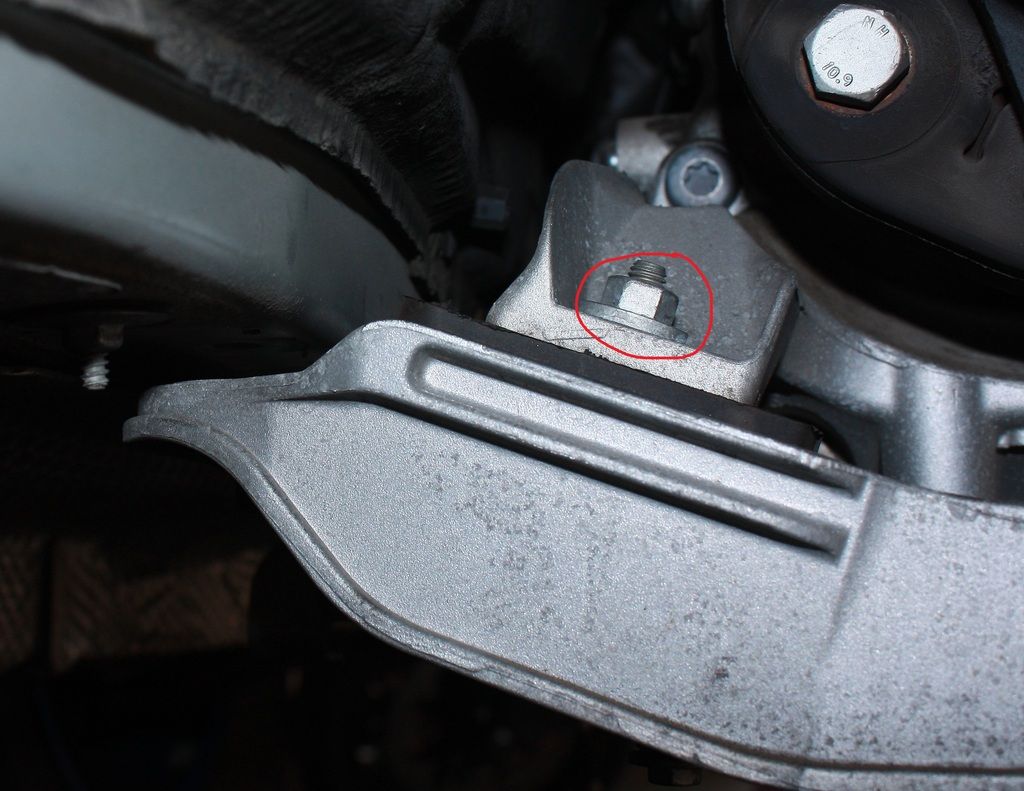
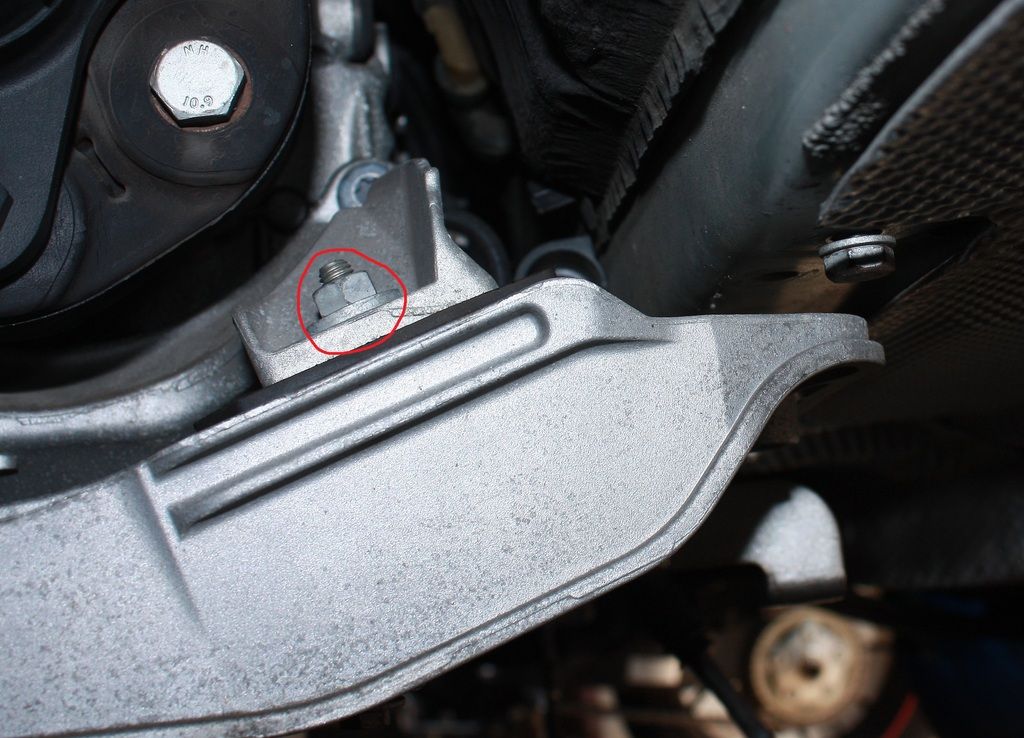
Un écrou de chaque côté boulonné à la transmission elle-même. À ce stade, j'ai recommandé de remplacer vos supports de transmission, la traverse est sortie et c'est le plus facile à ce stade de les remplacer. Je ne savais pas que j'allais être dans cette profondeur et ça ne m'a pas traversé l'esprit... Et encore une fois, il n'y a pas de bricolage pour cela... Pas parfait, mais je serai le cobaye pour nous tous.
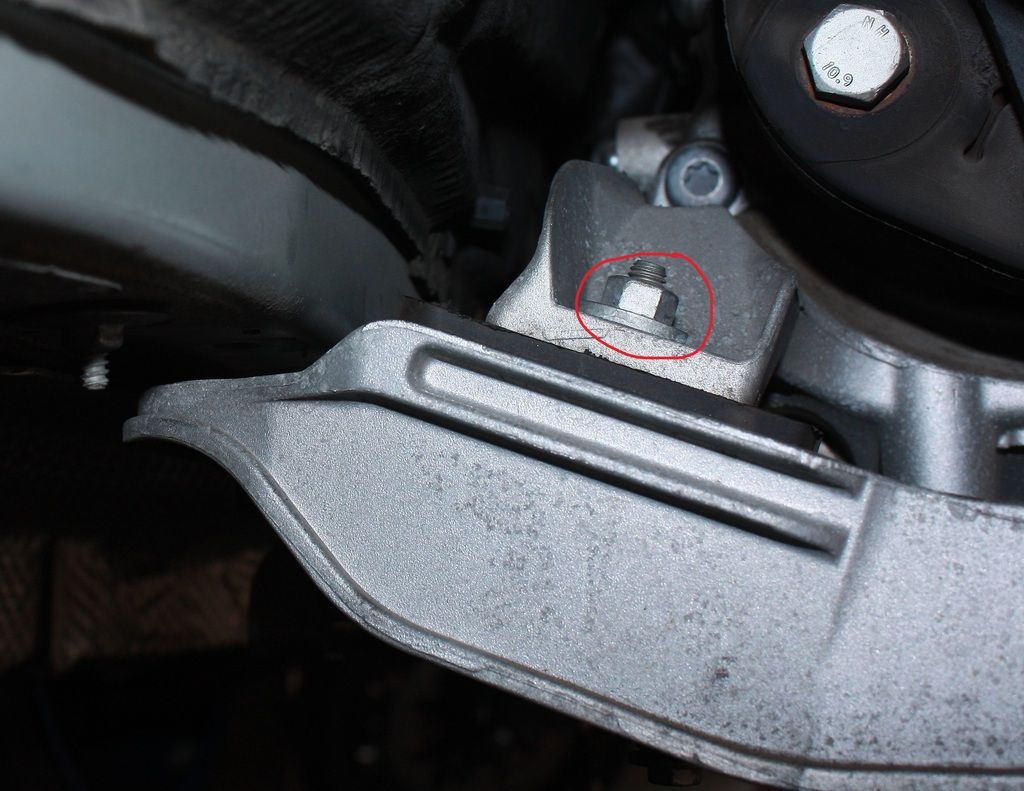
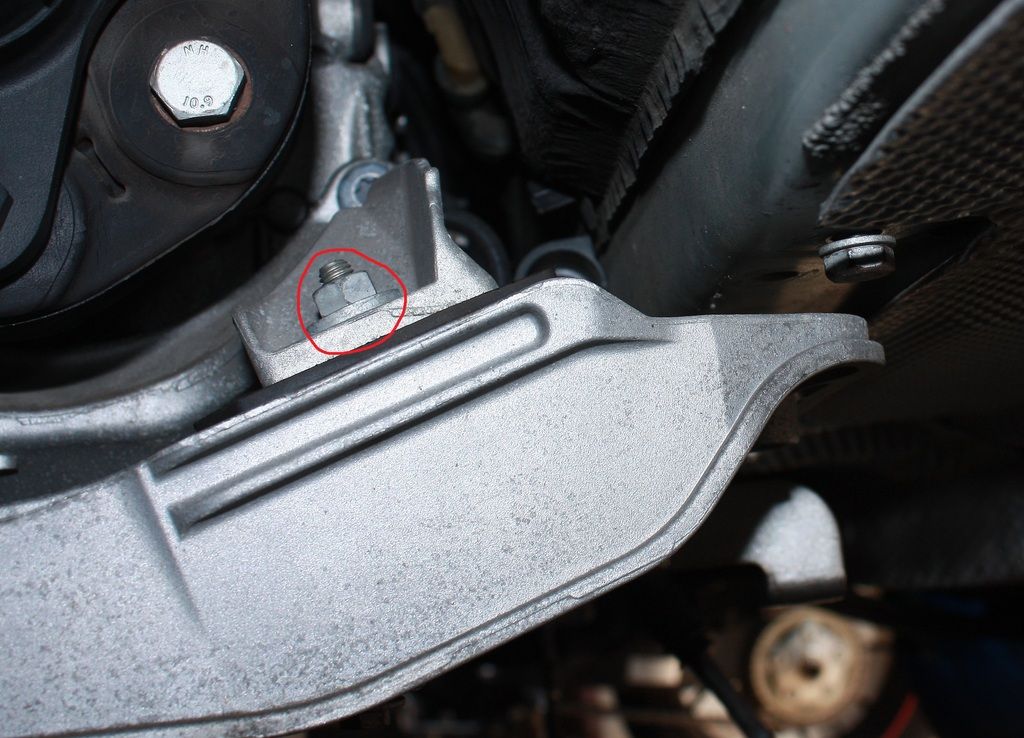
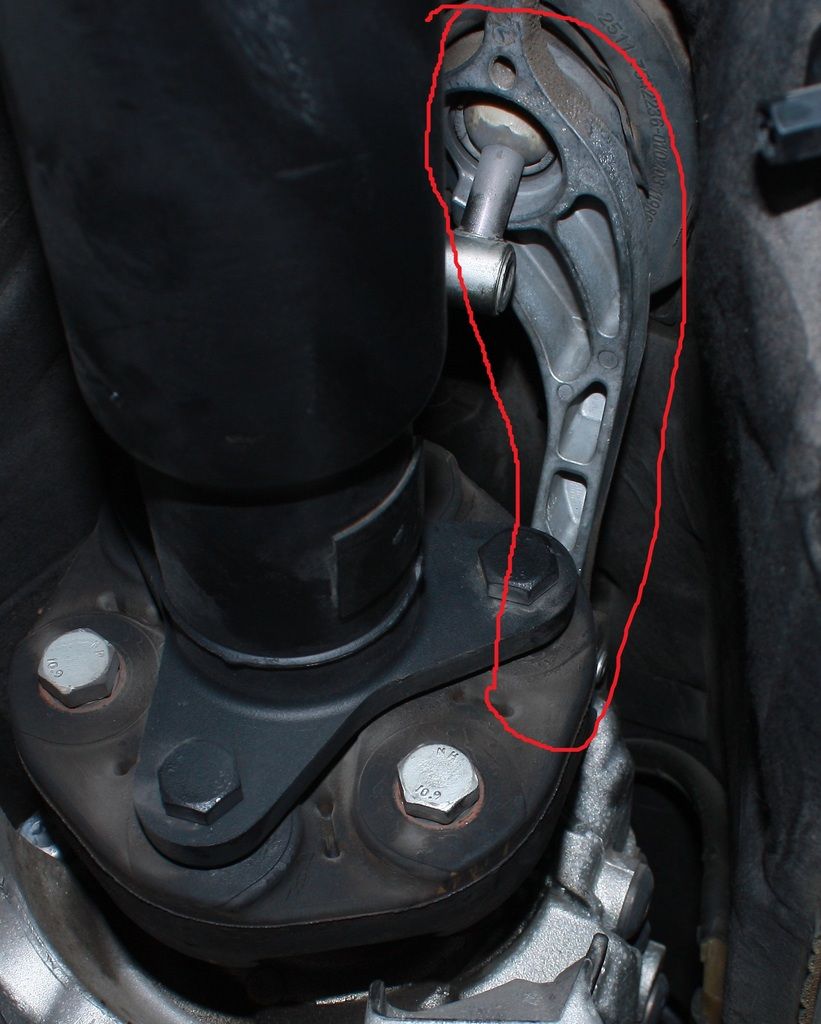
Une fois que la traverse a été retirée, vous voulez ensuite retirer le crochet d'échappement qui est boulonné à la transmission, vous voulez faire cela purement pour avoir plus d'espace de travail.
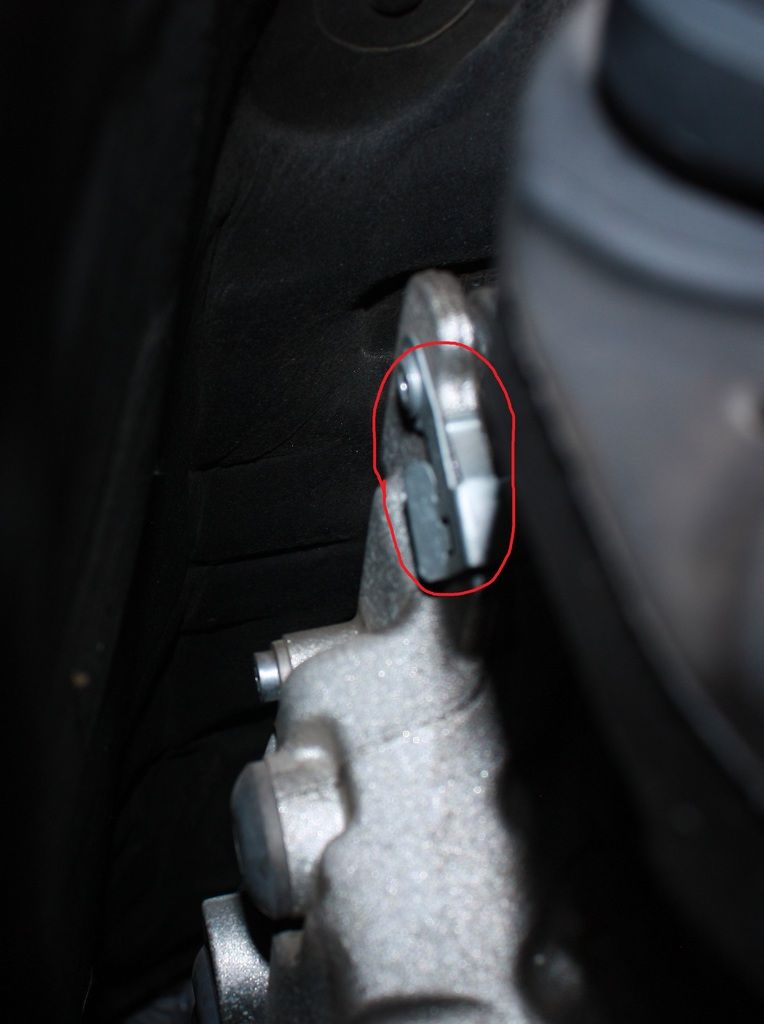
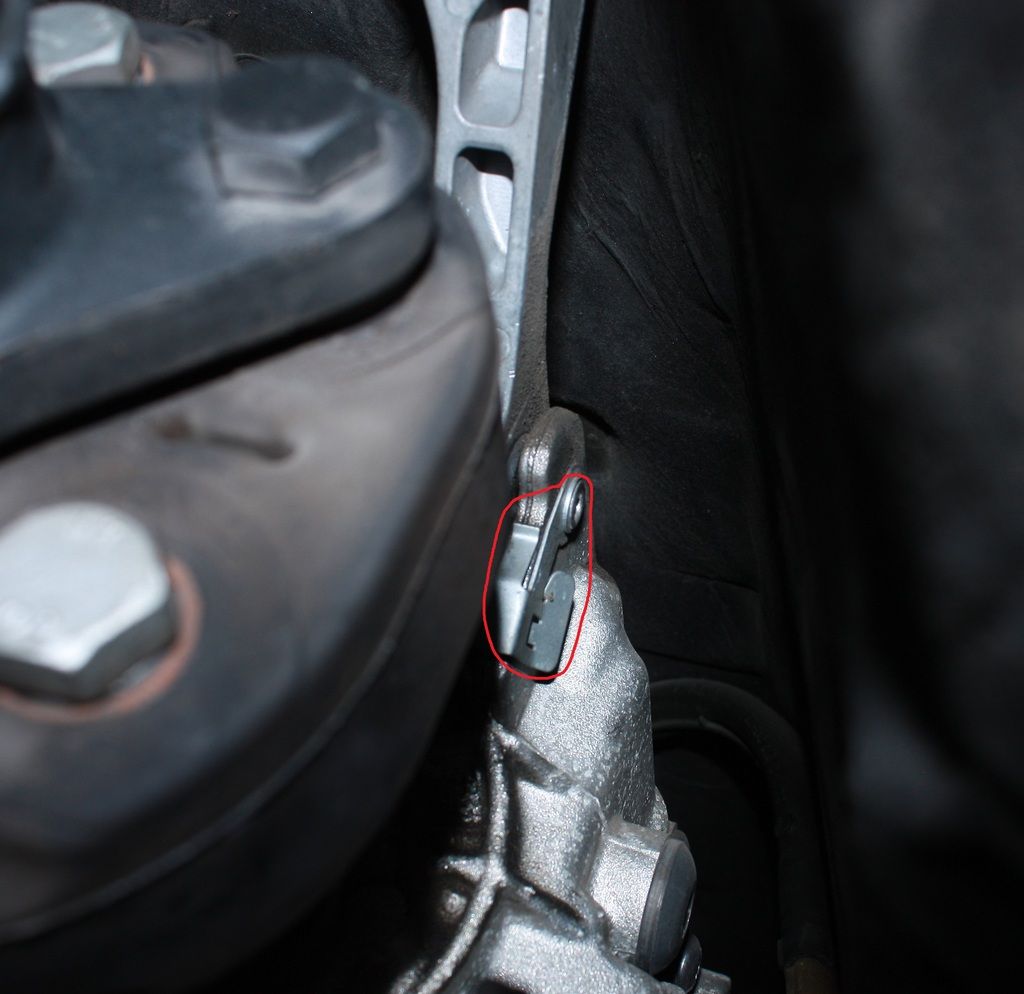
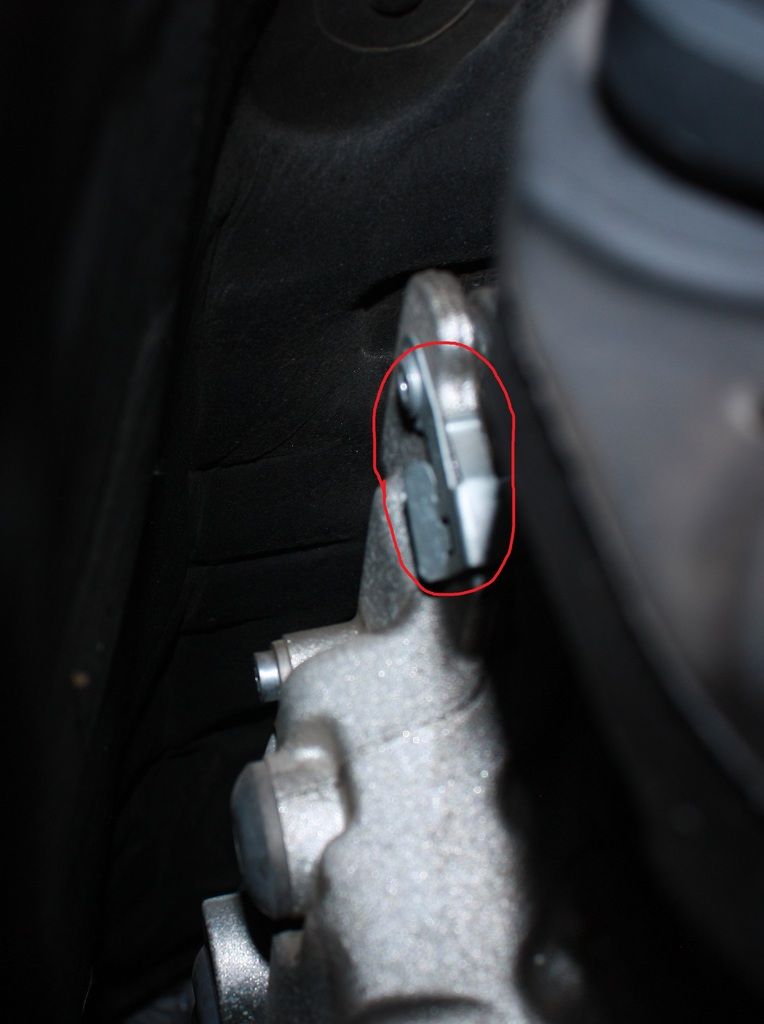
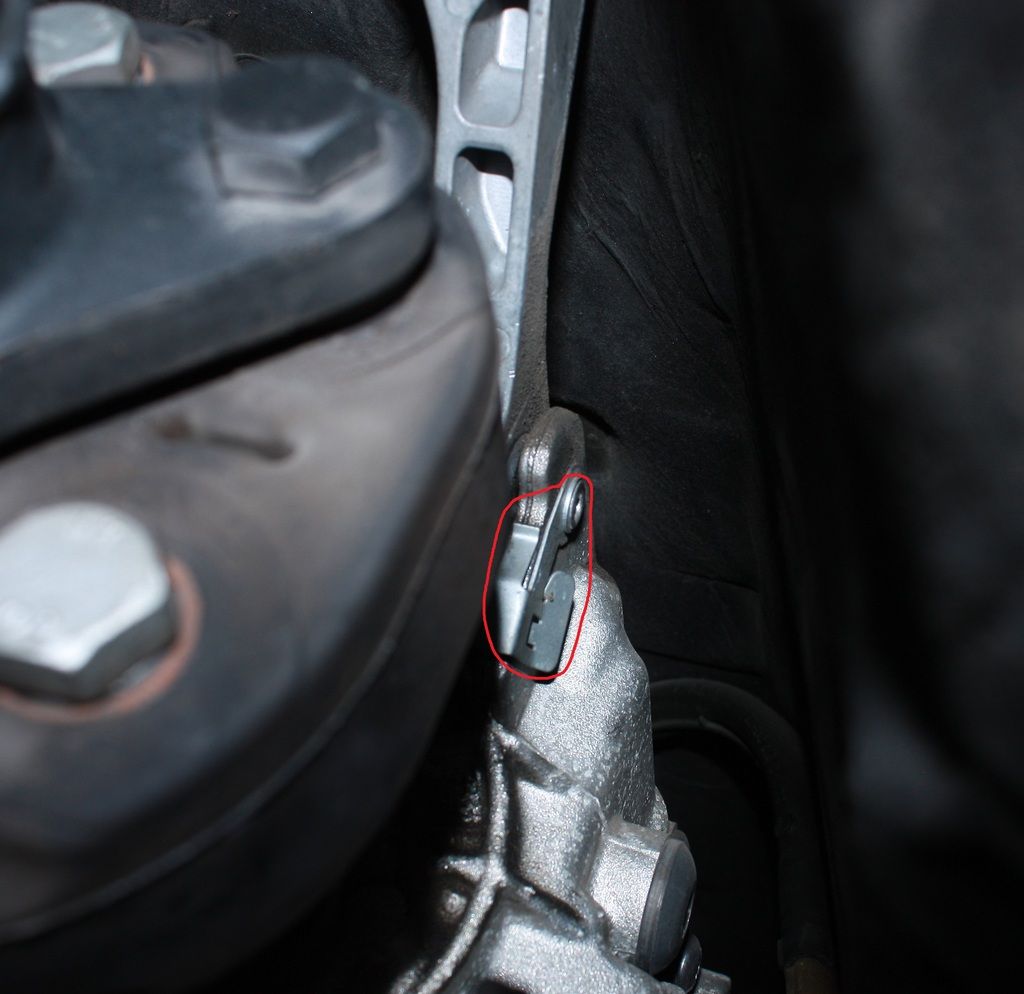
En retirant les deux clips, il y a un mécanisme de verrouillage. J'ai glissé un petit tournevis à pointe plate dans l'endroit plat sur le côté d'eux, puis ils se lèvent une fois déverrouillés.
Retirez ensuite le porte-bébé de l'œillet en caoutchouc (arrière) et deux goupilles (avant). une fois que vous enlevez les deux broches, vous devez relâcher la pression sur le jack et laisser tomber la transmission. Le transporteur ne peut monter que sur la transmission, puis glisser de chaque côté. vous devrez pousser vers le haut sur le transporteur et tirer un peu vers le bas sur la transmission en même temps pour le faire glisser, il n'a pas fallu beaucoup.
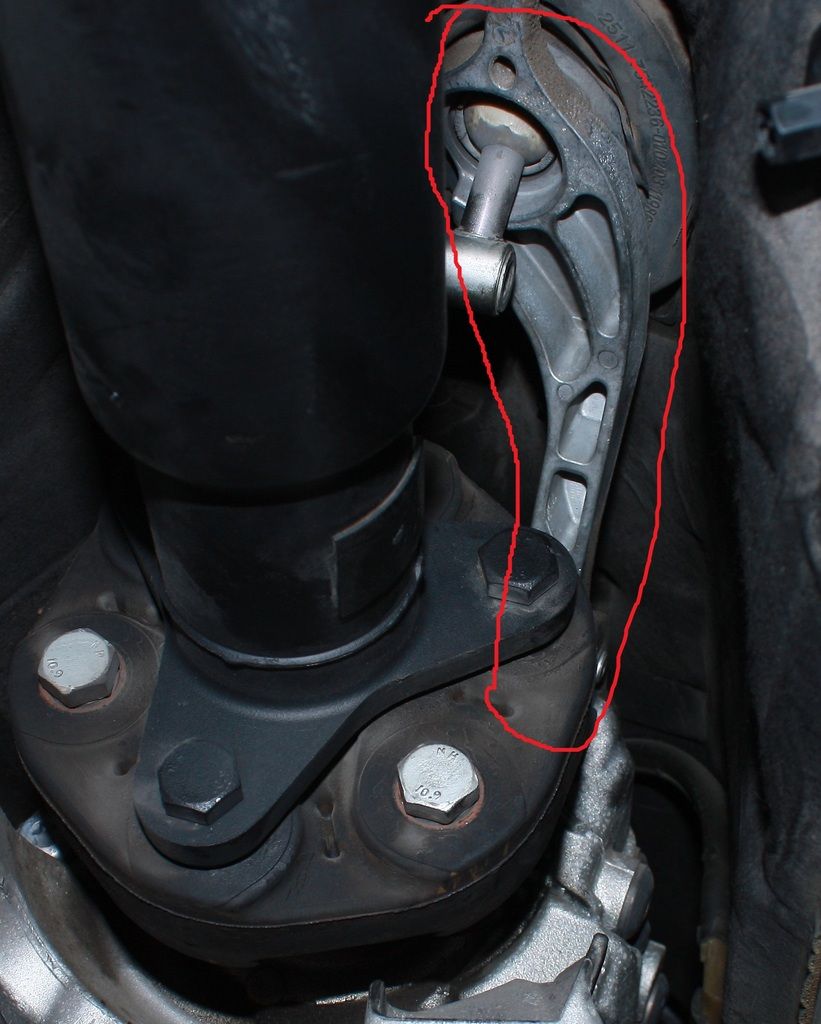
Comment il va ressembler à partir du bas et en haut avec le transporteur enlevé.
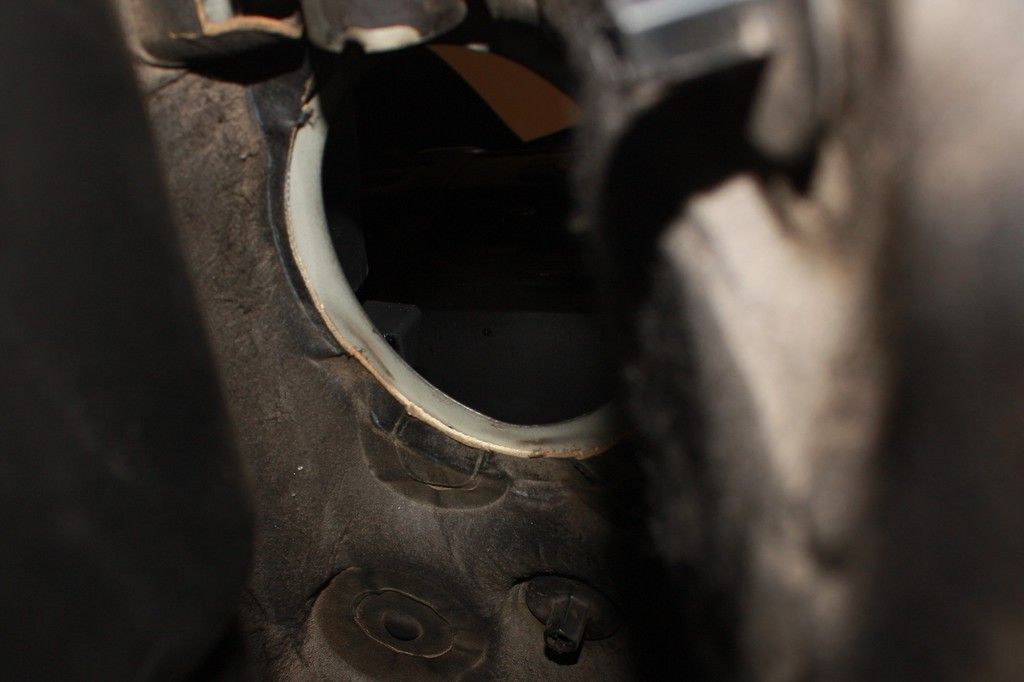
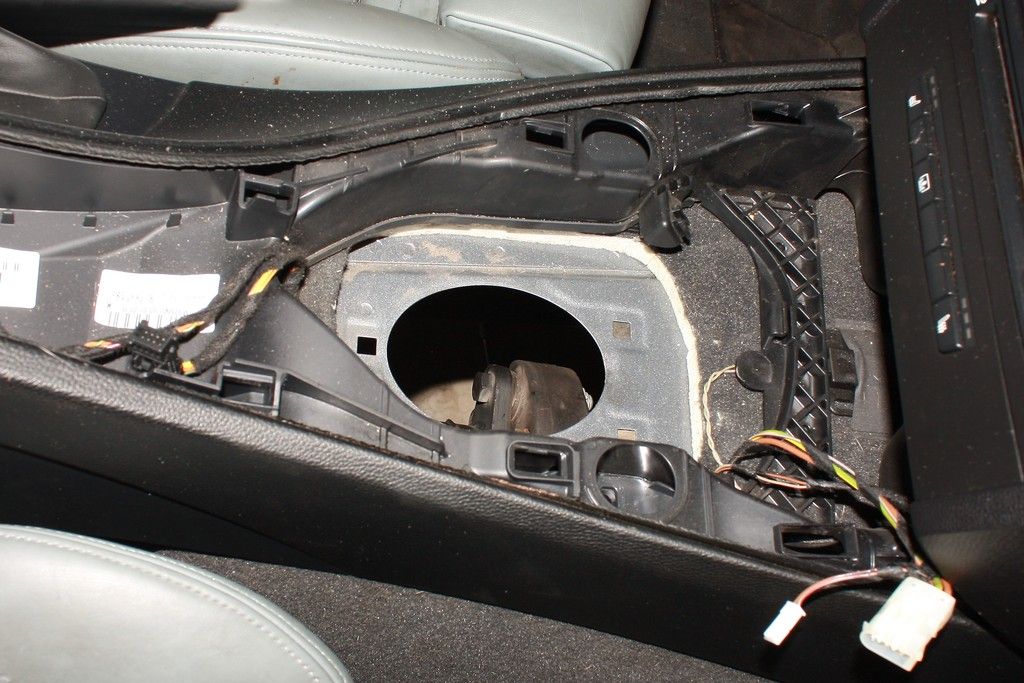
Maquette initiale de ce à quoi il ressemblera.... Il reste encore beaucoup à faire après ce point.
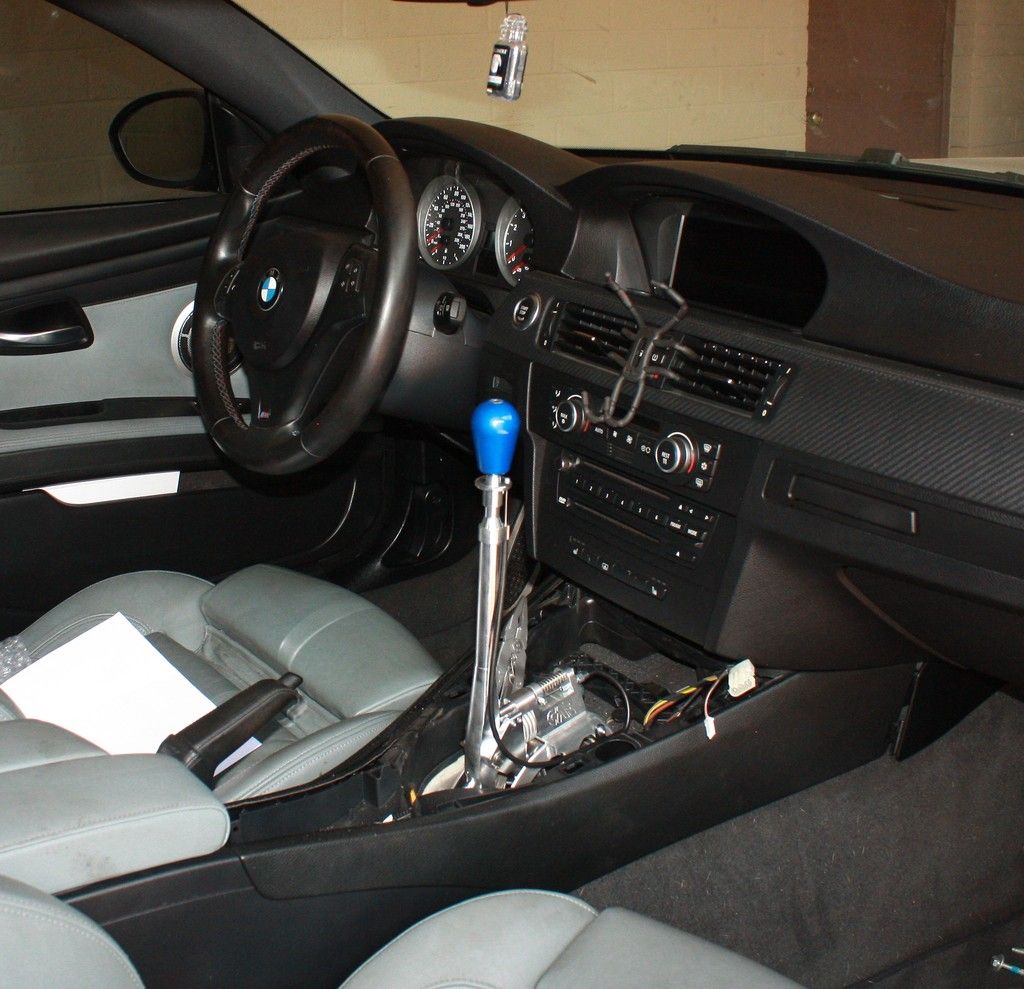
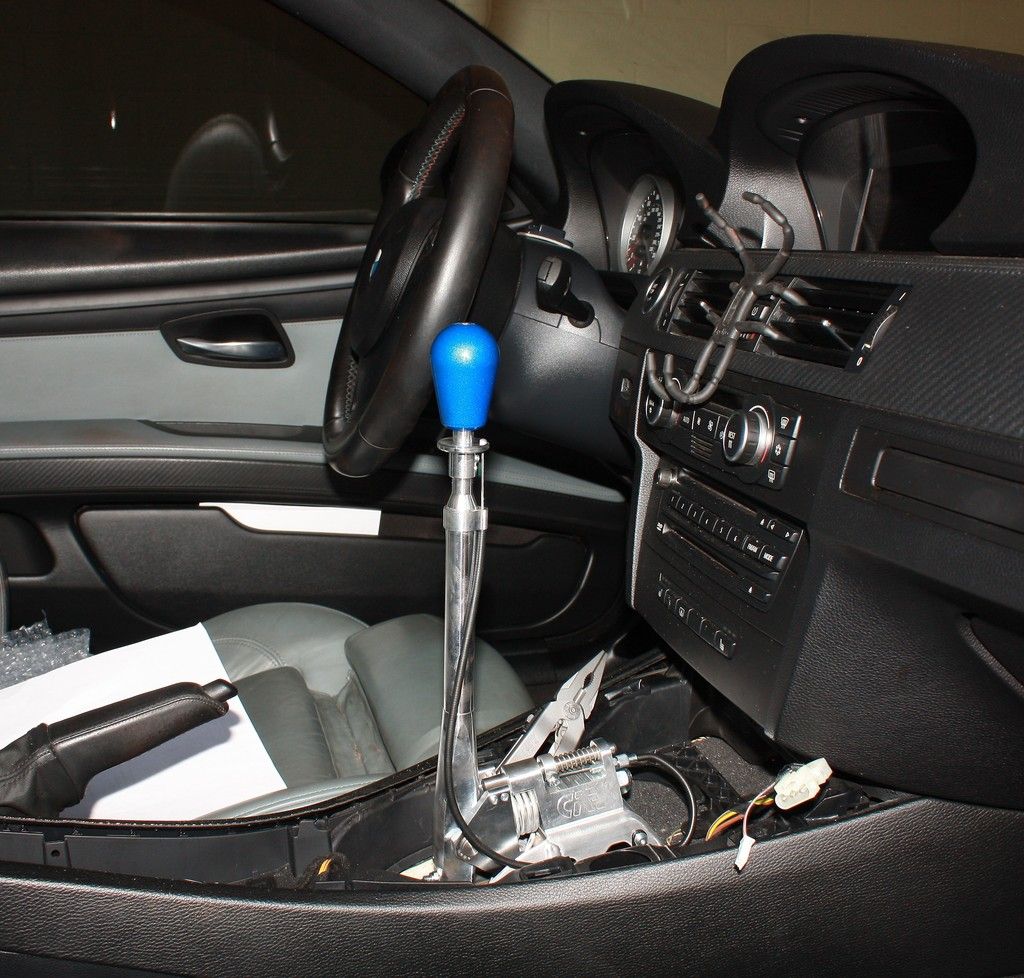
Maintenant, il est temps pour la partie où la plupart des gens commencent à deviner cet achat. J'ai un plan pour garder cette voiture jusqu'à ce qu'elle ne puisse plus conduire, et même alors je vais reconstruire. Donc, couper et percer n'était pas un problème pour moi.
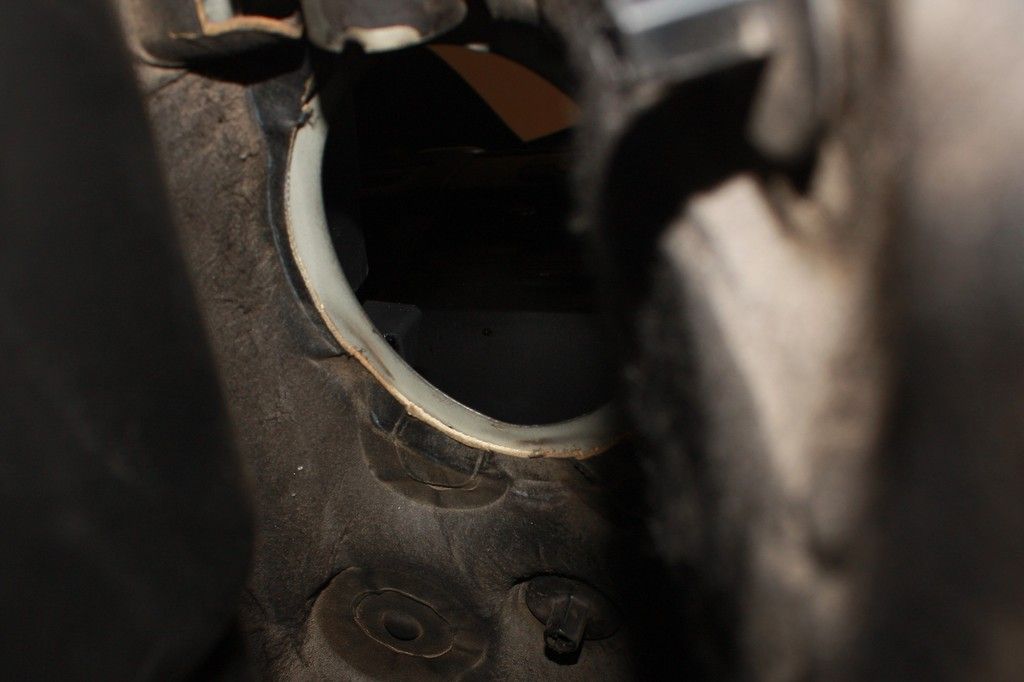
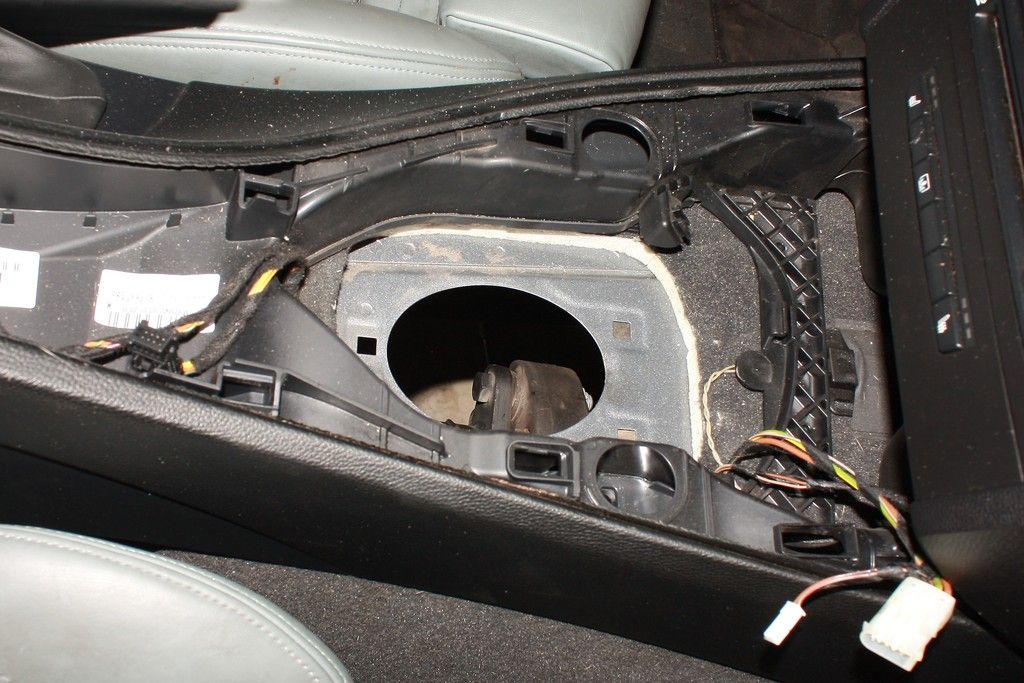
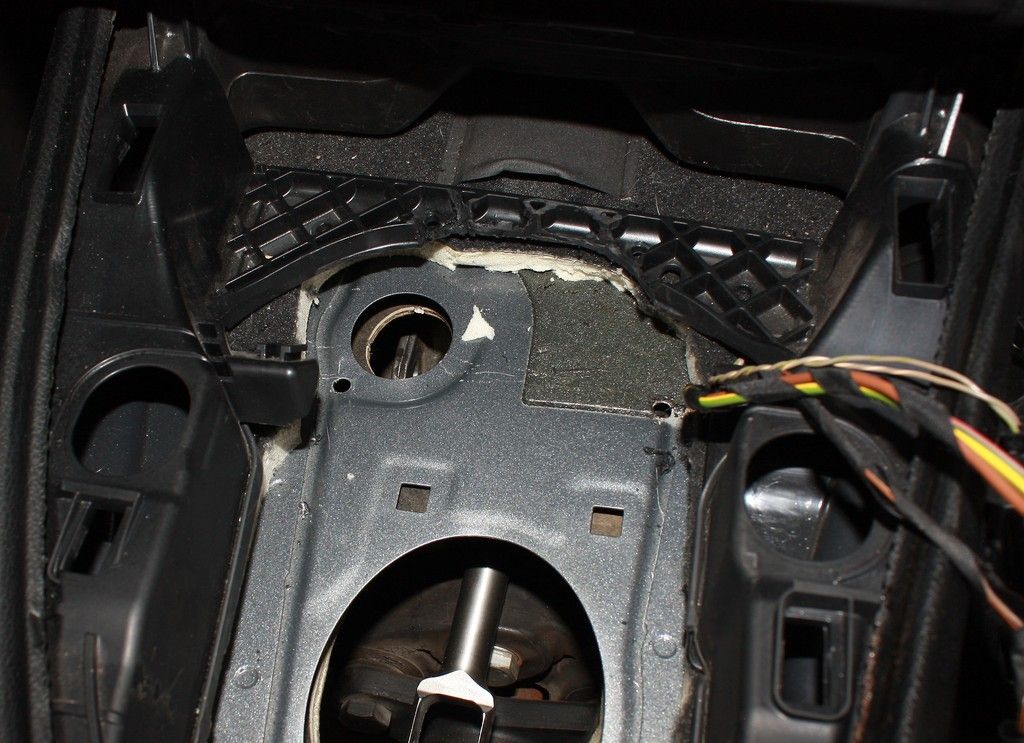
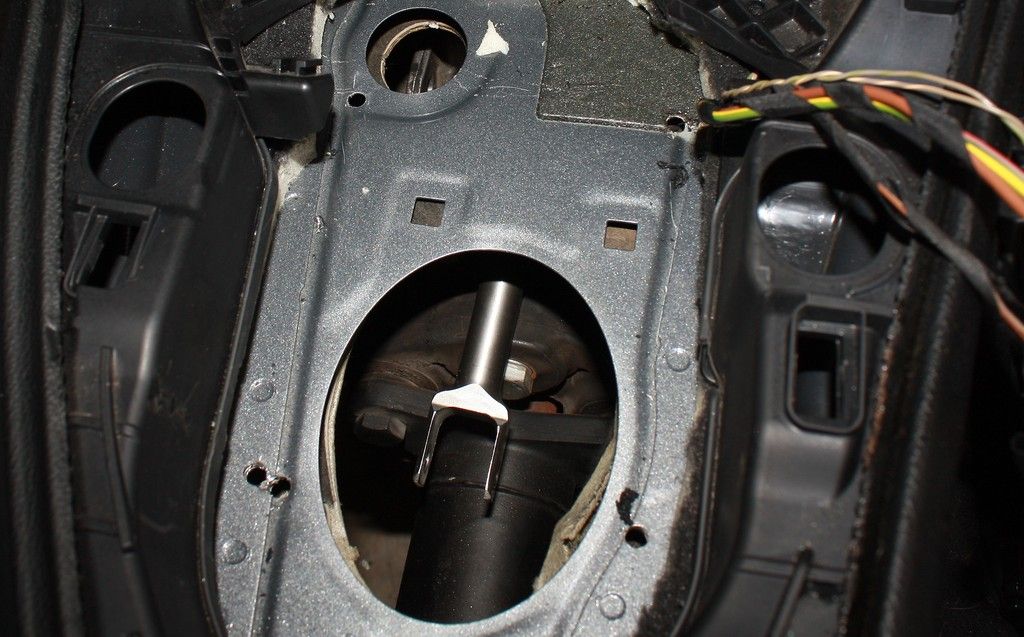
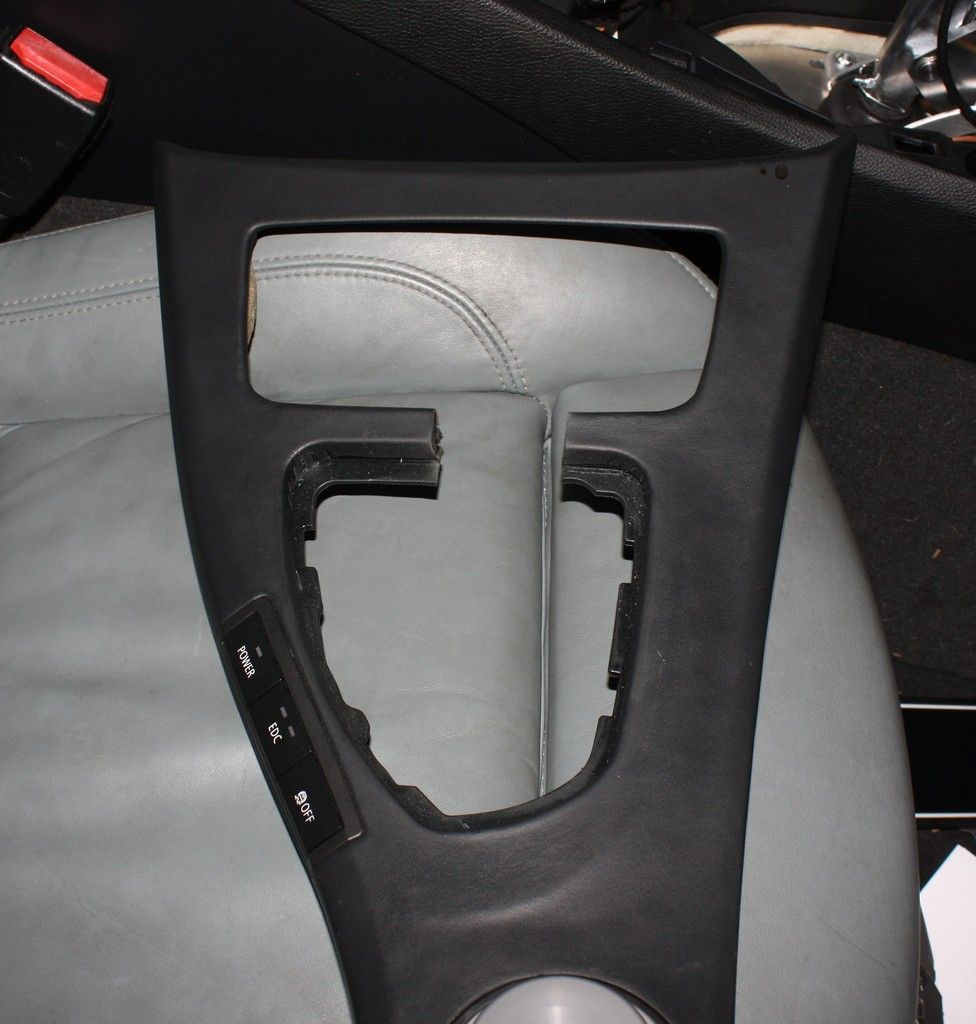
Cette photo est pour que vous puissiez avoir une idée de base de la coupe et du découpage qui doit être fait.
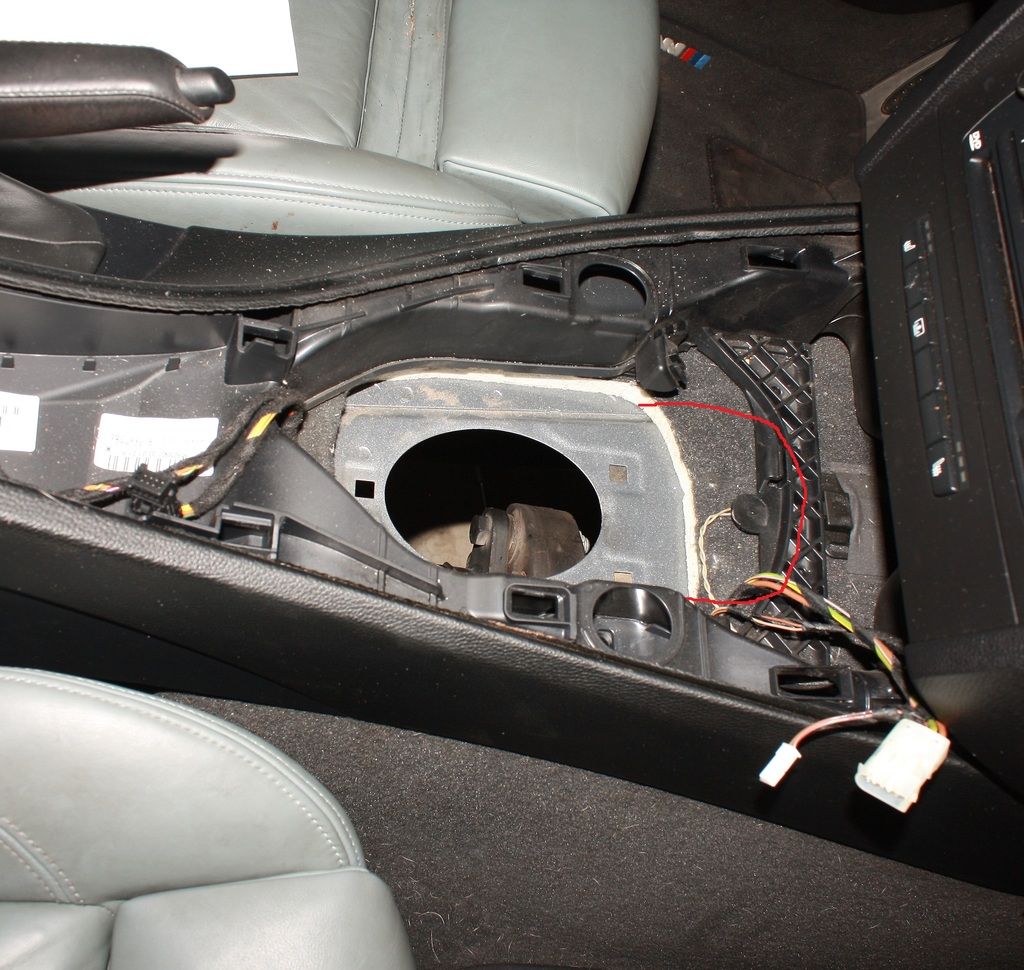
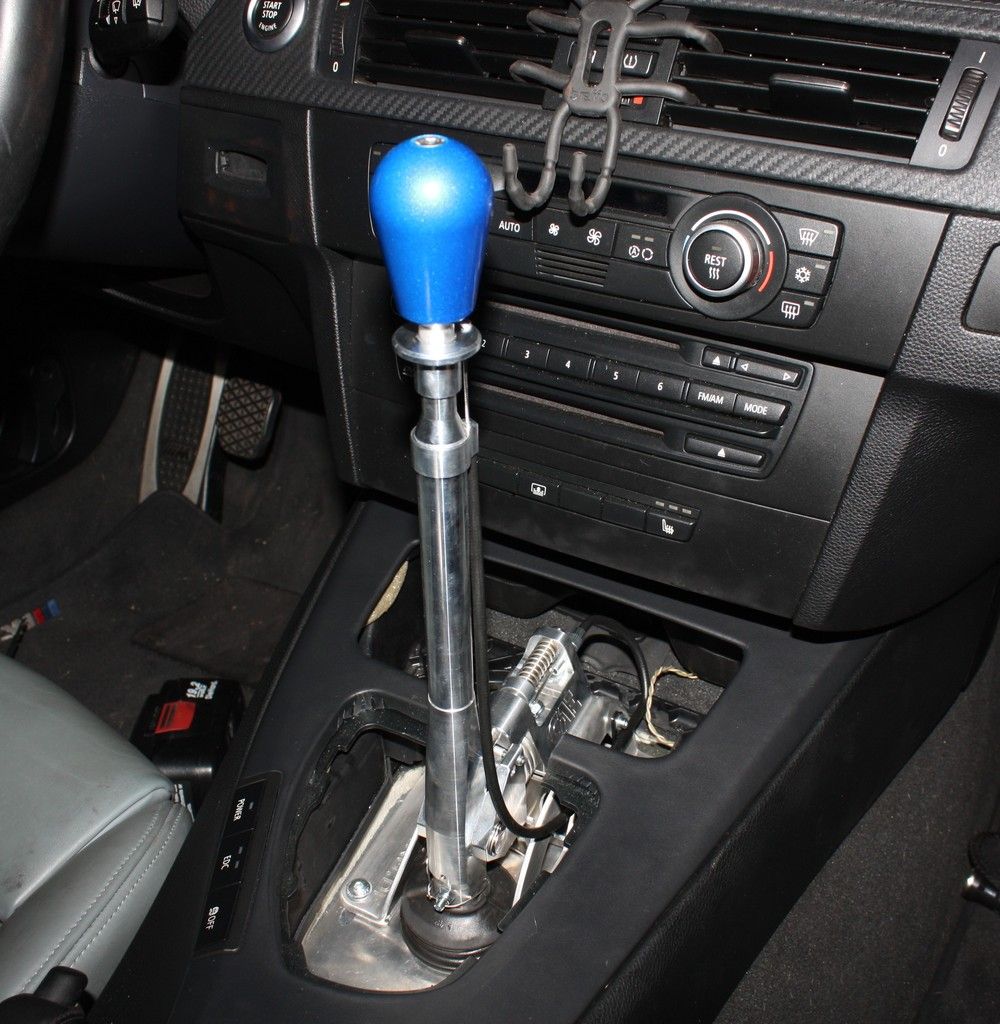
Voilà à quoi cela ressemblait après que tout ait été dit. J'ai dû couper et me moquer plusieurs fois jusqu'à ce que je trouve une position parfaite pour le levier de vitesses. Cela n'a pas l'air joli, mais c'est bien qu'il y ait une plaque fournie par CAE qui couvrira tout cela.
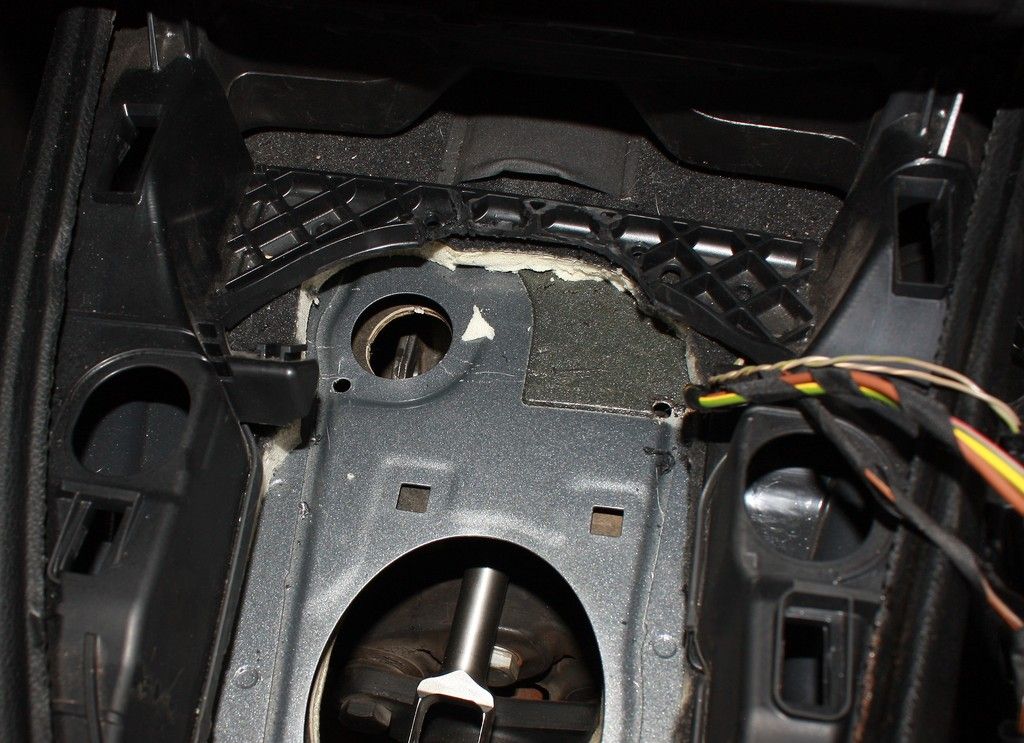
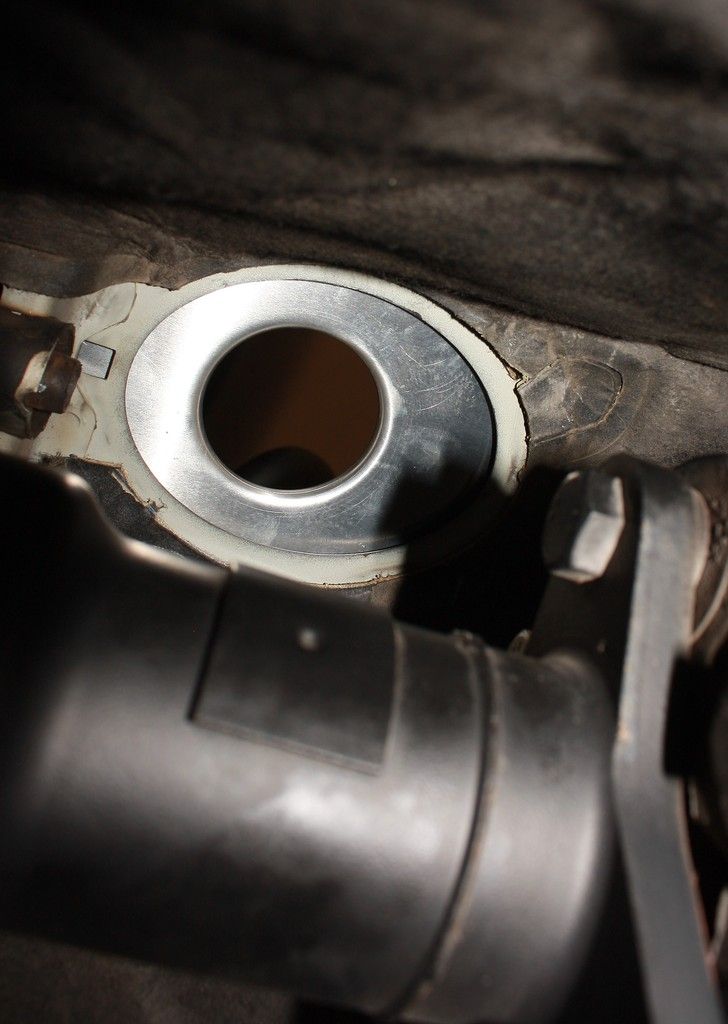
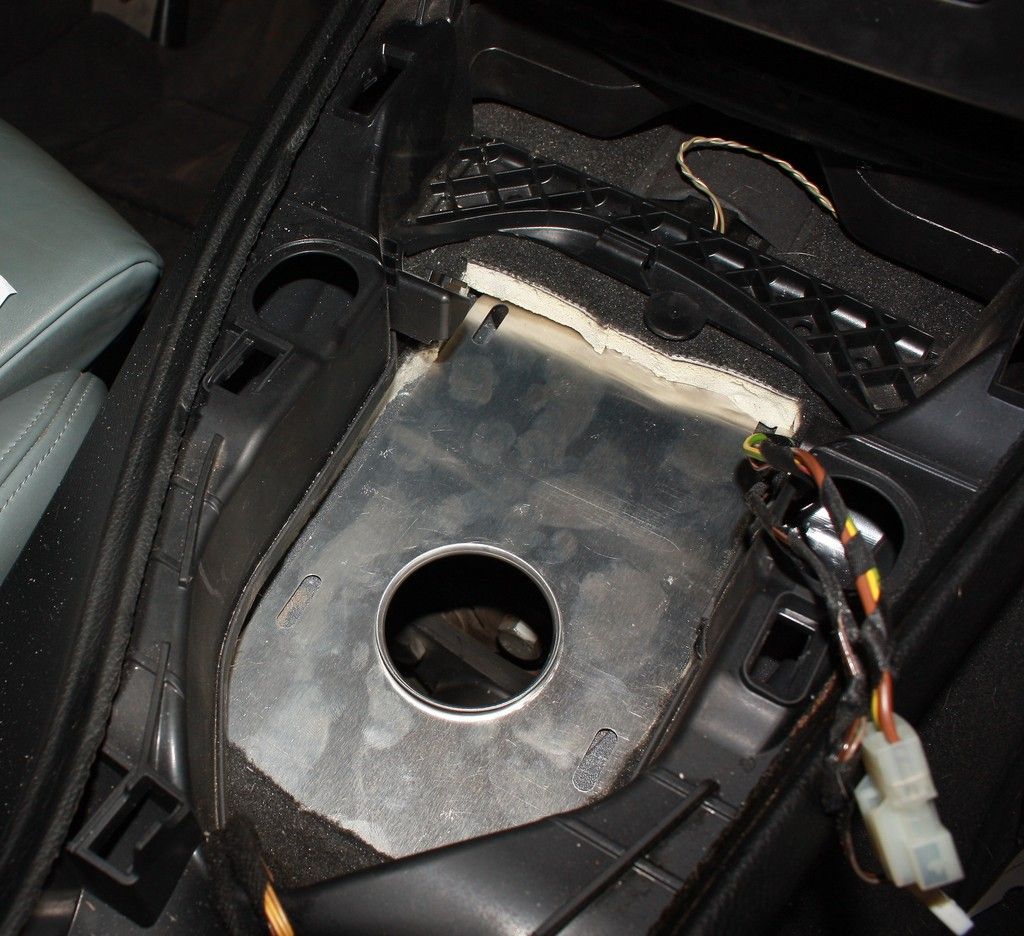
La plaque mentionnée ci-dessus.
Bas
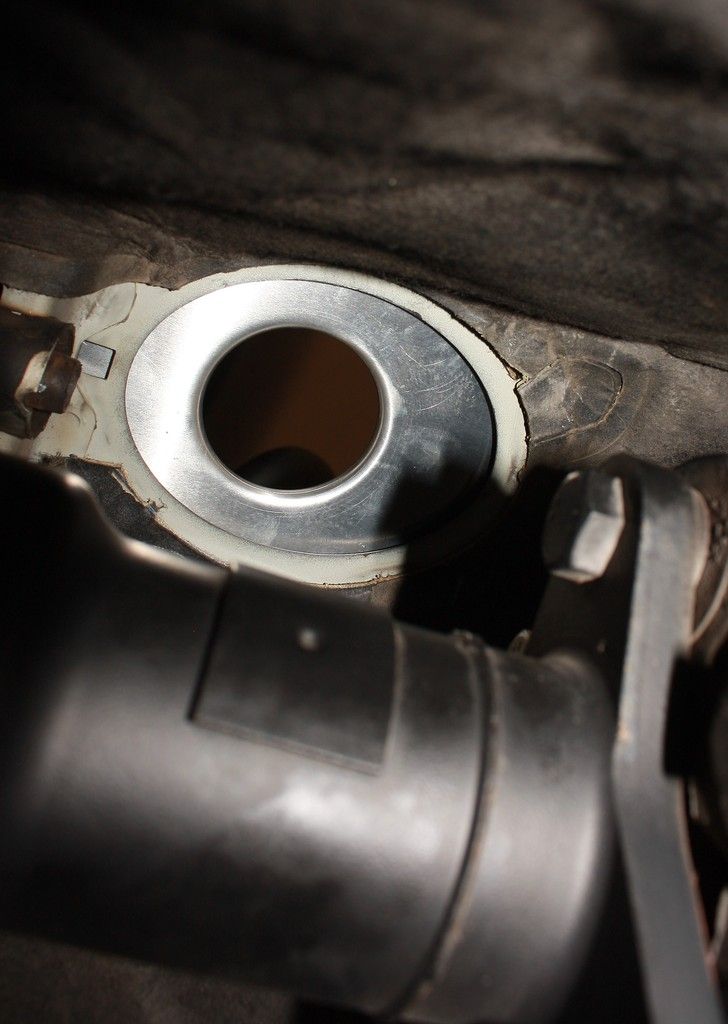
En haut
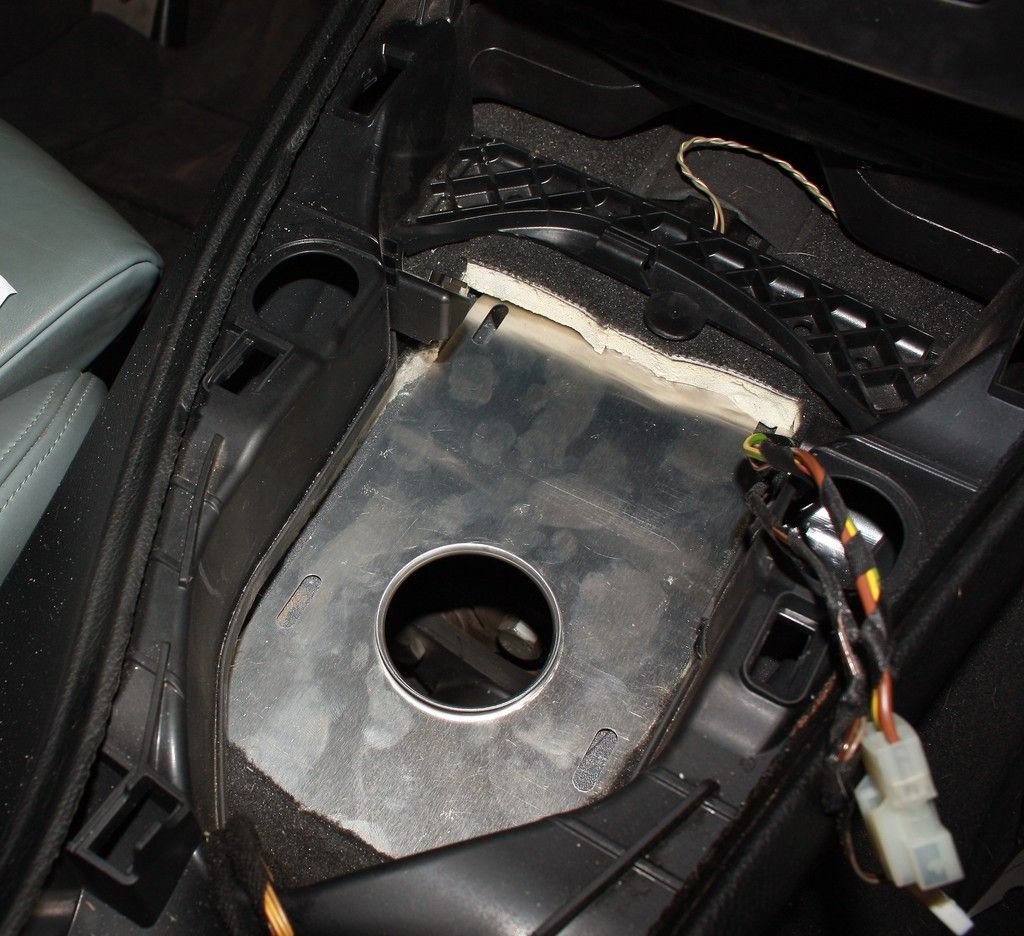
C'est presque fini... Ensuite, c'est le forage de quatre trous pour boulonner le levier de vitesses vers le bas. Comme je l'ai dit, ce n'est pas joli... J'ai raté la première série de trous. Encore une fois, la plaque recouvre tout cela. Pièce A 
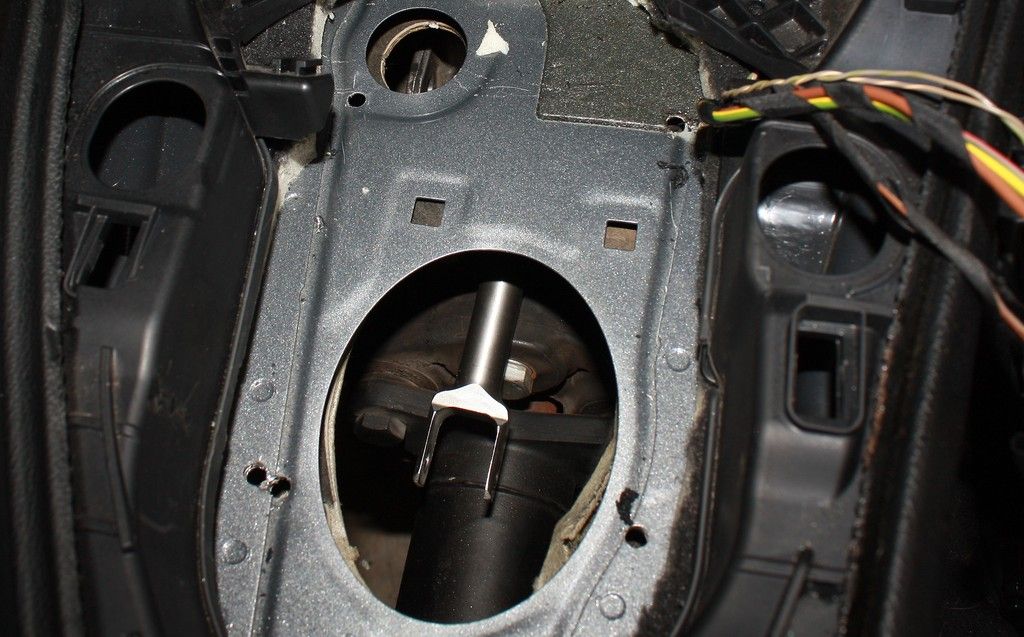
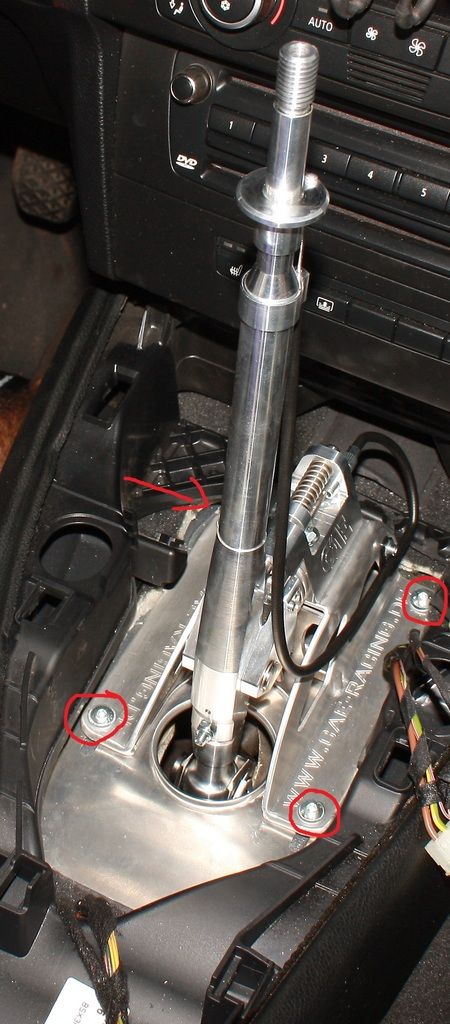
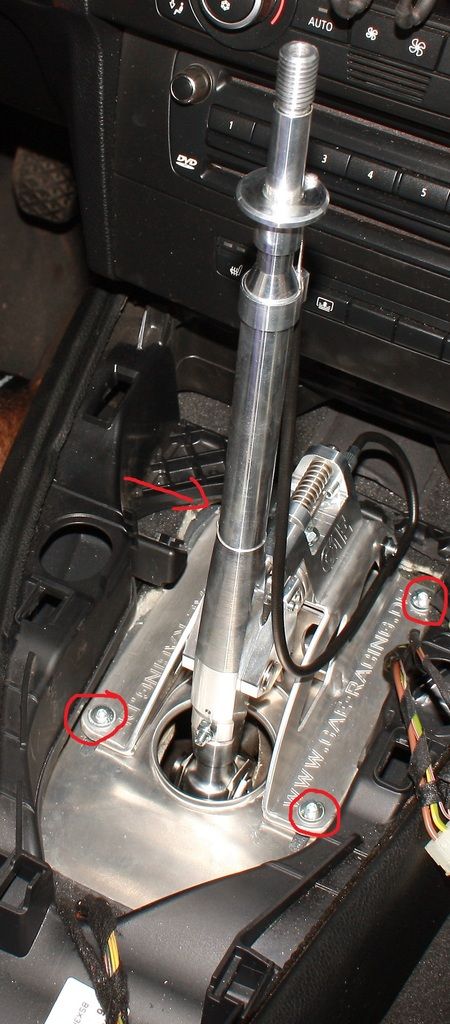
Donc une fois que vous avez percé les quatre trous DANS LE BON LIEU Tournez le levier vers le bas. Le matériel est fourni, vous pouvez utiliser soit des écrous et rondelles, ou une barre le vient avec des fils soudés. J'ai utilisé la barre d'un côté et les noix de l'autre. À ce stade, vous devez faire quelques choses; connecter le DSSR à la transmission et ensuite changer de vitesse ou tige OEM si vous n'avez pas mis à niveau, puis boulonner la traverse de transmission sur (Il y a d'autres étapes que vous devez suivre fournies par CAE)
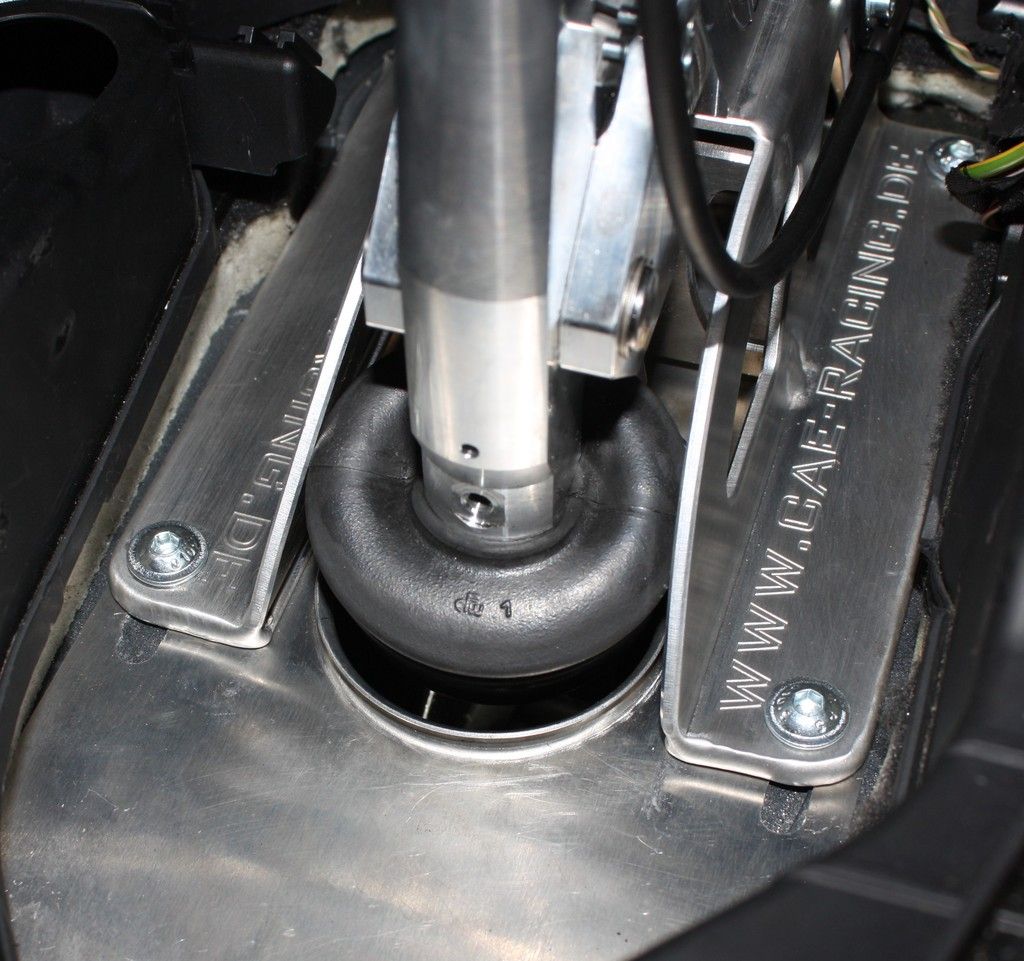
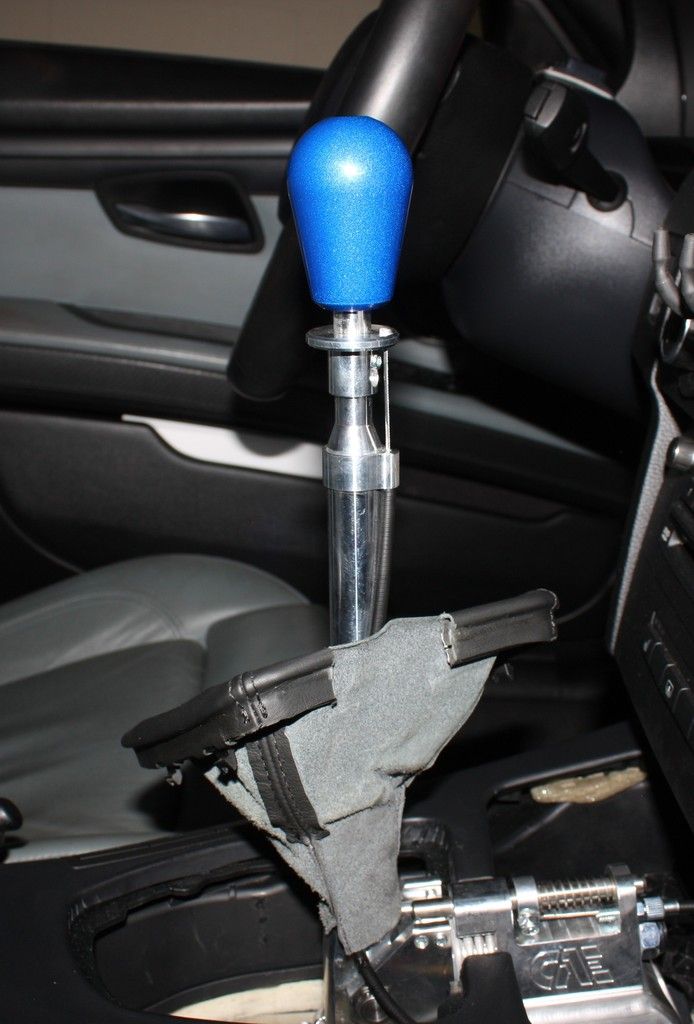
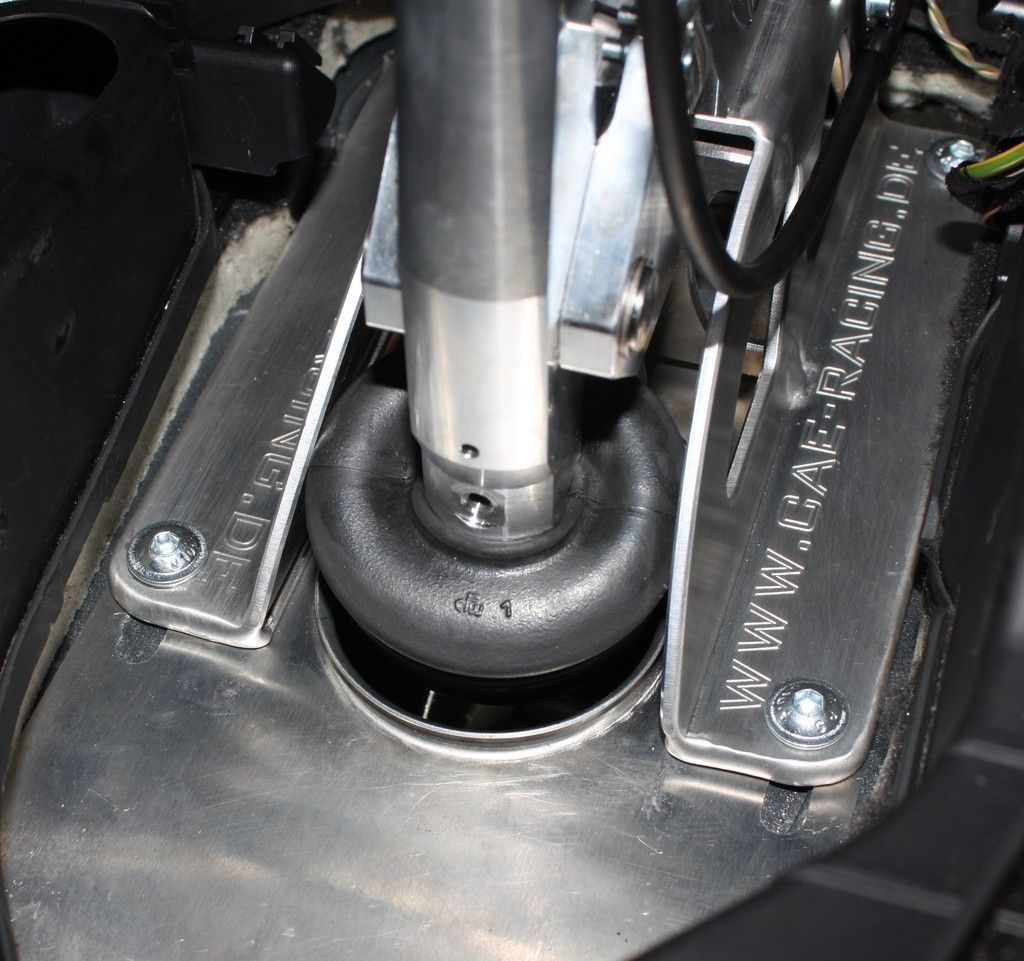
Une de ces étapes consiste à attacher la petite botte de poussière fournie par eux. qui est en fait beaucoup plus difficile qu'il n'y paraît... J'ai de grandes mains, donc il m'a fallu un certain temps pour le comprendre. J'ai utilisé une petite barre de levier pour tenir un côté vers le bas pendant que je tirais autant que possible de l'autre côté, en travaillant petit à petit tout autour.
Une fois que le lil F!! est fait, vous êtes sur le tronçon de la maison !!!!! 
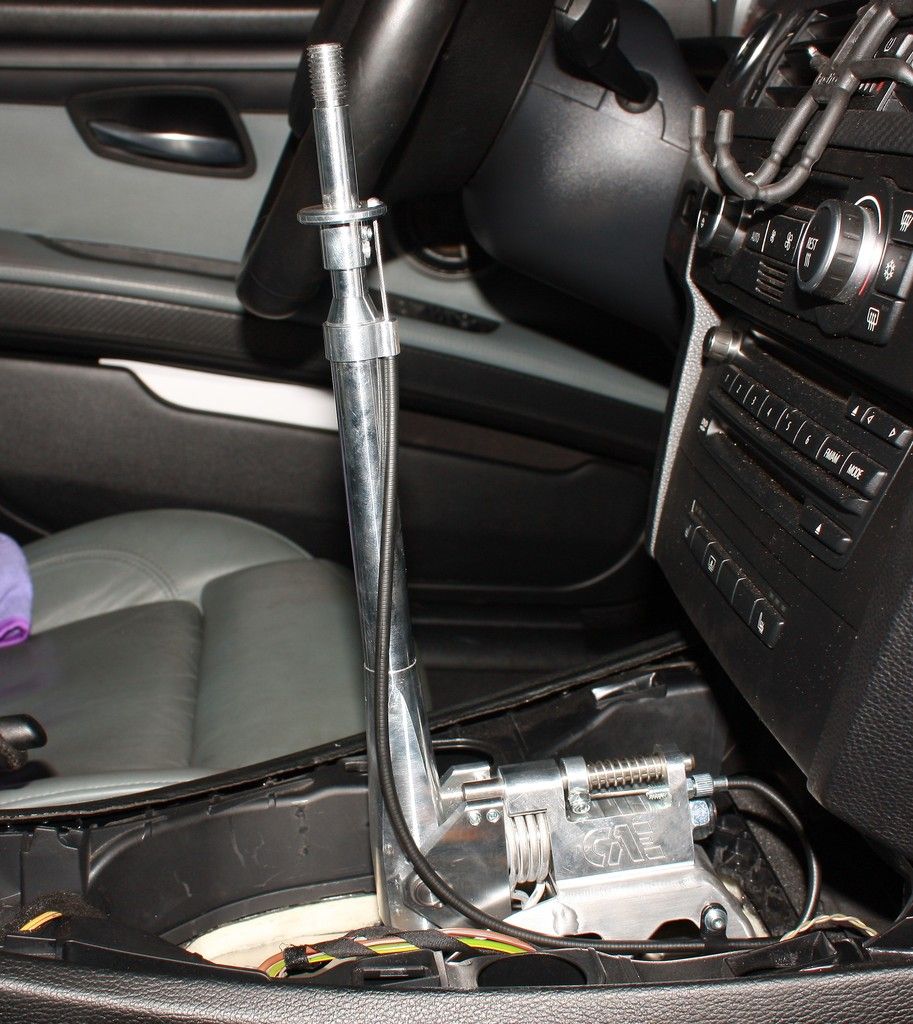
 Ici, tout est boulonné là où il est censé être.
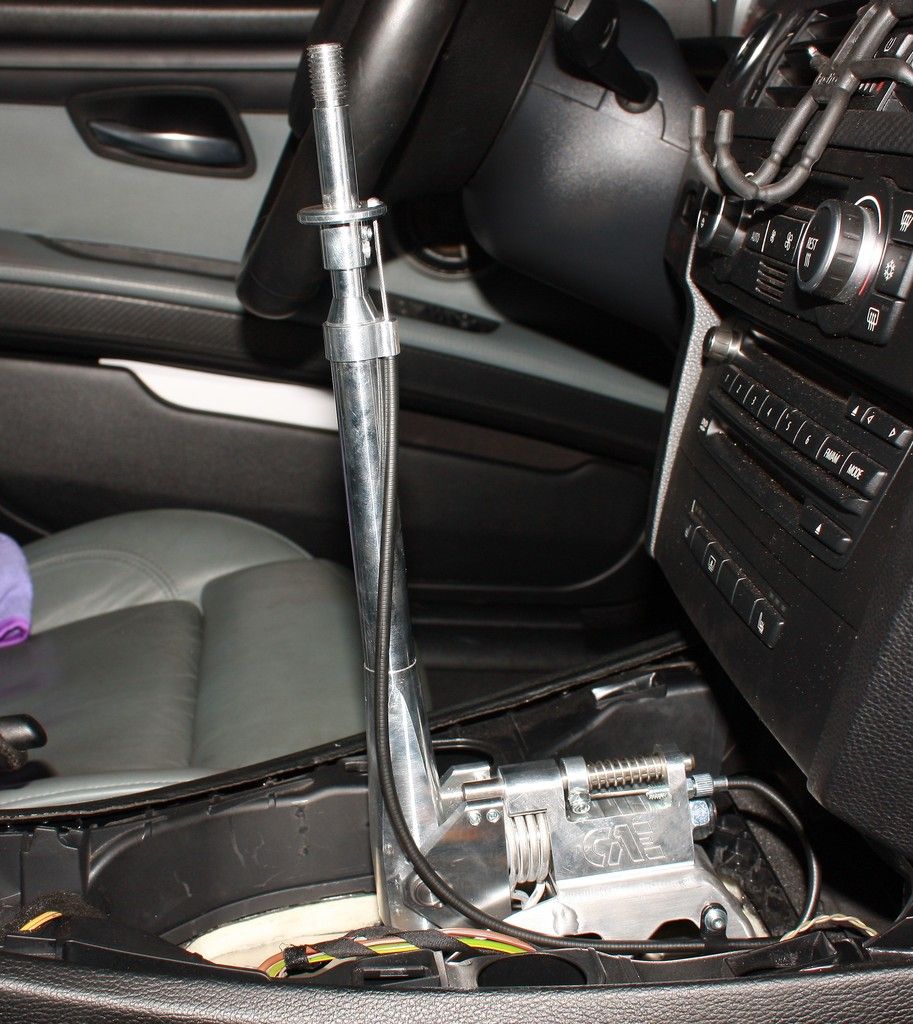
Prochaine et troisième étape, la coupe du couvercle de la console centrale... vous devrez enlever votre plateau de cendres (le mien) ou tout autre accessoire que vous pourriez avoir à cet endroit supérieur. Pour le marquer: placez-le là où il est censé être pour voir où il frappe le levier de vitesses et coupez cette pièce... Tout est fait sur cette photo.
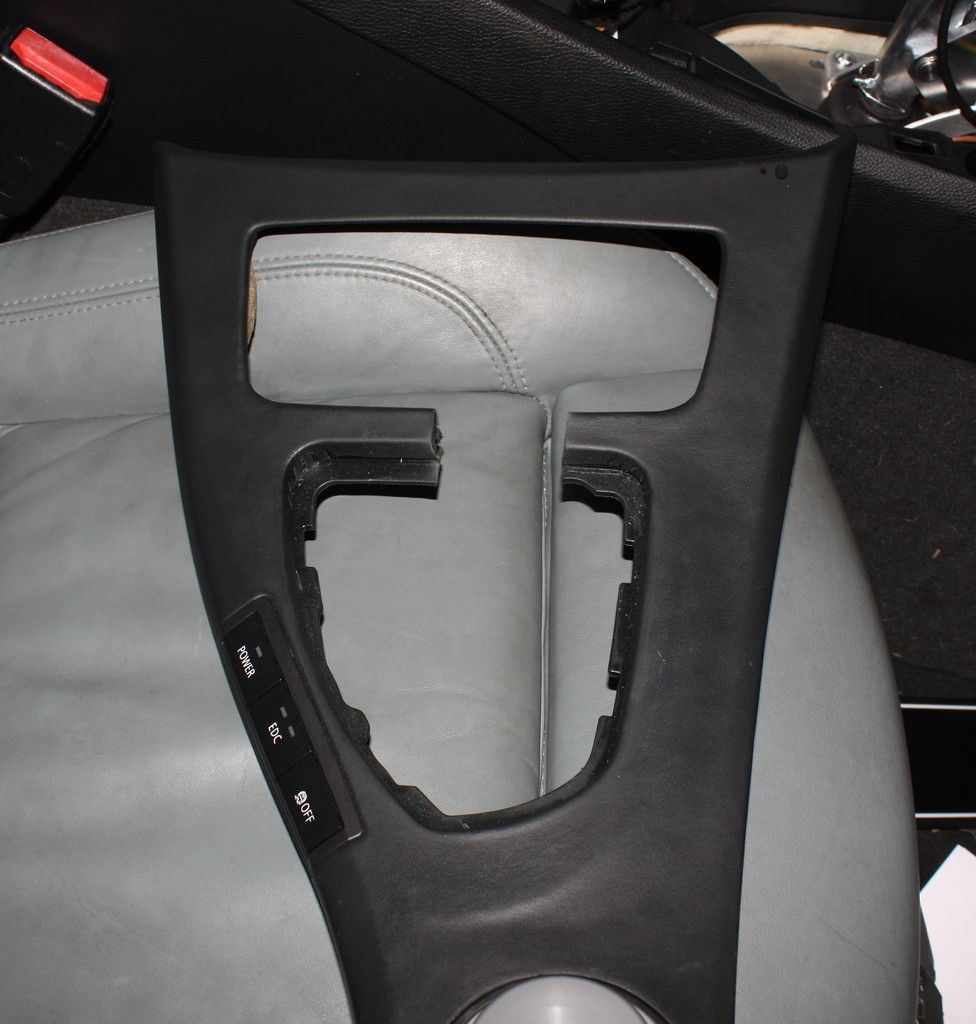
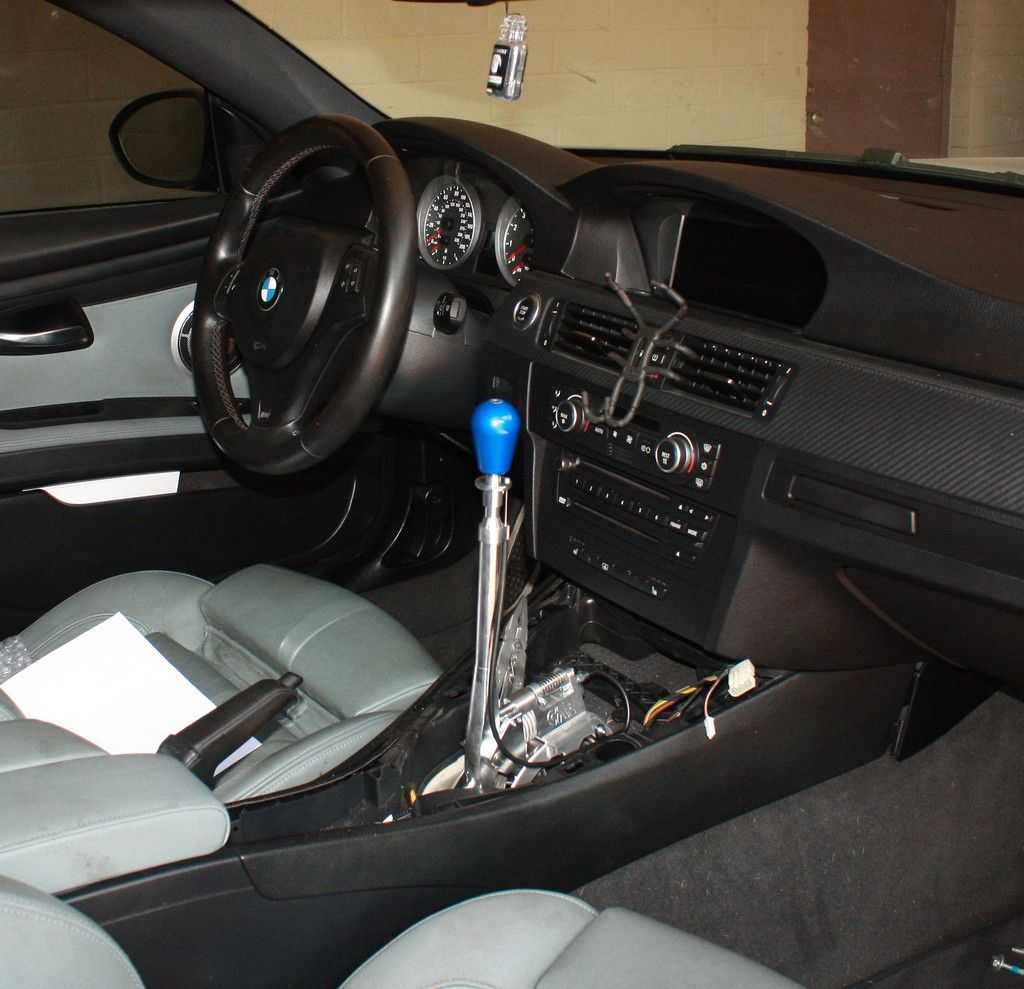
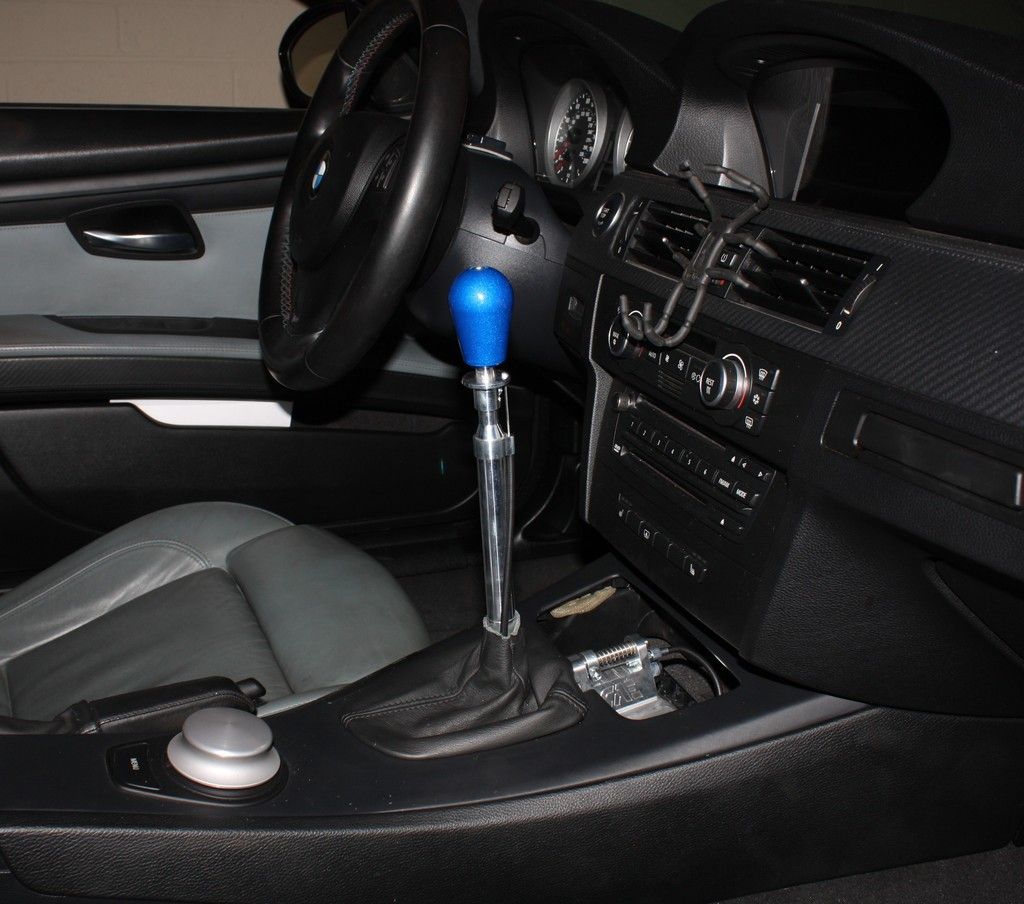
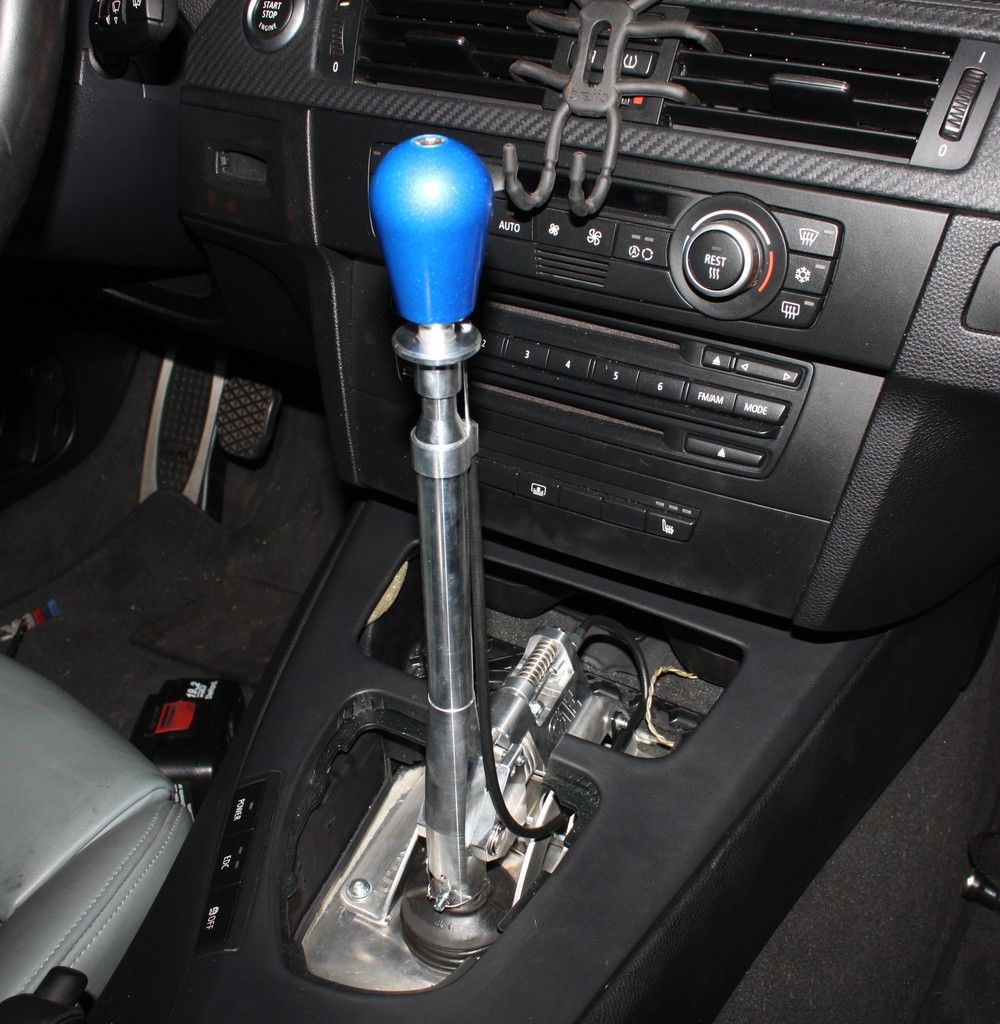
Et la couverture réinstallée
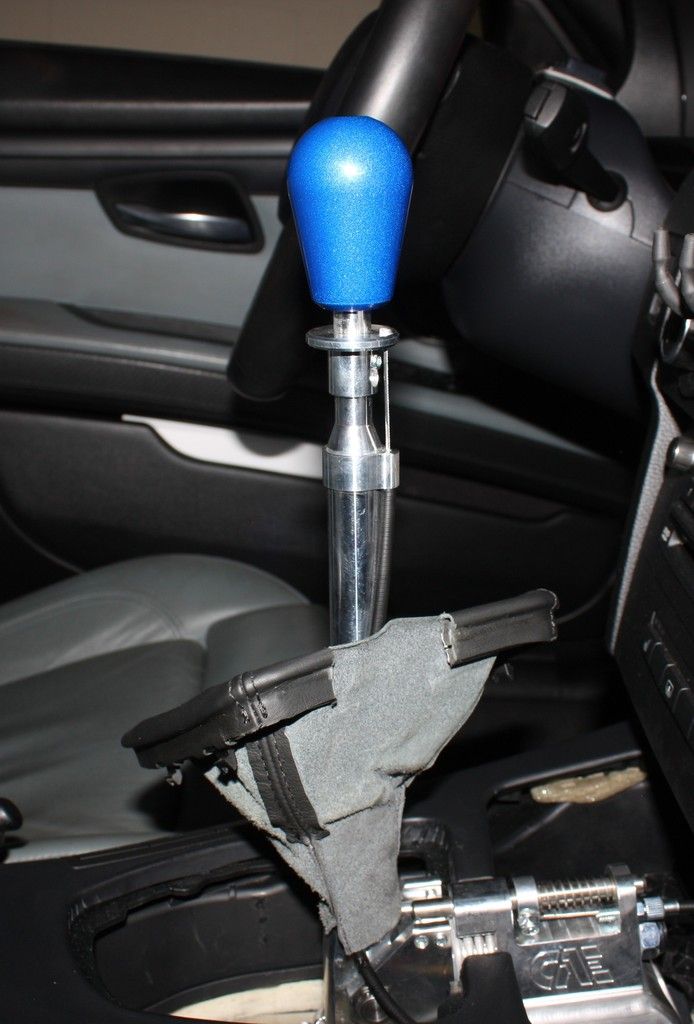
Deuxième étape: coupe du shift, j'utilise le OEM pour l'instant jusqu'à ce que je puisse avoir quelque chose de fait sur mesure pour le boot et la partie avant où se trouvait l'accessoire.
C'est fini !!! est d'affiner le levier de vitesses. Étape par étape sur la façon d'accorder le levier de vitesses sont fournis. 


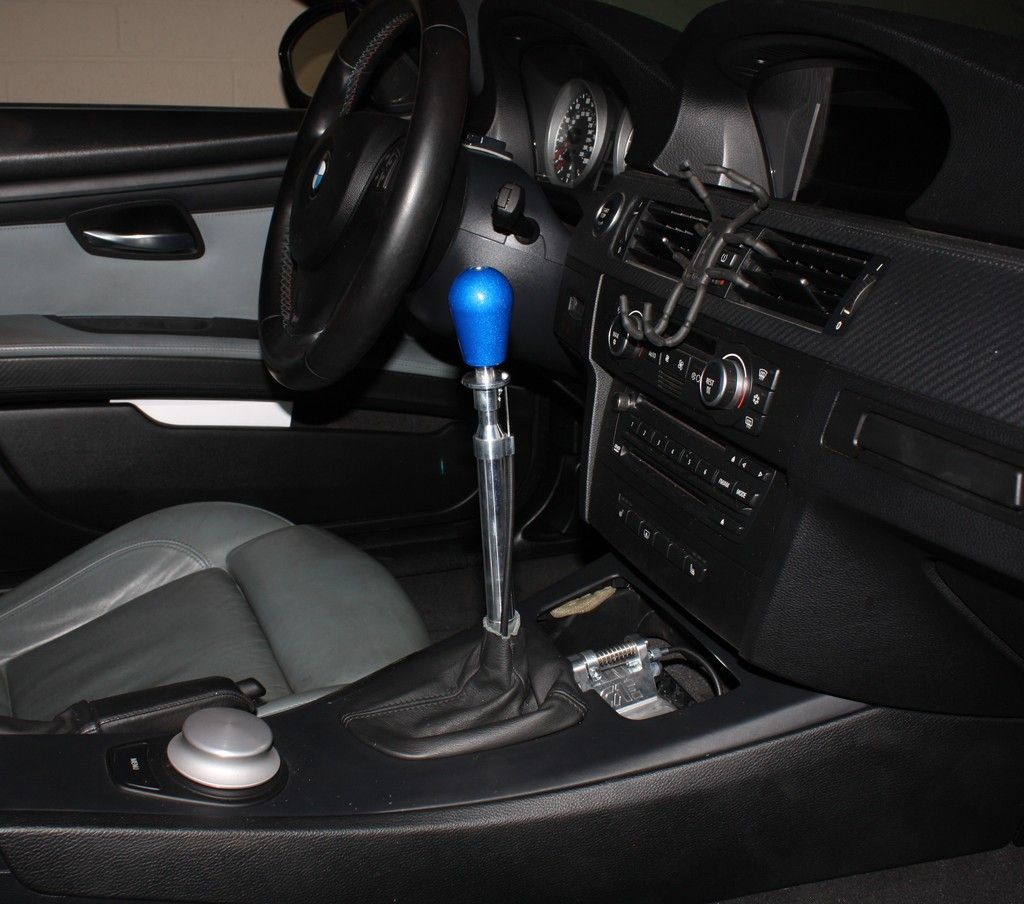
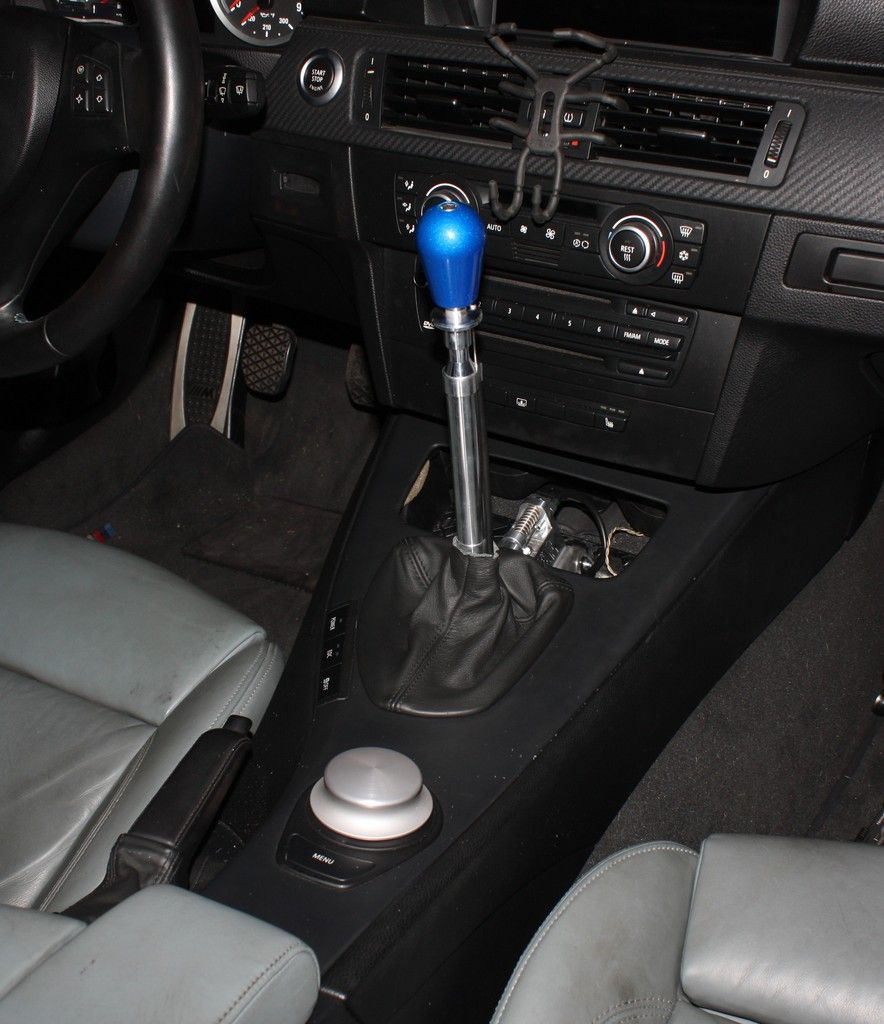
BBBUUTTT AVANT DE CONDUIRE boucliers thermiques doivent être boulonnés de nouveau, échappement monté sur avec ses cintres, faire une autre vérifier tout est serré! et finalement abaisser la voiture, puis aller conduire comme vous l'avez volé!
Merci d'avoir regardé. Si quelqu'un a des questions, je vais y répondre au mieux de mes capacités!
J'ai fait quelques courts clips vidéo pour Instagram les vérifier luis.1sl0m3
38,5 kVIEWS
39REPLIES
21APPRECIATES
14/10/2025LAST POST
Super, super travail ! Quand j'ai eu mon 6MT, je rêvais d'installer un de ces leviers. Puisque vous avez incorporé le démarrage d'usine, je pourrais suggérer que vous rouliez la partie supérieure sous, utilisez un zip-tie profil bas et vous pouvez éliminer le bord brut du démarrage montrant sur le sélecteur de décalage.
sterile stork wroteThank you!!! Me too I wanted one for the longest but was always afraid of the install! I'm so glad I finally got it done!!Awesome, awesome work! When I had my 6MT I dreamed of installing one of these shifters. Since you've incorporated the factory boot, I might suggest that you roll the top portion under, use a low-profile zip-tie and you can eliminate the raw edge of the boot showing on the shift selector.
And believe or not I actually tried that method buy it kept sliding off so I left it off for now. I want to get a tri stitch cover and a CF plate on the front eventually so not to worried on how it looks now.
Hey guys anyone have experience with this one ?
http://www.billswebspace.com/M3UUCEvo3DIY.htm
the uucevo3 shifter it looks to be easier to install then tha CAE:help:
http://www.billswebspace.com/M3UUCEvo3DIY.htm
the uucevo3 shifter it looks to be easier to install then tha CAE:help:
UUC and Auto Solutions and Rogue and other stock design aftermarket replacement shifters are very different from the CAE, Samsona, RTK and other bolt in spring loaded shifters. The bolt in shifters work best with stiffer engine and trans mounts since there are no longer rubber bushings locating the shifter that can move a little as the motor and trans move a little.
People love the CAE, Samsona, RTK and similar bolt in spring loaded shifters on the track. For purely street driving, they get mixed reviews.
You can buy an extension for a stock style shifter for more leverage. You can also make a stock style shifter perform better under load by using solid or very stiff motor and trans mounts, but very stiff trans and motor mounts make these cars miserable to street drive due to the vibration.
People love the CAE, Samsona, RTK and similar bolt in spring loaded shifters on the track. For purely street driving, they get mixed reviews.
You can buy an extension for a stock style shifter for more leverage. You can also make a stock style shifter perform better under load by using solid or very stiff motor and trans mounts, but very stiff trans and motor mounts make these cars miserable to street drive due to the vibration.
CIFUM3 wroteHi, great write up, I'll be sure to use this when I install my CAE. Quick question though, which DSSR did you install?I am also installing a DSSR instead of the OEM linkage,
Cheers
Very nice and detailed write up. The pictures are key!
how do these work with a 6mt? what exactly does it do? i'm completely ignorant to these things. sure, its faster, but how does it work?
roastbeef wroteI have one as well, it completely eliminates slop, throws are very short and the shifter handle location is literally at steering wheel height and super close, so you don't have to find the lever when gear change comes up, rather just move your right hand slightly right and shift.how do these work with a 6mt? what exactly does it do? i'm completely ignorant to these things. sure, its faster, but how does it work?
Great install Luis! I did this on my DCT and i can shift way faster now!
 CIFUM3 do you still have this collection of pictures anywhere? if so could I possibly get a copy of them? Photobucket has ruined so many good posts like this one. Thanks
hamletl wroteI did the CAE on my Z4MC
it was difficult as the shifter had to be modified to install 180° from the way it normally goes.
hamletl wroteI wrote them cursing them out for being bastards and literally said I hoped they would rot in hell and in response they extended my paid membership until 2019... so my DIY's still work but only for now
It's incredible how much damage a single company has made.
it really is incredible how many great sites they have ruined... It was the worst thing they could have done as a business in terms of customer relations but I guess they are making more money now. But back on topic, thank you  inTgr8r for your DIY. Hopefully CIFUM3 might still have the pics but if not your DIY is a fantastic resource.
inTgr8r for your DIY. Hopefully CIFUM3 might still have the pics but if not your DIY is a fantastic resource.
hamletl wroteI can't see how they can be making more business. Some DIY guys like myself bothered to pay $30/year to have their stuff hosted properly in Photobucket.it really is incredible how many great sites they have ruined... It was the worst thing they could have done as a business in terms of customer relations but I guess they are making more money now. But back on topic, thank you
There is no way a DIY guy who is not getting paid will pay $400/year to host their pics. It's just impossible. No one wants to help others THAT badly
How could no one at Photobucket think that they should limit the $30/year plan to, say, 500 pics? Friggin dumbasses
^WHS!!!!!
They PO'd a LOT of people
They PO'd a LOT of people
inTgr8r wrote^WHS!!!!!
They PO'd a LOT of people
hamletl wrote
SYT_Shadow wrotehamletl wroteI wrote them cursing them out for being bastards and literally said I hoped they would rot in hell and in response they extended my paid membership until 2019... so my DIY's still work but only for now
It's incredible how much damage a single company has made.
hamletl wroteDamn sorry guys didn't know they blocked the pics. I still have them I'll edit the post and re add them a different way. If I can't edit the post I'll add them numerically from start to finish. Give me a day or twoit really is incredible how many great sites they have ruined... It was the worst thing they could have done as a business in terms of customer relations but I guess they are making more money now. But back on topic, thank you
CIFUM3 wroteThere is a solution now for Chrome and Firefox users.Damn sorry guys didn't know they blocked the pics. I still have them I'll edit the post and re add them a different way. If I can't edit the post I'll add them numerically from start to finish. Give me a day or two
There are add-ins that bring the pics back.
I've been adding this to the top of all my DIY threads.
"If you're using Google Chrome, go to the three dots on the right side of the screen and click them. A drop down should appear. Hover your mouse over "More Tools," and when the next drop down appears, click on extensions. Go to the link towards the bottom that says "Get more extensions." In the search box, type "Photobucket Fix," and hit enter. Click the install button and once it's done, you should be able to see photobucket pictures again.
For FireFox users, click on the three bars on the right side of the screen, then click on add ons. Click search for "photobucket hotlink" and click install. Same result."
I'll be looking to try an RTD shifter when spring comes around, on a different car though. That may be a similar solution that doesn't require cutting the center console to fit.
inTgr8r wrote!!! Completely off-topic, but stumbled here and didn't know this existed. The plugin is available and works for Opera as well.There is a solution now for Chrome and Firefox users.
There are add-ins that bring the pics back.
I've been adding this to the top of all my DIY threads.
inTgr8r wroteThank you! Wish there was one for Safari.There is a solution now for Chrome and Firefox users.
There are add-ins that bring the pics back.
I've been adding this to the top of all my DIY threads.
"If you're using Google Chrome, go to the three dots on the right side of the screen and click them. A drop down should appear. Hover your mouse over "More Tools," and when the next drop down appears, click on extensions. Go to the link towards the bottom that says "Get more extensions." In the search box, type "Photobucket Fix," and hit enter. Click the install button and once it's done, you should be able to see photobucket pictures again.
For FireFox users, click on the three bars on the right side of the screen, then click on add ons. Click search for "photobucket hotlink" and click install. Same result."
CIFUM3 thank you for your response! Your guide even without pictures was incredibly helpful and made my install very easy! I just saw inTgr8r post and it fixed it so now I can see your pictures anyways!
Sorted the pictures for those that can't use the Photobucket fix on their browser.
CIFUM3 wroteSo I want to start off by saying that it was easier to install my ESS supercharger kit than this beautifully built shifter, mostly because I had to do everything by myself. I am by no means an expert or certified in any way. DO THIS AT YOUR OWN RISK. I AM NOT RESPONSIBLE FOR EXTRA PARTS, BROKEN PARTS, OR BROKEN FEELINGS.
I love learning so I decided to knock this out solo, and share my experience with you guys. The lack of DIYs for this install was what stopped me from purchasing one of these a long time ago. I finally took the plunge and I couldn't be happier. I am also installing a DSSR instead of the OEM linkage, I didn't test it but I'm positive the OEM linkage will fit.
The "Before"
HERE WE GO
Big BIG thanks to:
You can follow majority of his steps all the way until he takes apart the shifter from the shifter carrier. He used two screwdrivers, spinning the locking mechanism clockwise. BUTTT remove your exhaust and heat shields, you are going to want all the space to do this.
All the foam and rubber shift boots will be discarded. You will also need to trim the foam that is in the car, and cut some of the plastic off. I used a cordless dremel to do the cutting and sanding. I'll show what I did in later posts.
For this install you will have to remove the center console cover (the instructions call for the removal of the whole center console but I couldn't find a DIY, and couldn't figure it out, so I left it on. Which to me it turned out for the better because it eliminated the guessing when it came to the cutting and trimming.
The cover is held on by a few pressure clips so it just pulls straight up with some pressure. I started from the front and moved back.
There's also two bolts I decided to remove that holds the center console down. it gives a little bit of extra "leg room" to work with.
Back to the bottom of the car; first you have to support the transmission with a transmission jack if you have one. I didn't, so I used a piece of wood with my regular jack. Once supported you will need to remove the transmission cross member and exhaust hanger that is bolted to the transmission with torx bolts.
Transmission cross member
Two bolts on the right bolted to the frame
Two bolts on the left bolted to the frame
One nut on each side bolted to the transmission itself. At this point I recommended replacing your transmission mounts, the cross member is out and it's the easiest at this point to replace them. I did not know I was going to be in this deep and it didn't cross my mind... and again there is no DIYs for it... NOT perfect but I'll be the guinea pig for us all.
Once the cross member has been taken out, next you want to remove the exhaust hanger that is bolted to the transmission, you want to do this purely to have more space to work with.
Removing the two clips there's a locking mechanism. I slid a small flat tip screw driver in the flat spot on the side of them and then they swing up once unlocked.
Next removing the carrier from rubber grommet (back) and two pins (front). once you remove the two pins you have to release pressure on the jack, and let the transmission go down. The carrier can only go up over the transmission and then slide down on either side of it. you will have to push up on the carrier and pull down a bit on the transmission at the same time to make it slide out, it didn't take much.
How it will look like from the bottom and top with the carrier removed.
Initial mock up of how it will look.... still more to go after this point.
Now it's time for the part where most people start second guessing this purchase. I for one plan on keeping this car till it can't drive anymore, and even then I'll rebuild. So cutting and drilling wasn't an issue for me.
This pic is so you guys can get a basic idea of the cutting and trimming that needs to be done.
This is what it looked like after it was all said in done. I had to cut and mock it up a few times till I found a perfect position for the shifter. It doesn't look pretty but that is fine there is a plate provided by CAE that will cover this all up.
The plate mentioned above.
Bottom
Top
Almost done... Next it's the drilling of four holes to bolt the shifter down. Like I said its not pretty... I messed up the first set of holes. Again the plate covers this all up. Exhibit A
So once you drilled the four holes IN THE RIGHT PLACE Bolt the shifter down. Hardware is provided you can use either nuts and washers, or a bar the comes with threads welded on. I used the bar on one side and nuts on the other. At this point you have to do a few things; connect the DSSR to the transmission and then shifter, or OEM rod if you didn't upgrade, then bolt the transmission cross member back on (There's other steps you have to follow provided by CAE)
One of those steps is attaching the little dust boot provided by them.. which actually is a lot harder than it seems... I have big hands so it took me a while to figure it out. I used a small pry bar to hold one side down while I pulled as much as I could on the other side, working it little by little all the way around.
Once that lil F!@#!# is done you're on the home stretch!!!!!
Next and third to final step, trimming of the center console cover... you will have to remove your ash tray (mine) or any other accessory you may have in that upper spot. To mark it: place it where it supposed to be see where it hits the shifter and cut that piece... All done in this picture.
And cover reinstalled
Second to final step: is trimming the shift boot, I'm using the OEM one for now till I can have something custom made for the boot and the front part where the accessory was.
FINAL STEP!!!! is fine tuning the shifter. Step by step on how to tune the shifter are provided.
BBBUUTTT BEFORE YOU GO DRIVING heat shields need to be bolted back on, exhaust mounted back on with its hangers, do one more check everything is tight! and finally lower the car and then go drive it like you stole it!
Thanks for looking. If anybody has any questions I'll answer them at the best of my ability!
I made a few short video clips for Instagram check them out @luis.1sl0m3