96 kVIEWS
81REPLIES
5APPRECIATES
04/06/2018LAST POST

J'ai pris plus de 2 mois avant d'installer mes branchies (en janvier) car je voulais trouver une méthode plus facile pour les installer. Voici comment j'ai installé le mien. J'espère que ça vous aidera. Une fois que vous avez pris le temps de faire un côté, il vous faudra moins d'une minute pour les sortir. J'espère que cela vous aidera les gars.

Outils requis

  • Scotch Packing Tape (ou tout ruban adhésif super résistant qui ne laisse pas d'adhésif lorsque vous le décollez)
  • Blue Painters Tape

Avant de commencer :

Si vous avez peur de gratter votre voiture, scotchez la surface peinte autour des branchies avec du ruban adhésif

Installation

Étape 1. Retirer la branchie latérale OEM chrome

Appliquez du ruban adhésif à l'extrémité la plus proche de la porte (p. ex. la partie pointant vers l'arrière de la voiture). Pour appliquer la bande, tirez une longue bande de ruban et bande les extrémités vers le haut et le bas de la branchie puis appuyez sur la bande ensemble.

En supposant que vous travaillez sur le côté conducteur (à gauche) branchie (vous ferez l'inverse pour l'autre côté):

  • Utilisez votre main droite et saisissez le long morceau de la bande avec votre paume droite et vos trois derniers doigts (le majeur, l'annulaire et le petit doigt).
  • Maintenant, en utilisant votre pouce droit et le doigt du pointeur, prenez le haut et le bas de la branchie en appuyant sur la bande.
  • Pour que votre main gauche ne se sente pas seule, attrapez le milieu de la branchie avec les doigts de votre main gauche.
  • Perdez-vous de haut en bas pendant que vous tirez sur la bande.
  • La branchie devrait sortir facilement.
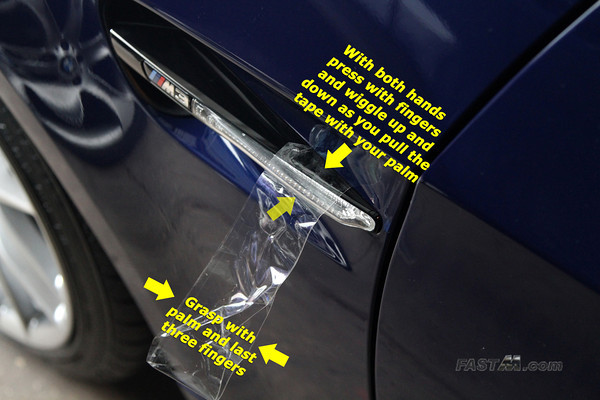
Image hosted on: www.fastm.com

Étape 2. Ne laissez pas tomber le fil derrière l'aile

Inclinez la branchie hors de l'aile pour exposer et sortir.

Avant de déconnecter le câblage, utilisez du ruban adhésif pour les peintres afin qu'il ne tombe pas derrière l'aile. S'il tombe derrière l'aile, vous prolongerez votre temps d'installation BEAUCOUP plus longtemps en essayant de le pêcher.

Une fois que le fil est sécurisé et vous savez qu'il ne tombera pas derrière l'aile, déverrouillez la prise du faisceau de câblage de la branchie.
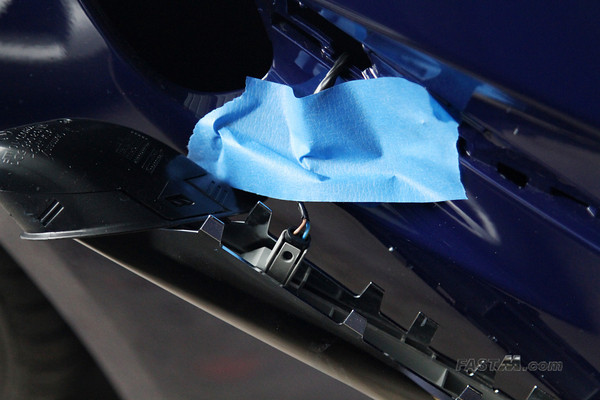
Image hosted on: www.fastm.com

Étape 3. Installer de nouvelles branchies

Enfin, la partie facile !

Branchez le faisceau de câblage dans la nouvelle branchie latérale, puis insérez la plus grande extrémité de la branchie dans l'aile et alignez les points de montage.

Il suffit d'appuyer sur la branchie dans les points de montage jusqu'à ce qu'il soit affleurant. C'est fini !
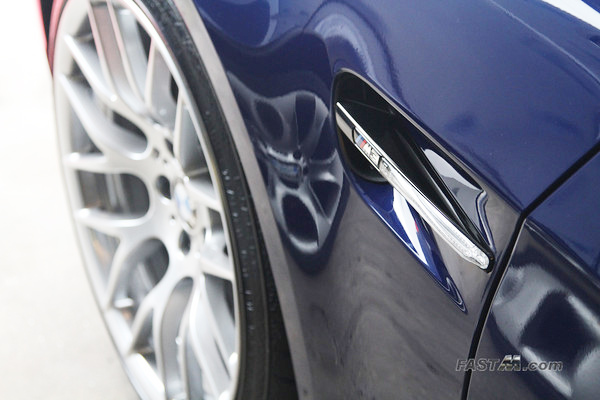
Image hosted on: www.fastm.com

Voici une comparaison de la nouvelle branchie noire OEM M3 Edition chromée
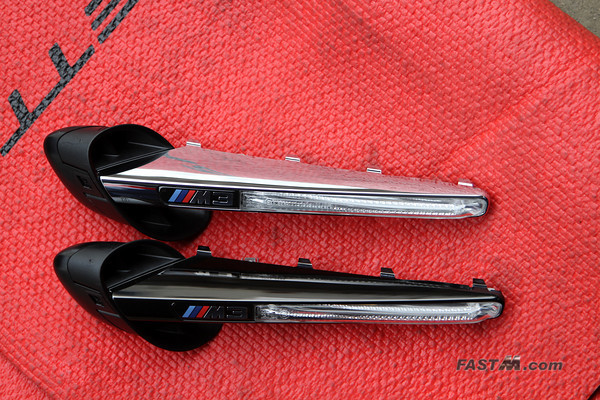
Image hosted on: www.fastm.com

Avertissement: Utilisez ce bricolage à vos propres risques, je ne suis pas responsable des dommages causés à votre voiture.

Thread referenced by BimmerM in Can't get the side grilles off. 16/05/2011
C'est une excellente façon de le faire! :thumsup:
Nice man and thanks for the DIY! Im assuming it'll be the same for the e90 though? Heard alot about it being harder on the e90 for some reason...any more pics of the black chrome installed? BTW where did you get them from? Thanks!
stealthM3 wrote
Nice man and thanks for the DIY! Im assuming it'll be the same for the e90 though? Heard alot about it being harder on the e90 for some reason...any more pics of the black chrome installed? BTW where did you get them from? Thanks!
I'm not too certain on the E90 as I have not done it on the E90. However, I would assume it would come out similiar. :confused2

I bought my M3 "Edition" gills from getBMWParts.com.

Unfortunately I haven't really taken too many closeup shots of them installed. If you search on the forum there's many that have posted pics of them installed. :thumsup:
This DIY worked out great, just make sure to put a thick layer of blue tape to avoid scratches. Also let the car sit in the some for a bit he helps out
Great method!
Actually I found it's easier to do with two people.
I have my girlfriend pulling the tape while I pull the gill upwards, and it pop off easily.
+1 worked for me!
worked like a charm to get off the car. 30 sec for each side. Now, the only trouble im having is removing the chrome body from the black end thingy. Cant seem to get the 2 clips loose:mad0260:
OMG! You are a genius man! Simply wrap the tape around it, hold the gill with a micro fiber towel, wriggle the gill in the towel and pull hard on the tape. I changed both sides in 10 minutes! Holy crap, to think of people ripping out their fender liners and prying these things off with a screwdriver... This method there was no way you damage anything. They pop out, but not violently, very easy to control and no chance of damaging the paint or the gill.

This board should have reputation points like 6 speed. You certainly earn some with this.
:thumsup::clap:
rye m3 wrote
OMG! You are a genius man! Simply wrap the tape around it, hold the gill with a micro fiber towel, wriggle the gill in the towel and pull hard on the tape. I changed both sides in 10 minutes! Holy crap, to think of people ripping out their fender liners and prying these things off with a screwdriver... This method there was no way you damage anything. They pop out, but not violently, very easy to control and no chance of damaging the paint or the gill.

This board should have reputation points like 6 speed. You certainly earn some with this.
:thumsup::clap:
Glad you found it useful. :thumbsup:
Please clarify...

Can this method also be used to replace gills on a 2011 e90? I ask bc of the "grille" on the gills unlike the vert or coupe.

thanks
Brilliant worked just as indicated. Just completed install on E93 took about 20 mins. Thanks for this method.
I am shaking my head, seeing how obvious this approach is, because the hardest thing about swapping gills was getting a firm grip on it to get it out. It takes gorilla grip to do it! But the tape technique could really help.

Now did I read you right: OEM black chrome gills? I got black chrome, but they were not OEM afaik.

Edit: Moderators, please sticky this thread. This is very useful!
Thread referenced by llis in DIY: Painted/Replace Side Vents 08/10/2011
llis wrote
I am shaking my head, seeing how obvious this approach is, because the hardest thing about swapping gills was getting a firm grip on it to get it out. It takes gorilla grip to do it! But the tape technique could really help.

Now did I read you right: OEM black chrome gills? I got black chrome, but they were not OEM afaik.

Edit: Moderators, please sticky this thread. This is very useful!
Yes, it was part of the M3 "Edition" car that was released overseas. The OEM Satin/Black Chrome parts can be ordered from here: http://www.trademotion.com/partlocator/index.cfm?action=MorePartInfo&PartID=884016&siteid=214672&catalogid=4462

:thumbsup:
Thread referenced by stefan in E92 M3 Assesory Question (grills/carbon fibre mirror cap) 25/10/2011
Thread referenced by ailikesiliu in Need held on side gill replacement!!! 08/11/2011
To the OP - I love you! LOL This worked like a charm. It was much better than the screw driver trick. The only thing i added was 2 more strips of packing tape from the little end towards the middle for more leverage...you rock!
I followed this advice, and it worked extremely well. The packing tape is the key method for getting the gill off with no fuss, all other methods risk scratching the paint or using too much force, in my opinion.

I did the first gill replacement, and then took videos of the second.

Before you start, it's worth watching all 4 videos (sorry, I don't have time to splice them together) so you know all the steps.

Overall, this is a very simple procedure that even non-mechanically inclined people can do.

Now that I've done one set, I could do 1 gill replace and removal in probably 7-8 minutes, so 15 minutes for both sides.

I hope this is useful.
:
By the way, this should probably be a sticky thread.

Jason
mmaroto wrote
Please clarify...

Can this method also be used to replace gills on a 2011 e90? I ask bc of the "grille" on the gills unlike the vert or coupe.

thanks
Even my dealer managed to break the plastic vents when they changed the side grilles for me on my old car - for the E90 the safest way is to remove the wheels and go in from the wheel well - it can be done without doing this but youre taking a risk of something breaking.
Took 20 min total with replacing all the parts and whatnot. I'm glad I stumbled upon this...all the other DIY's were way too difficult..
you guys are the best...took less than 10 min total, no scratches. ( i did spend some good time doing research though)
Thread referenced by BimmerM in side gill install tip 19/01/2012
BimmerM

Thanks for the excellent write up. I swapped mine out today and it looks so much cleaner.
Thread referenced by paradocs98 in OEM Edition grilles & gills: Thanks, IND! 28/01/2012
