

farbarg wroteCan you post a pic of the pliers you used? I want to see how large is large. Thanks.Finally, I second the recommendation to use a large pair of pliers to remove the clips. Wrap them so they don't scratch the brakes, and it makes removal very easy.
246.8KVIEWS
168REPLIES
19APPRECIATES
12-10-2025LAST POST
A pair of channel-lock pliers. Here they are. I just wrapped the jaws with a few paper towels.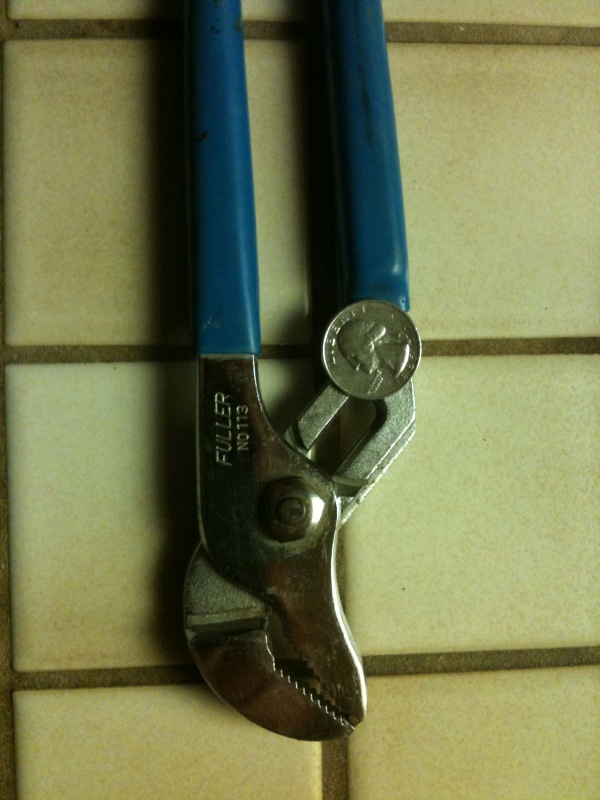
Thanks!
First of all many thanks for a great thread!
I was reading this thread over at e90post where Mr.5 demonstrates pad change by removing the pad carrier along with the caliper instead of just the caliper as shown in this thread. Whenever I changed my pads on my Mini I use lucid's method of unscrewing the caliper pins and not the pad carrier bolts. I haven't changed pads on the bmw yet. Mr.5's thread got me thinking. I was wondering what is the right/easier procedure to follow. Here are my questions and I would appreciate any opinions/insights.
1) From the pics and the schematics it seems to me that the stopping force is transferred to the pad carrier and not to the caliper pins. Do you think this is correct? The caliper pins look too flimsy and their torque specs are low (22lbft).
2) If 1 is correct it follows that the caliper is not taxed with stopping forces but just with compressing the pads onto the rotor, which would explain the size and torque specs of the caliper pins. Does this make sense?
3) Somebody on the e90post thread mentioned that the caliper pins are only guiding the caliper so it would be better to remove the caliper instead of removing the pad carrier with the caliper. In the latter case one would need to unscrew the pad carrier bolts that are experiencing all the stopping force if 1 is true and are torqued much tighter than the caliper pins. So, remove the caliper or the pad carrier along with the caliper? (I vote for the caliper only as I have done many times. Although it seems easier to handle the pads when the caliper is still attached to the pad carrier).
Thanks in advance.
I was reading this thread over at e90post where Mr.5 demonstrates pad change by removing the pad carrier along with the caliper instead of just the caliper as shown in this thread. Whenever I changed my pads on my Mini I use lucid's method of unscrewing the caliper pins and not the pad carrier bolts. I haven't changed pads on the bmw yet. Mr.5's thread got me thinking. I was wondering what is the right/easier procedure to follow. Here are my questions and I would appreciate any opinions/insights.
1) From the pics and the schematics it seems to me that the stopping force is transferred to the pad carrier and not to the caliper pins. Do you think this is correct? The caliper pins look too flimsy and their torque specs are low (22lbft).
2) If 1 is correct it follows that the caliper is not taxed with stopping forces but just with compressing the pads onto the rotor, which would explain the size and torque specs of the caliper pins. Does this make sense?
3) Somebody on the e90post thread mentioned that the caliper pins are only guiding the caliper so it would be better to remove the caliper instead of removing the pad carrier with the caliper. In the latter case one would need to unscrew the pad carrier bolts that are experiencing all the stopping force if 1 is true and are torqued much tighter than the caliper pins. So, remove the caliper or the pad carrier along with the caliper? (I vote for the caliper only as I have done many times. Although it seems easier to handle the pads when the caliper is still attached to the pad carrier).
Thanks in advance.
r53s65e90 wroteHere is my understanding (without having the caliper system in front of me):First of all many thanks for a great thread!
I was reading this thread over at e90post where Mr.5 demonstrates pad change by removing the pad carrier along with the caliper instead of just the caliper as shown in this thread. Whenever I changed my pads on my Mini I use lucid's method of unscrewing the caliper pins and not the pad carrier bolts. I haven't changed pads on the bmw yet. Mr.5's thread got me thinking. I was wondering what is the right/easier procedure to follow. Here are my questions and I would appreciate any opinions/insights.
1) From the pics and the schematics it seems to me that the stopping force is transferred to the pad carrier and not to the caliper pins. Do you think this is correct? The caliper pins look too flimsy and their torque specs are low (22lbft).
2) If 1 is correct it follows that the caliper is not taxed with stopping forces but just with compressing the pads onto the rotor, which would explain the size and torque specs of the caliper pins. Does this make sense?
3) Somebody on the e90post thread mentioned that the caliper pins are only guiding the caliper so it would be better to remove the caliper instead of removing the pad carrier with the caliper. In the latter case one would need to unscrew the pad carrier bolts that are experiencing all the stopping force if 1 is true and are torqued much tighter than the caliper pins. So, remove the caliper or the pad carrier along with the caliper? (I vote for the caliper only as I have done many times. Although it seems easier to handle the pads when the caliper is still attached to the pad carrier).
Thanks in advance.
The pins should not be carrying any significant braking load. If you look at the picture in Step 10 of this DIY, you can see that the caliper body positions the pads so that the top and the bottom ends of the pad back plates are either making or about to make contact with the carrier. When you brake, the pads generate the braking force by resisting the movement of the rotor. The pads "want" to rotate counter-clockwise together with the rotor when the piston applies pressure on the inside pad, which is also experienced by the outside pad since the caliper body is rigid and free to move along the axis of the two pins, but since the pads make contact with the carrier, which is fixed (non-rotating), they can't. So, the resulting friction force is transmitted to the carrier through the large contact area between the top of the pad back plates and the carrier as can be seen in the picture in Step 10. There might be some resultant forces that are not orthogonal to that contact surface, which might be transmitted to the carrier body itself, but they must be small.
I cannot see why it would be necessary to remove the carrier. The carrier bolts are torqued high and it is not easy to get to them with a breaker bar without really jacking up the car. The first time I replaced pads, I must not have pushed the piston back far enough and could not remove the caliper after removing the pins, and unbolted the carrier. It was much harder to do. Then JAJ pointed out that I didn't have to do that, so I learned the hard way.

Thanks for all the advise and generally for this very useful thread.
Two qns:
1. Will paggid and AP pads accomodate the wear sensor?
2. Assuming that iDrive shows estimated remaining life of brake pads (in km or miles) based on some sort of an algorythm, will the (gu)estimate be "correct" if the pads are changed to anything other than OEM (which have different coefficient of friction)?
Apologies for these being off topic as far as this DIY is concerned.
Two qns:
1. Will paggid and AP pads accomodate the wear sensor?
2. Assuming that iDrive shows estimated remaining life of brake pads (in km or miles) based on some sort of an algorythm, will the (gu)estimate be "correct" if the pads are changed to anything other than OEM (which have different coefficient of friction)?
Apologies for these being off topic as far as this DIY is concerned.
gr8000 wrote1. Pagids accomodate the wear sensor. Don't know about AP pads.Thanks for all the advise and generally for this very useful thread.
Two qns:
1. Will paggid and AP pads accomodate the wear sensor?
2. Assuming that iDrive shows estimated remaining life of brake pads (in km or miles) based on some sort of an algorythm, will the (gu)estimate be "correct" if the pads are changed to anything other than OEM (which have different coefficient of friction)?
Apologies for these being off topic as far as this DIY is concerned.
2. Assuming different compounds wear differently, it will probably be off. But if you drive on the track, the entire estimate approach goes out of whack quickly to begin with, so pad compound/wear issue is not the real issue then. You will have to visually check the condition of your pads and rotors rather than relying on the iDrive estimate, and the iDrive interval will most likely need to reset before service is due, etc. More on that in these threads:
http://www.m3post.com/forums/showthread.php?t=142417&highlight=brake+service+indicator
http://www.m3post.com/forums/showthread.php?t=239200&highlight=brake+service+indicator
lucid wroteAbsolutely true, on this and virtually every standard disc setup. Neither any compression load or rotational - they're just keeping bits from falling out.The pins should not be carrying any significant braking load.

farbarg wroteI have changed the pads on all my BMWs for a many years and have always followed a procedure similar to Lucid's.First, thanks Lucid, for this DIY. I had my dealer put my XP10's on (didn't have time or a jack before my track day), but saved a lot of money by removing them myself. Made me feel like I was mechanically inclined.
Second, my Carbotech's also had excess material in the space where the wear sensor goes. Just had to zip tie the sensor out of the way.
Finally, I second the recommendation to use a large pair of pliers to remove the clips. Wrap them so they don't scratch the brakes, and it makes removal very easy.
Seems like removing the caliper is an un-necessary pain since the torque for the bolts is much higher.
I am on my 3rd track with the Carbotech XP10 and I think these are amazing track pads. They brake really hard, I could not noticed any fading after 30mins sessions and so far no warping issues (I am extra careful during my cooling laps to go slow and barely touch the brakes)
I am unsure why you need a large pair of pliers to remove the retaining clips. I find them extremely easy to remove with a simple semi-large flat head screwdriver: Just place the flat head under the middle section of the clip and push the clip outboard. Comes right off.
Hey Lucid,
Your guide rocks! I just finished doing my first pad job and it went very well following your guide. While doing this I noticed quite a few hairline cracks around some of the disc drilled holes, so it seems I might have to replace rotors soon. Do you know of any good DIY guide (like this one) to replace rotors?
Your guide rocks! I just finished doing my first pad job and it went very well following your guide. While doing this I noticed quite a few hairline cracks around some of the disc drilled holes, so it seems I might have to replace rotors soon. Do you know of any good DIY guide (like this one) to replace rotors?
FrenchBoy wroteI am unsure why you need a large pair of pliers to remove the retaining clipsQUOTE]
I was the poster that suggested the big pliers. Later on in life, I realized that you could do it with just your fingers. The springs aren't actually that strong (or maybe I just have strong fingers).
In any case, I stopped using tools of any kind to remove and re-install the anti-rattle springs on my stock brakes. Much easier on the paint.
In answer to the question on wear sensors and AP Racing brake pads, "no" they don't accomodate the sensor. You just zapstrap the wire out of the way and check them once in a while.
BMW M Power Mexico wroteI am not aware of a DIY, but check the E90 DIY page. They might have some. You'd have to remove the carrier, and the rest should be fairly straight forward. You do need to raise the car high to be able to comfortablely remove the larger nuts holding the carrier in place though.Hey Lucid,
Your guide rocks! I just finished doing my first pad job and it went very well following your guide. While doing this I noticed quite a few hairline cracks around some of the disc drilled holes, so it seems I might have to replace rotors soon. Do you know of any good DIY guide (like this one) to replace rotors?
A few short cracks is OK. I would keep an eye on them. When they spread around and you can easily catch them with your finger, it's time to replace them.
BMW M Power Mexico wroteI am not aware of a DIY, but check the E90 DIY page. They might have some, and I think the assemblies are similar. You'd have to remove the carrier, and the rest should be fairly straight forward. You do need to raise the car high to be able to comfortably remove the larger nuts holding the carrier in place though.Hey Lucid,
Your guide rocks! I just finished doing my first pad job and it went very well following your guide. While doing this I noticed quite a few hairline cracks around some of the disc drilled holes, so it seems I might have to replace rotors soon. Do you know of any good DIY guide (like this one) to replace rotors?
A few short cracks is OK. I would keep an eye on them. When they spread around and catch your fingernail easily, it's time to replace them.
lucid wroteThank you as always.I am not aware of a DIY, but check the E90 DIY page. They might have some. You'd have to remove the carrier, and the rest should be fairly straight forward. You do need to raise the car high to be able to comfortablely remove the larger nuts holding the carrier in place though.
A few short cracks is OK. I would keep an eye on them. When they spread around and you can easily catch them with your finger, it's time to replace them.
I am attaching a pic of the cracks. They are not deep and I cannot feel a difference in the disc surface with my finger. Rotor depth seems to be ok, a lip is developing but not very deep yet though I have no way to measure exactly.
Having said that, I have had this rotors on the car since new and it has done 6 track days (1 street tires, 5 R-comps) of about 100-140 miles each (on HT-10s first then Pagids) and 6,000 street miles (on stock pads). I am pleasantly surprised at rotor/pad durability so far.
These pics are of my front rotors. I only use track pads on the front, I have found that the rears hold up fine with stock pads and I don't really feel any balance issues.
BMW M Power Mexico wroteThat rotor looks fine to me. The cracks seem small and localized. My rotor looked much worse when I had it replaced. I think you'll get another 4-5 track days on them. Of course, you should do what you think is safe. Just my 2 cents...Thank you as always.
I am attaching a pic of the cracks. They are not deep and I cannot feel a difference in the disc surface with my finger. Rotor depth seems to be ok, a lip is developing but not very deep yet though I have no way to measure exactly.
Having said that, I have had this rotors on the car since new and it has done 6 track days (1 street tires, 5 R-comps) of about 100-140 miles each (on HT-10s first then Pagids) and 6,000 street miles (on stock pads). I am pleasantly surprised at rotor/pad durability so far.
These pics are of my front rotors. I only use track pads on the front, I have found that the rears hold up fine with stock pads and I don't really feel any balance issues.
BMW M Power Mexico wroteOn the hub part of the rotor they have inscribed the rotor minimum thickness which is 28.4mm if I remember. On my car you can clearly see it without taking the wheel off. I would believe lip is OK as long as you are above the minimum thickness.Rotor depth seems to be ok, a lip is developing but not very deep yet though I have no way to measure exactly.
I use this to measure when I take the wheels off.
Thanks for the DIY, very helpful.
I want to add that when the brakes are cool you can retract the piston by simply pulling firmly outward on the brake caliper for 60-90 seconds. I didn't have a C-clamp big enough so I tried and it's wasn't very hard. I didn't have to worry about the metal C-clamp scratching anything either and it's one less thing to carry out to the car.
I want to add that when the brakes are cool you can retract the piston by simply pulling firmly outward on the brake caliper for 60-90 seconds. I didn't have a C-clamp big enough so I tried and it's wasn't very hard. I didn't have to worry about the metal C-clamp scratching anything either and it's one less thing to carry out to the car.
Looks like I will make some good use of this DIY! I just called a garage nearby... and they are quoting me ~$270 for this work (both axles)!! They count an hour per axle... 
MTROIS wroteThat's ~$500 per track event assuming you want your street pads back on!Looks like I will make some good use of this DIY! I just called a garage nearby... and they are quoting me ~$270 for this work (both axles)!! They count an hour per axle...

You can do all 4 corners in less than a hour. With a lift, it should be more like 30 minutes.
jm1234 wroteHaven't tried that. Good to know.I want to add that when the brakes are cool you can retract the piston by simply pulling firmly outward on the brake caliper for 60-90 seconds.
Lucid,
Were you able to confirm the 22 ft-lbs on BMW TIS?
Were you able to confirm the 22 ft-lbs on BMW TIS?
MTROIS wroteIt truly is a pretty easy job. I swap my front pads and all 4 wheels before and after every track event and it takes me about an hour each time.Looks like I will make some good use of this DIY! I just called a garage nearby... and they are quoting me ~$270 for this work (both axles)!! They count an hour per axle...
