

What’s up guys! I just installed NRW Design’s new bolt through solution VANOS Covers and I wanted to clear up some misconceptions as well as go through the install procedure. The reason I went with NRW and waited for them to release them, is because no one is doing it like NRW. They put their products through immense R&D and proper testing. They went through 40+ bolts strength testing these covers and making sure their product would actually last the test of time and wouldn’t just make profit. NRW did not pay me, I payed full price for their valve covers, vanos covers, billet spark plug tubes, and gaskets and I could not be more pleased. Thank you to NRW for helping us make the S65 bulletproof!
Now to the install
I want to preface this and say im a BMW dealership technician of 3 years. I was nervous about the whole reverse threaded bolts crazy torque sequence thing at first but after thoroughly reading bmw’s repair instructions and doing it, it’s honestly pretty straightforward forward and simple once you understand the process. If you know what you’re doing and do everything correctly there should be absolutely zero issues. This is a bit more intensive DIY so I would be weary there if you do not have much mechanical experience especially with delicate engines like this one.
TIMING DISCLAIMER:
People believe timing is affected when installing this style of covers or that the motor must be re-timed afterwards because the Vanos units are unbolted. However, if your motor is already in time there is no reason for it to become out of time. If you do everything correctly and carefully, nothing is affected.
TIMING TOOLS REQUIRED:
You will have to have special S65 timing tools to lock down the cams as well as the crank. CTA is a good brand and you can pick up their set from amazon. I used BMW’s since i have access. Fitment is exactly the exact same thing.
NEED TO REMOVE:
To get to the vanos gears prepare to remove the plenum, valve covers, timing covers, the radiator fan as you will need to be able to turn the engine, and the oem plastic vanos covers. Make sure to put down rags or shop towels to insure no plastic shards enter the engine
**RELEASE PARKING BRAKE AND ENGAGE NEUTRAL GEAR**
STEP ONE: Attachment #1
To begin you must first put the motor into TDC (top dead center) position of cylinder #1. The crank pulley has two small channels on the top ridge, one is labeled OT (TDC in German) and 10°(only used during torque sequence) The pin tool in the S65 timing tool kit will slide into a hollow cylinder just above and to the right of the crank pulley and lock the crank into either channel. The S65 has two TDC settings, TDC position of cylinder #1, where all the cam markings point up, and in the second position “TDC overlap” where the cam markings face down. Ill get back to the later. With the cam engravings all facing upwards, lock the special tool into that hollow cylinder and lock the crank pulley into OT.
STEP TWO: Attachment #1
Starting on the driver side (bank 2) the timing tools that are for locking down the cams are installed. Clean the area of the cylinder head where the tools will sit and all contact points of the tools as well. If the motor is timed correctly and is in the proper TDC setting. The tools should slide over the cams no problem. Thread the bolts in by hand and torque to 10nm.
STEP THREE: Attachment #2
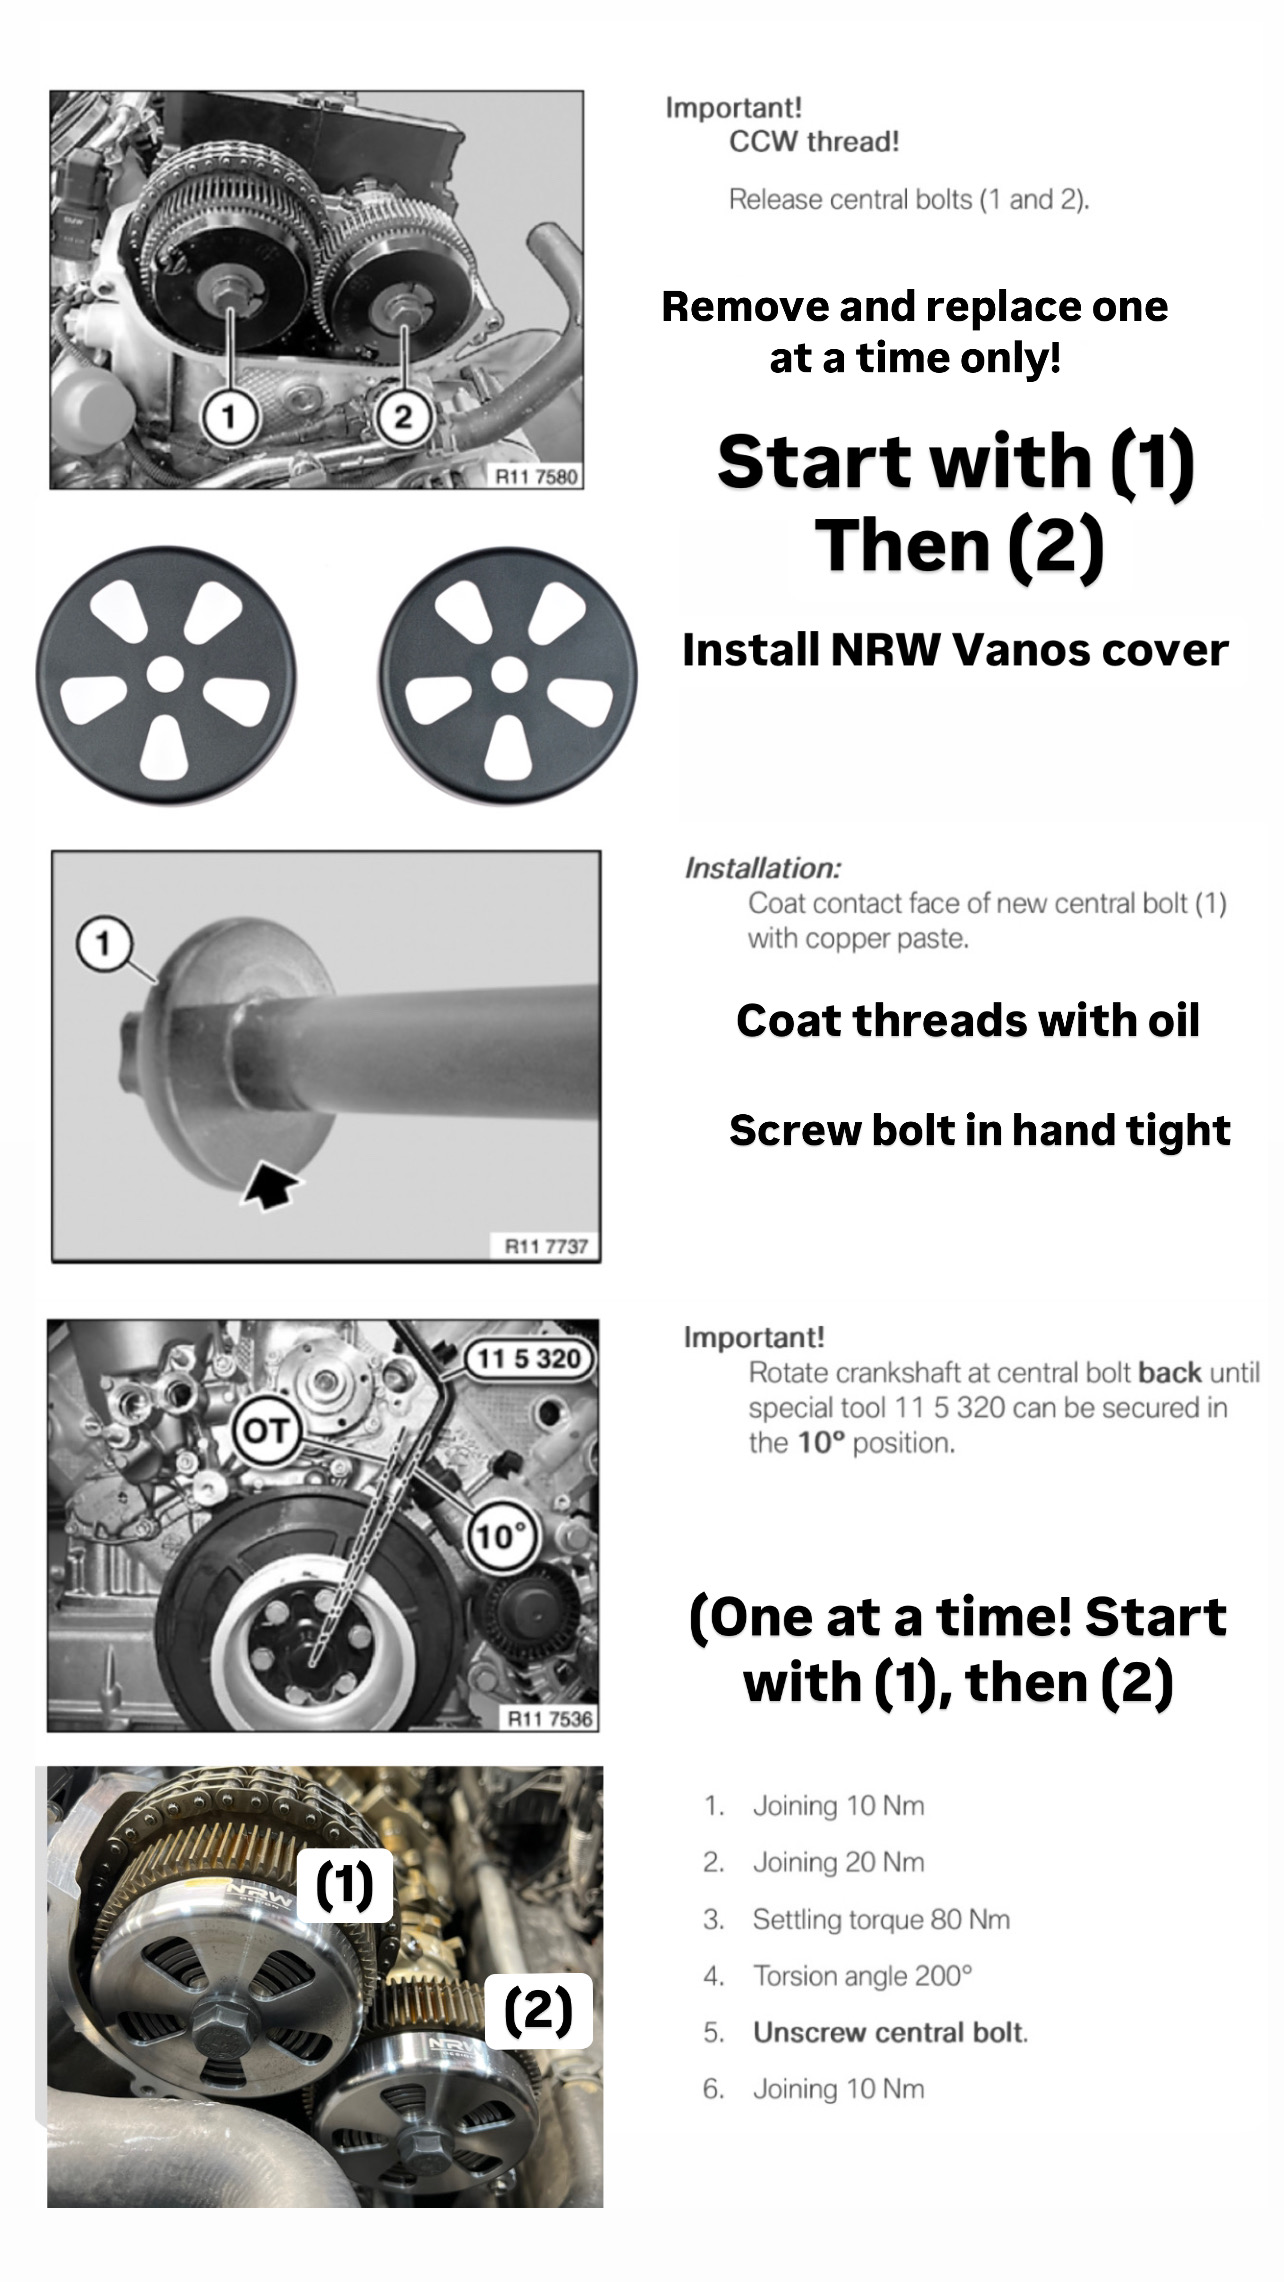
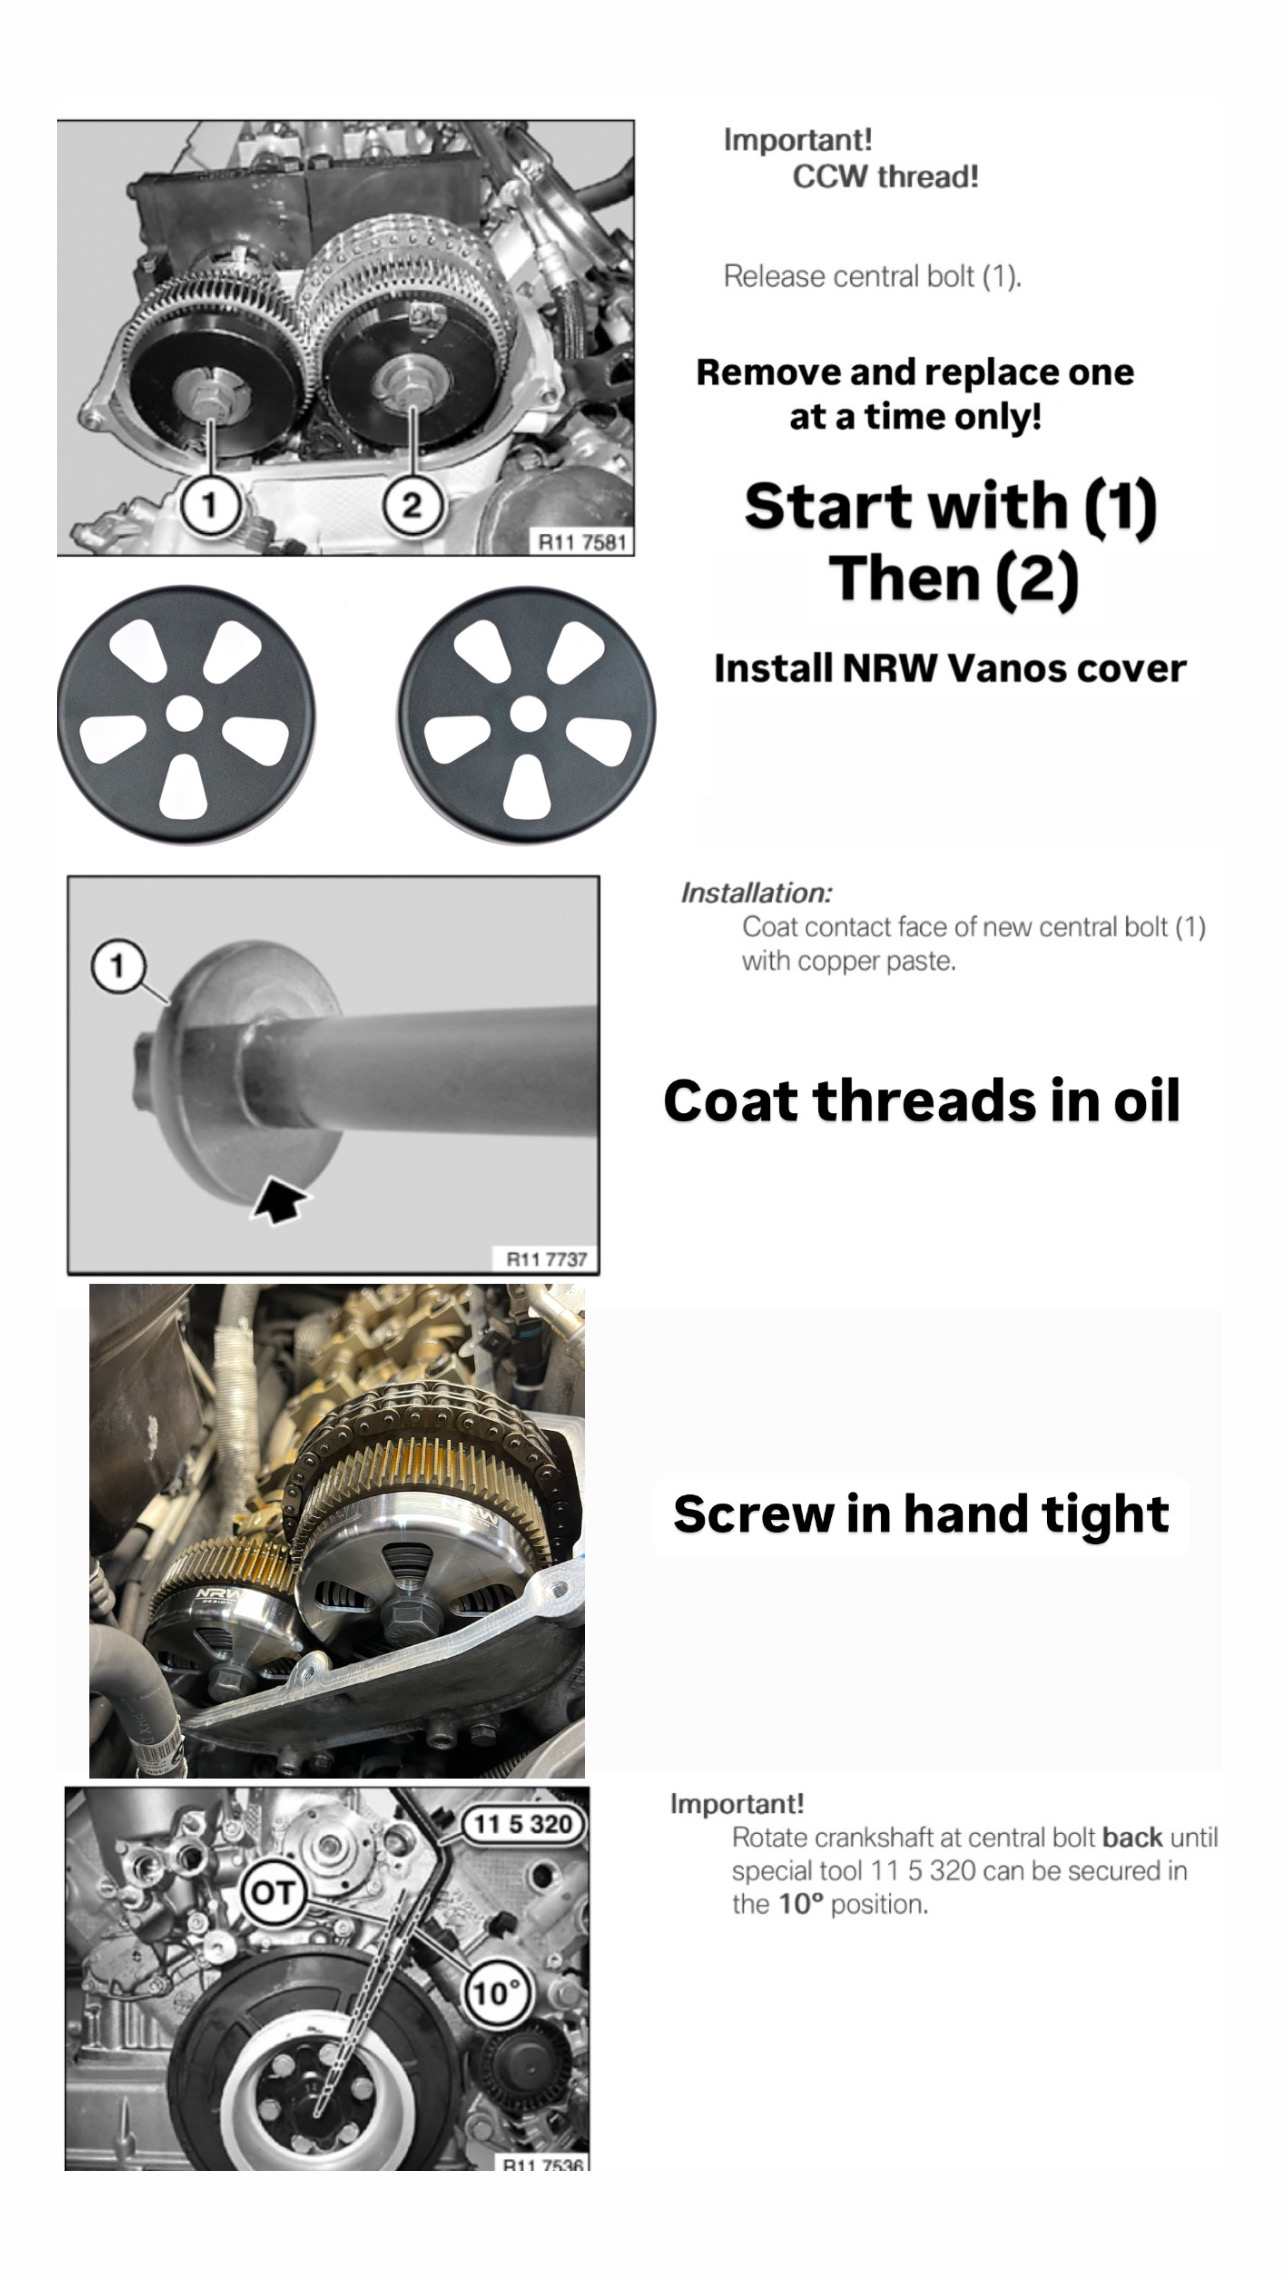
Now to remove the vanos bolts for banks 2 cylinders 5-8. Remember these are left hand thread. Yes that means they are righty loosey, you do not want to forget that. I personally broke both bolts loose starting with the inlet side per the repair instruction then replaced a bolt and washer for a bolt and vanos cover one by one. However the repair instruction is for completely removing the vanos. So I would recommend braking loose and removing them one by one starting with the intake side (closest to the center of the engine) then installing the new bolts and vanos covers in by hand and hand tightening them before the torque sequence is started just to be safe. Per the repair instruction make sure to coat the bolts contact points with copper paste and coat the threads of the bolts in oil.
STEP FOUR: Attachment #3
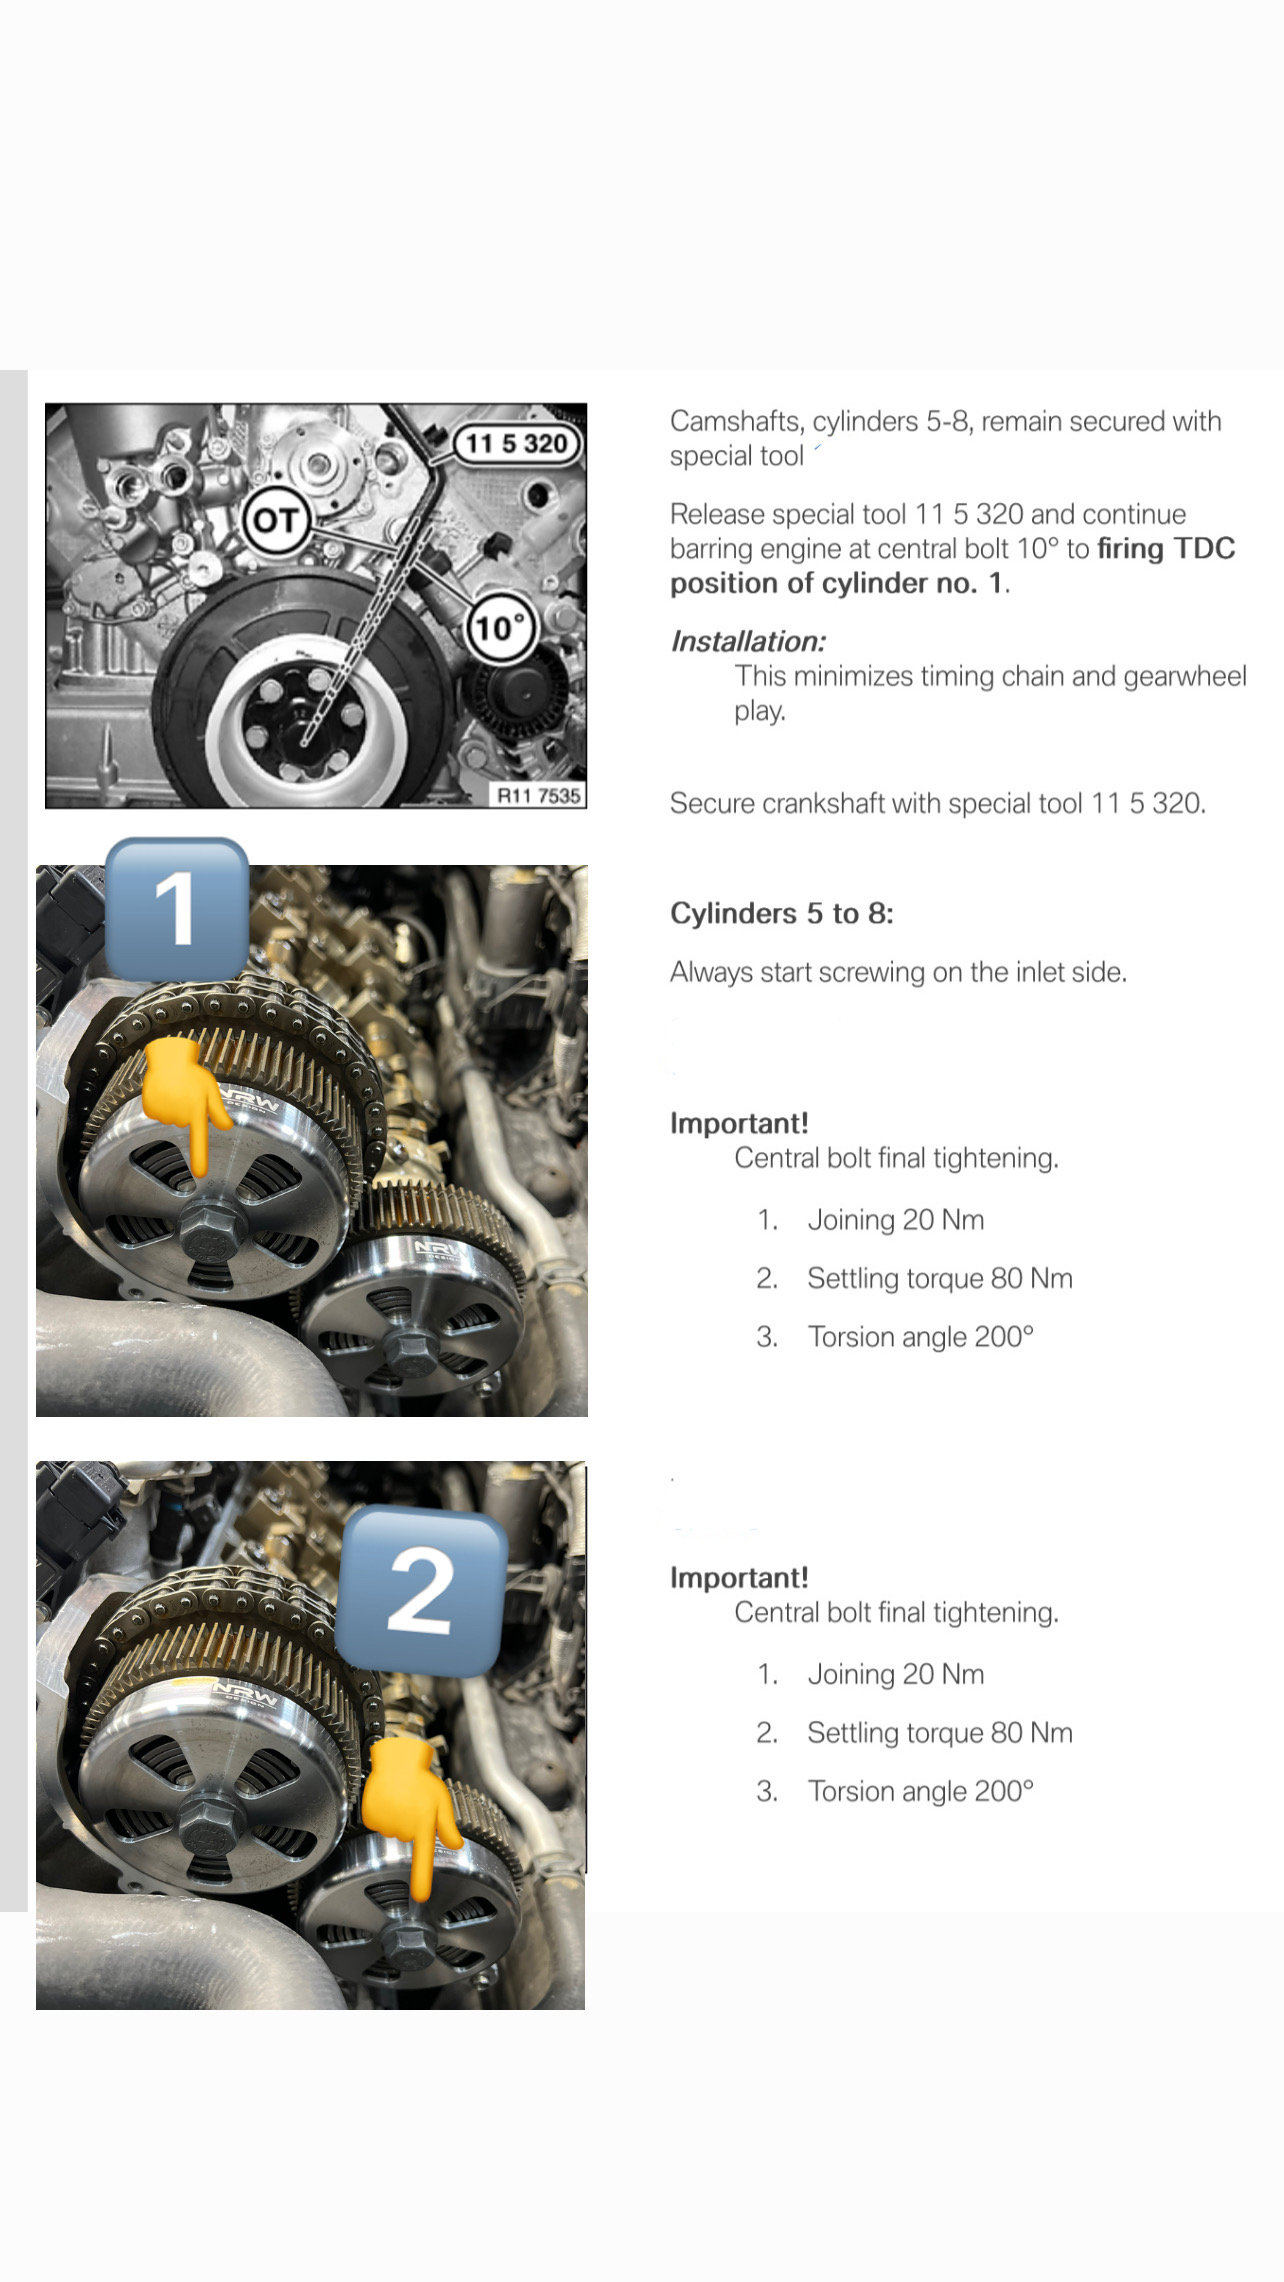
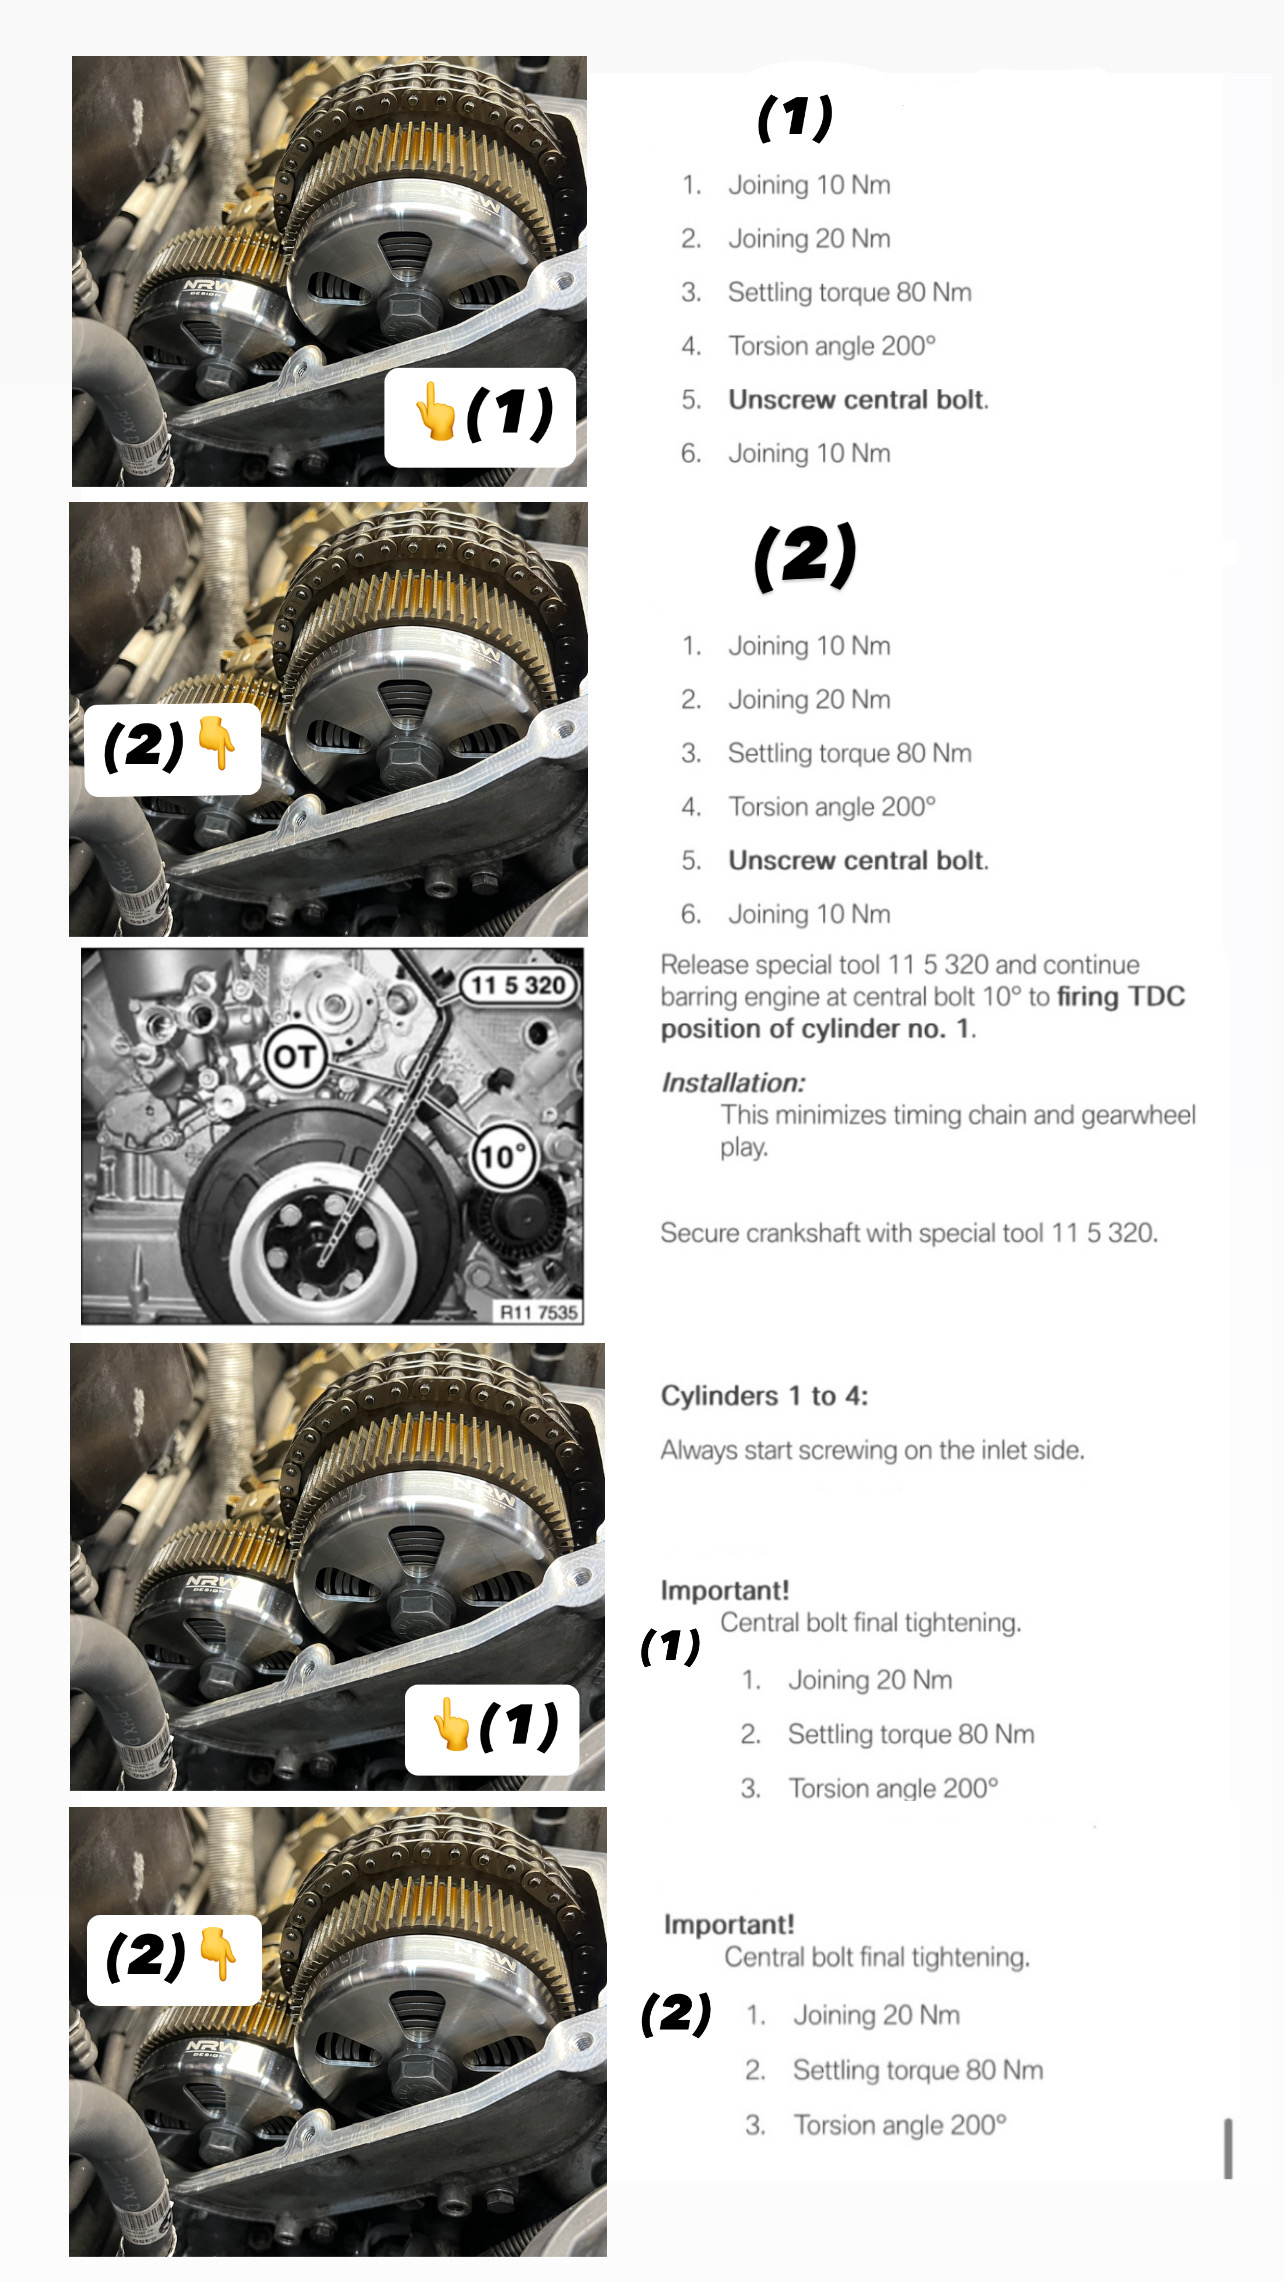
Its time for the fun stuff the torque sequence, its pretty easy it would help immensely if you have a digital torque wrench that will go in reverse. Remember LEFT HAND THREAD, LEFTY TIGHTY. Pull the crank pin tool up, turn the motor until you can place it into the 10° channel and lock it in. Perform the torque sequence starting with the intake side only, then exhaust. Torque sequence is as follows one by one in order: 10nm. 20nm. 80nm. then 200 degrees. Thats turning the bolt another 200 degrees out of 360. Loosen the bolts completely then tighten them to 10nm, per the repair instructions turn the motor back into TDC and perform the last torque sequence starting with the inlet side then exhaust side. It’s the same torque sequence but 10nm was already done. Final torque sequence: 20nm. 80nm. 200 degrees. See not that bad. Remove the timings tools for the cams only.
STEP FIVE: Attachment #4
Now to move onto bank 1 for cylinder 1-4.
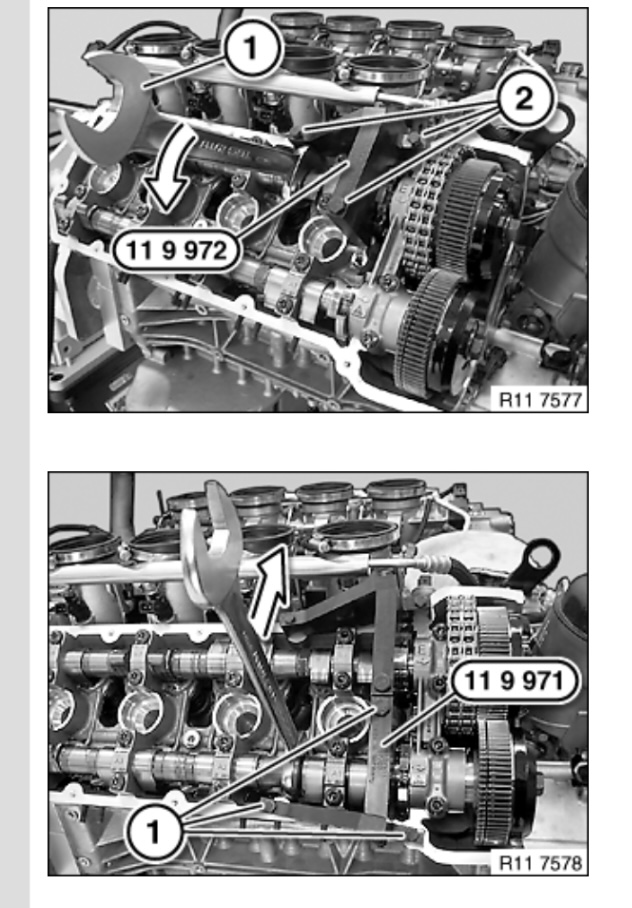
Keep the engine in TDC of cylinder #1 and place the timing tools over the cams of bank 1. To be able to slide the tools on, you will need to slightly move each cam with a 26mm wrench one at a time to place each tool over each cam. Hold them until they allow the tool to slide all the way down and screw in bolts by hand only. Torque the timing tool bolts to 10nm.
STEP SIX: Attachment #5 & Attachment #6
Replace each Vanos bolt and spacer with a new bolt and a NRW vanos cover, again one at a time starting with the outlet side per repair instructions. Do not forget to coat the contact surface of the bolts with copper paste and coat threads with oil. Screw in bolts hand tight. Place the motor bock into 10° before TDC and perform the first torque sequence one by one. Turn back to TDC and perform the final torque spec! Now you’re all done!
CHECKING TIMING:
Like I said you don't need to check timing ot anything unless you do something dumb and removed all the bolts and start pulling on chains and vanos. But I thought it was cool so I wanted to find out the process. With the engine where it is in TDC of cylinder 1, starting on bank 2 again if the timing tools that hold the cams in place sit absolutely flush on the head no play, bank 2 is good. There is a permissible limit 1.0mm allowed between the tools. Remove the tools. Spin the engine 360 degrees to “over lap TDC” and place the timing tools onto bank 1. If they sit flush same as the other side you’re in time.
I hope this cleared up questions and by the end of this you should know if you are capable of doing it or not 😂
Update: finished the job last Saturday, drove the car 7hrs to LA on Monday with zero issues. She feels better than ever and no leaks! ZERO TOP OFFS MADE 😂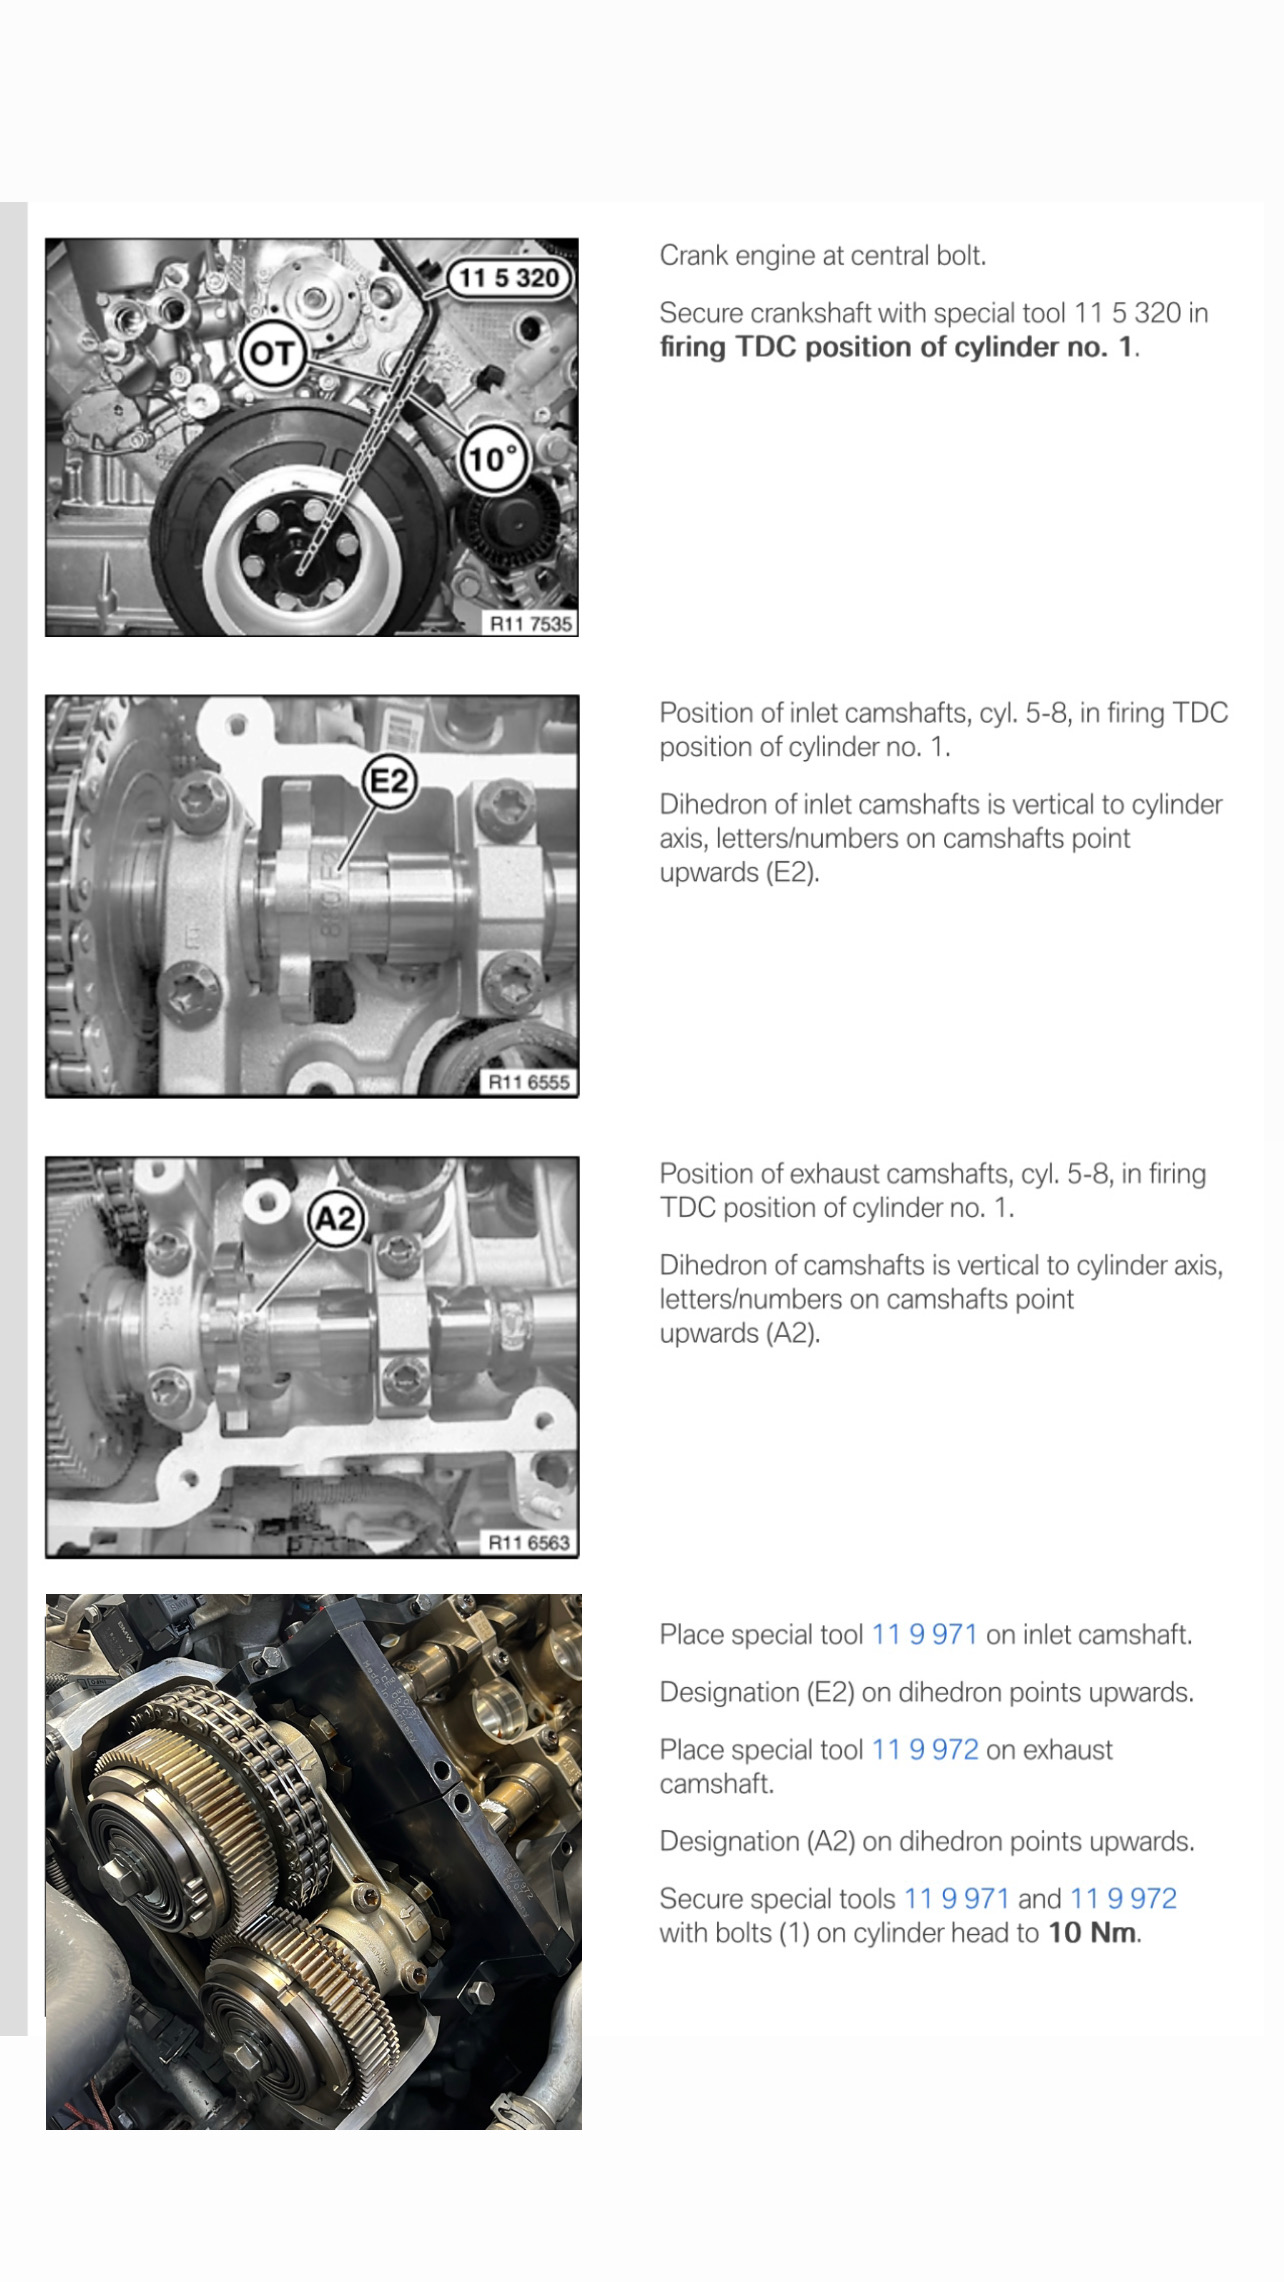
Now to the install
I want to preface this and say im a BMW dealership technician of 3 years. I was nervous about the whole reverse threaded bolts crazy torque sequence thing at first but after thoroughly reading bmw’s repair instructions and doing it, it’s honestly pretty straightforward forward and simple once you understand the process. If you know what you’re doing and do everything correctly there should be absolutely zero issues. This is a bit more intensive DIY so I would be weary there if you do not have much mechanical experience especially with delicate engines like this one.
TIMING DISCLAIMER:
People believe timing is affected when installing this style of covers or that the motor must be re-timed afterwards because the Vanos units are unbolted. However, if your motor is already in time there is no reason for it to become out of time. If you do everything correctly and carefully, nothing is affected.
TIMING TOOLS REQUIRED:
You will have to have special S65 timing tools to lock down the cams as well as the crank. CTA is a good brand and you can pick up their set from amazon. I used BMW’s since i have access. Fitment is exactly the exact same thing.
NEED TO REMOVE:
To get to the vanos gears prepare to remove the plenum, valve covers, timing covers, the radiator fan as you will need to be able to turn the engine, and the oem plastic vanos covers. Make sure to put down rags or shop towels to insure no plastic shards enter the engine
**RELEASE PARKING BRAKE AND ENGAGE NEUTRAL GEAR**
STEP ONE: Attachment #1
To begin you must first put the motor into TDC (top dead center) position of cylinder #1. The crank pulley has two small channels on the top ridge, one is labeled OT (TDC in German) and 10°(only used during torque sequence) The pin tool in the S65 timing tool kit will slide into a hollow cylinder just above and to the right of the crank pulley and lock the crank into either channel. The S65 has two TDC settings, TDC position of cylinder #1, where all the cam markings point up, and in the second position “TDC overlap” where the cam markings face down. Ill get back to the later. With the cam engravings all facing upwards, lock the special tool into that hollow cylinder and lock the crank pulley into OT.
STEP TWO: Attachment #1
Starting on the driver side (bank 2) the timing tools that are for locking down the cams are installed. Clean the area of the cylinder head where the tools will sit and all contact points of the tools as well. If the motor is timed correctly and is in the proper TDC setting. The tools should slide over the cams no problem. Thread the bolts in by hand and torque to 10nm.
STEP THREE: Attachment #2
Now to remove the vanos bolts for banks 2 cylinders 5-8. Remember these are left hand thread. Yes that means they are righty loosey, you do not want to forget that. I personally broke both bolts loose starting with the inlet side per the repair instruction then replaced a bolt and washer for a bolt and vanos cover one by one. However the repair instruction is for completely removing the vanos. So I would recommend braking loose and removing them one by one starting with the intake side (closest to the center of the engine) then installing the new bolts and vanos covers in by hand and hand tightening them before the torque sequence is started just to be safe. Per the repair instruction make sure to coat the bolts contact points with copper paste and coat the threads of the bolts in oil.
STEP FOUR: Attachment #3
Its time for the fun stuff the torque sequence, its pretty easy it would help immensely if you have a digital torque wrench that will go in reverse. Remember LEFT HAND THREAD, LEFTY TIGHTY. Pull the crank pin tool up, turn the motor until you can place it into the 10° channel and lock it in. Perform the torque sequence starting with the intake side only, then exhaust. Torque sequence is as follows one by one in order: 10nm. 20nm. 80nm. then 200 degrees. Thats turning the bolt another 200 degrees out of 360. Loosen the bolts completely then tighten them to 10nm, per the repair instructions turn the motor back into TDC and perform the last torque sequence starting with the inlet side then exhaust side. It’s the same torque sequence but 10nm was already done. Final torque sequence: 20nm. 80nm. 200 degrees. See not that bad. Remove the timings tools for the cams only.
STEP FIVE: Attachment #4
Now to move onto bank 1 for cylinder 1-4.
Keep the engine in TDC of cylinder #1 and place the timing tools over the cams of bank 1. To be able to slide the tools on, you will need to slightly move each cam with a 26mm wrench one at a time to place each tool over each cam. Hold them until they allow the tool to slide all the way down and screw in bolts by hand only. Torque the timing tool bolts to 10nm.
STEP SIX: Attachment #5 & Attachment #6
Replace each Vanos bolt and spacer with a new bolt and a NRW vanos cover, again one at a time starting with the outlet side per repair instructions. Do not forget to coat the contact surface of the bolts with copper paste and coat threads with oil. Screw in bolts hand tight. Place the motor bock into 10° before TDC and perform the first torque sequence one by one. Turn back to TDC and perform the final torque spec! Now you’re all done!
CHECKING TIMING:
Like I said you don't need to check timing ot anything unless you do something dumb and removed all the bolts and start pulling on chains and vanos. But I thought it was cool so I wanted to find out the process. With the engine where it is in TDC of cylinder 1, starting on bank 2 again if the timing tools that hold the cams in place sit absolutely flush on the head no play, bank 2 is good. There is a permissible limit 1.0mm allowed between the tools. Remove the tools. Spin the engine 360 degrees to “over lap TDC” and place the timing tools onto bank 1. If they sit flush same as the other side you’re in time.
I hope this cleared up questions and by the end of this you should know if you are capable of doing it or not 😂
Update: finished the job last Saturday, drove the car 7hrs to LA on Monday with zero issues. She feels better than ever and no leaks! ZERO TOP OFFS MADE 😂



