25KVIEWS
55REPLIES
79APPRECIATES
06-20-2026LAST POST
This is great info, thank you! Pictures definitely help understand what you were referring to, especially for someone who's yet to take this on.

Also interesting they're using the Neilsen kit. I had asked if anyone had experience with it and if it was any good in a thread I made on timing tools. Guess we know now :lol:
Anyone know if you can replace timing chain during this with ease and same directions?
rollsISU wrote
I completed the job :)

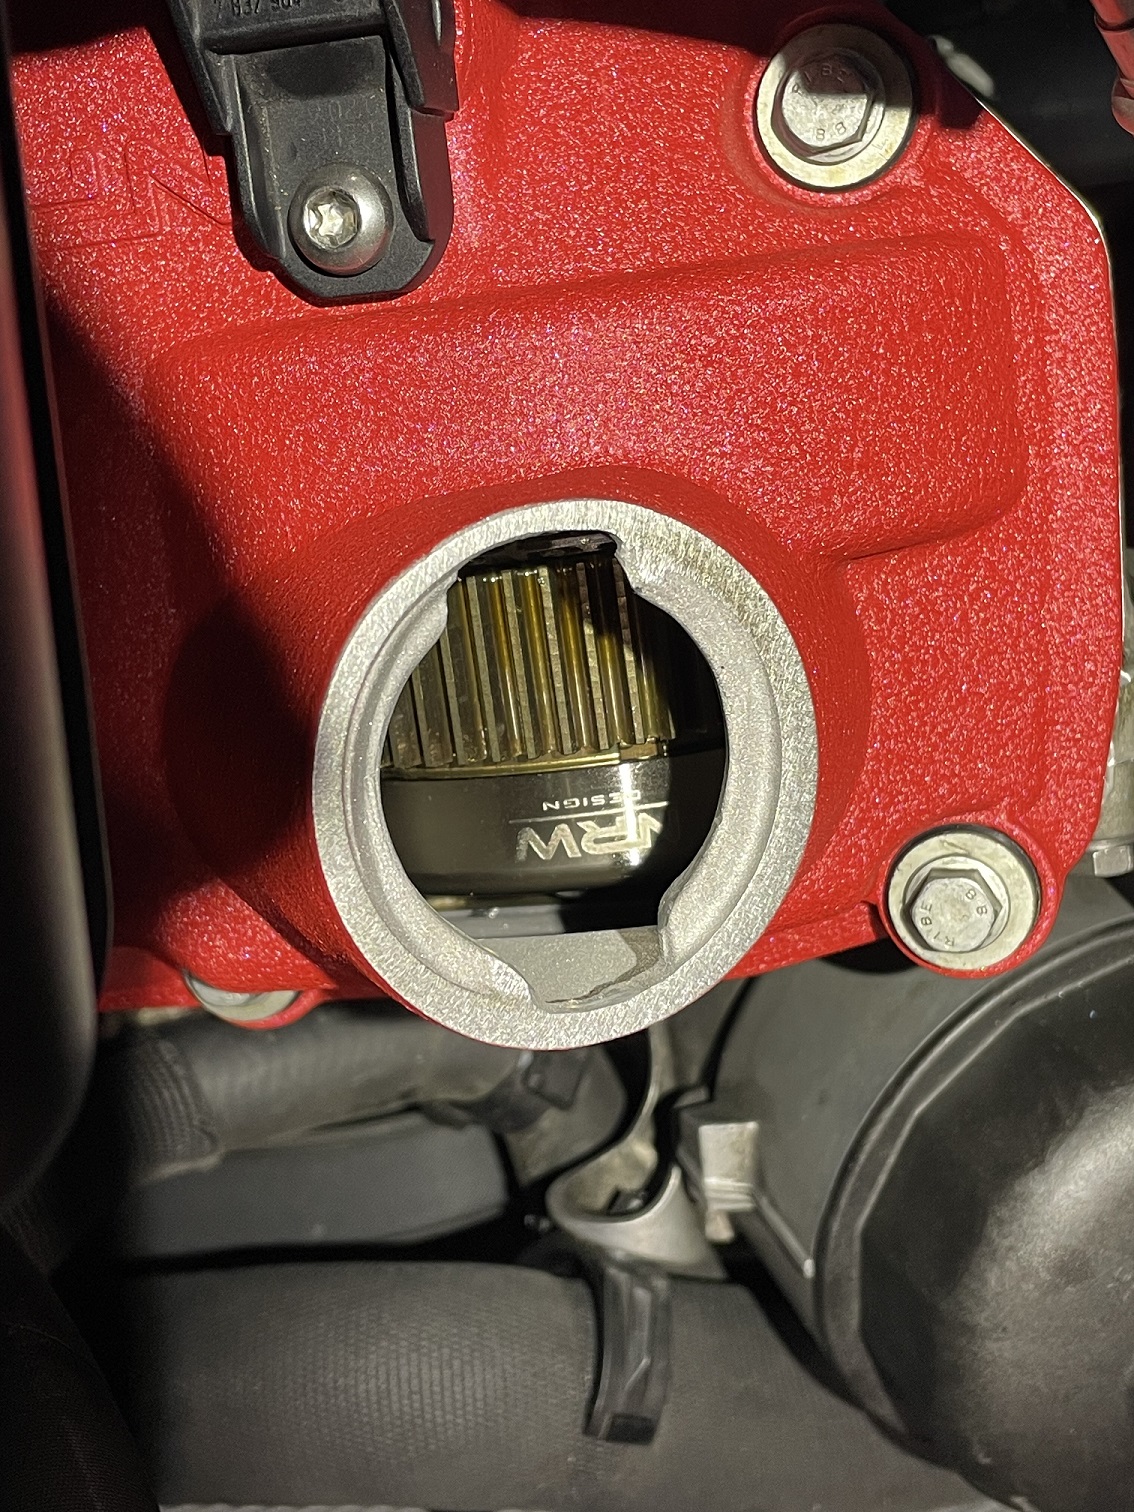
I took a grinder to the key. I ground it just enough to not interfere. It was still kinda tight, could probably have gone further. Also, I did it for an orientation that would be difficult without removing the water pump pulley. I removed that, easy enough.

Also, in retrospect I learned the BMW service manual states two different locking keys, one for use with engine out and one for use with engine installed. The one for use with the engine installed is basically just a cut off version with a string on the end. Why none of the tool kits consider this, I don't know. Also, why not just always use the shorter one??? Seems that would be easy enough with engine out also. If I owned the kit I suppose I'd just cut it off, but it wasn't my tool and NRW said I could grind it so that's what I did.

Attached image
Attached image
Attached image
When I did mine, I slightly loosened the locating hole bracket, just enough for the tool to slide in. A bit tight but it worked fine. I checked the timing using the TIS procedure afterwards and it was all good.
fengrr wrote
Anyone know if you can replace timing chain during this with ease and same directions?
From my experience, the answer would unfortunately be no.

You only have to remove the small timing covers at the top of the engine to get to the vanos covers. To change the timing chain itself you would have to remove the crank pulley, accessories, full lower cover, etc.
rollsISU wrote
I completed the job :)

I took a grinder to the key. I ground it just enough to not interfere. It was still kinda tight, could probably have gone further. Also, I did it for an orientation that would be difficult without removing the water pump pulley. I removed that, easy enough.

Also, in retrospect I learned the BMW service manual states two different locking keys, one for use with engine out and one for use with engine installed. The one for use with the engine installed is basically just a cut off version with a string on the end. Why none of the tool kits consider this, I don't know. Also, why not just always use the shorter one??? Seems that would be easy enough with engine out also. If I owned the kit I suppose I'd just cut it off, but it wasn't my tool and NRW said I could grind it so that's what I did.

Attached image
Attached image
Attached image
Congratulations!

I am happy that worked out for you!

I am thankful NRW was accommodating. It would make sense for them to have the shorter tool as I am assuming the majority of us are not removing those coolant tubes.
Not to hijack thread, but I had to buy the CTA timing tool as they weren’t available for rent.

I had to cut the lock pin to slide in. It did help removing the water pump pulley but should fit with it on. I have mine available with the 27mm wrench and TIS.

PM me directly as to keep this thread relevant.

OP: I can remove my posting if you’d like.
Attached image
What about heating and bending the locking tool so it clears the coolant hard pipes? Wrap the business end in a wet rag and give it some hell with MAP gas.
rollsISU wrote
I completed the job :)

I took a grinder to the key. I ground it just enough to not interfere. It was still kinda tight, could probably have gone further. Also, I did it for an orientation that would be difficult without removing the water pump pulley. I removed that, easy enough.

Also, in retrospect I learned the BMW service manual states two different locking keys, one for use with engine out and one for use with engine installed. The one for use with the engine installed is basically just a cut off version with a string on the end. Why none of the tool kits consider this, I don't know. Also, why not just always use the shorter one??? Seems that would be easy enough with engine out also. If I owned the kit I suppose I'd just cut it off, but it wasn't my tool and NRW said I could grind it so that's what I did.

Attached image
Attached image
Attached image
Would you happen to have the part number for the shorter tool?
It's nice that NRW rents the tool out, though it would be better if they modified it to fit, or bought the kit meant for in engine service. I plan on going this route when the time comes (hopefully this coming fall) and would love to support the OG MPorium Vanos Cups, but they no longer rent the tool. Unless I'm looking at the wrong tools, they look like they are 300 minimum to buy, for a tool I would likely never use again. At that point I would probably just pay a trusted shop to do the job.
Did mine, along with the valve covers.

Couple comments:

TIS and the M539 video has you doing bank 1 first, bank 2 second, so I did mine that way. Don't know if it makes a difference, but mine was timed perfectly when done.

Use a ton of copper lube on the head of the bolts, else they stick and pop. I found the amount does matter. And re-apply a ton when you fully loosen them between torque sequences. Wipe clean after.

For step 4 in the OP, my cams seem to be somewhere between 26.5mm and 27mm, so I used a 27nm wrench.

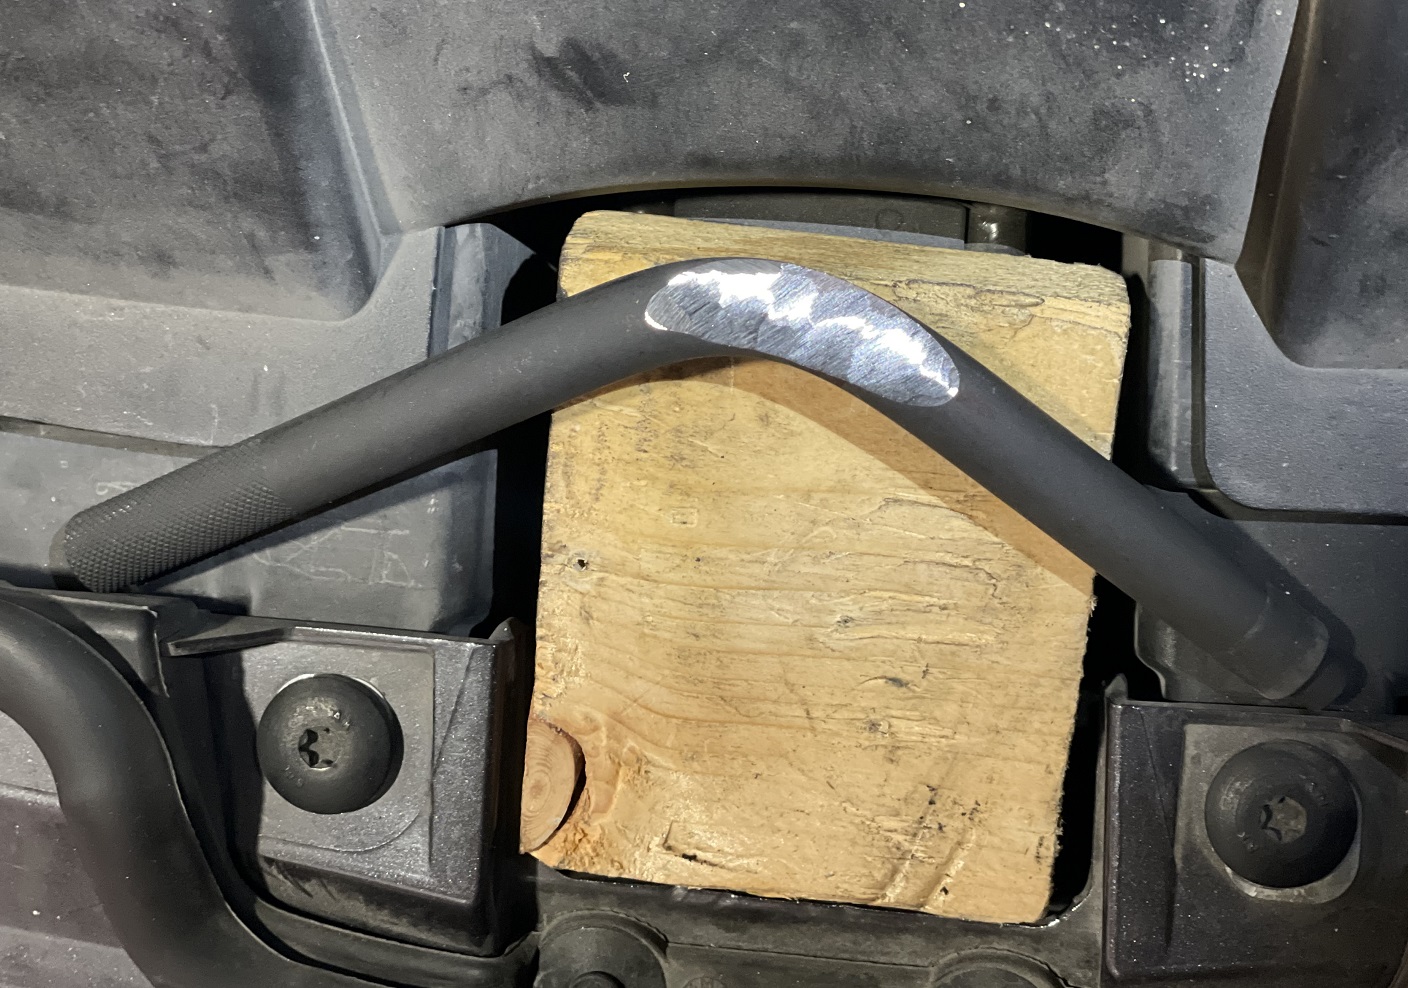
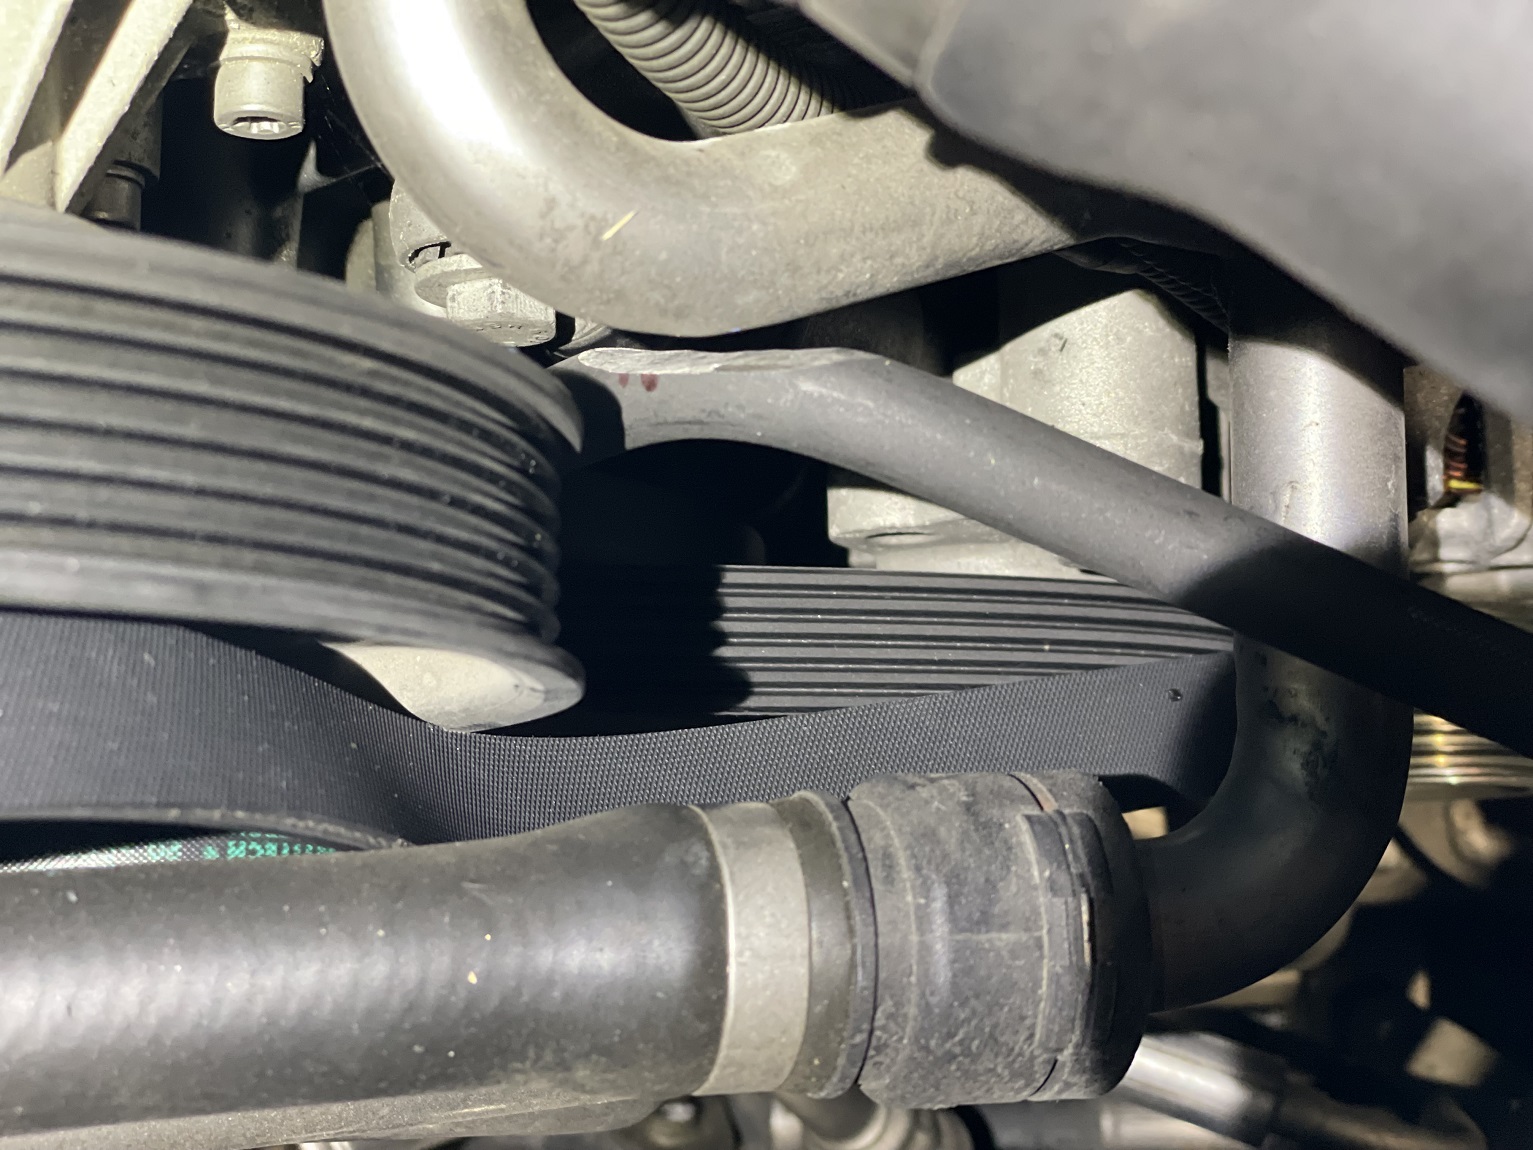
I ground my lock pin tool just enough to clear the hard pipe, but reflected from what rollsISU's user avatarrollsISU did. No pulley removal required, but I did pop the belt loose.
Attached image
Attached image

It seems the CTA tools had a bad batch of cam timing tools out which didn't clear the cams correctly, but they're proactive about replacement if you get one of the incorrectly sized sets. Mine were sized correclty, but given the timing spec of this engine, I wouldn't have tried removing material from the cam locks without a mill.

There are a lot of garbage TTY angle tools available. After a couple tools (one from internet, one from local parts store), I ended up keeping a Lisle 28100. Still wasn't great, but worked OK. I had to tighten the needle down with a set of pliers to ensure it didn't come loose when torquing, finger tight wasn't enough, especially if you get stick and pop from too little copper lube. I also marked and took pics of my bolts after the 80Nm steps so I could estimate in case it came loose. I think the gauge of the Hazet 6690 used in the M539 vid will be too large to fit with accessories on the engine, the little Lisle barely cleared a couple places, and only after tying off a soft coolant hose with a big zip tie for one of the cams.

NRW pr0n:

Attached image
endur0 wrote
Did mine, along with the valve covers.

Couple comments:

TIS and the M539 video has you doing bank 1 first, bank 2 second, so I did mine that way. Don't know if it makes a difference, but mine was timed perfectly when done.

Use a ton of copper lube on the head of the bolts, else they stick and pop. I found the amount does matter. And re-apply a ton when you fully loosen them between torque sequences. Wipe clean after.

For step 4 in the OP, my cams seem to be somewhere between 26.5mm and 27mm, so I used a 27nm wrench.

I ground my lock pin tool just enough to clear the hard pipe, but reflected from what rollsISU's user avatarrollsISU did. No pulley removal required, but I did pop the belt loose.
Attached image
Attached image

It seems the CTA tools had a bad batch of cam timing tools out which didn't clear the cams correctly, but they're proactive about replacement if you get one of the incorrectly sized sets. Mine were sized correclty, but given the timing spec of this engine, I wouldn't have tried removing material from the cam locks without a mill.

There are a lot of garbage TTY angle tools available. After a couple tools (one from internet, one from local parts store), I ended up keeping a Lisle 28100. Still wasn't great, but worked OK. I had to tighten the needle down with a set of pliers to ensure it didn't come loose when torquing, finger tight wasn't enough, especially if you get stick and pop from too little copper lube. I also marked and took pics of my bolts after the 80Nm steps so I could estimate in case it came [...]
This is all great info. Thank you! I was planning on taking this job on tomorrow but feel totally unprepared now so will go over this thread a few times and YouTube videos and give it a shot next weekend.

What do you mean by the bolts 'stick and pop' due to lack of copper paste? I mean what does that feel or look like?

Also grinding the pin is making me nervous. I'm thinking I'll do it beforehand so I don't waste time, as I need to work outdoors. If you could share some more pics of where you ground it, and how it's different from rollsISU's user avatarrollsISU I'd appreciate it. Some posts mentioned cutting it short entirely, would that be a bad idea?

Lastly after loosening the belt, how do you tighten it back to spec? Is there an adjustment there? On my WRX I used a Gates tension tool. Not sure if the same would apply.
a5m wrote
This is all great info. Thank you! I was planning on taking this job on tomorrow but feel totally unprepared now so will go over this thread a few times and YouTube videos and give it a shot next weekend.

What do you mean by the bolts 'stick and pop' due to lack of copper paste? I mean what does that feel or look like?

Also grinding the pin is making me nervous. I'm thinking I'll do it beforehand so I don't waste time, as I need to work outdoors. If you could share some more pics of where you ground it, and how it's different from rollsISU's user avatarrollsISU I'd appreciate it. Some posts mentioned cutting it short entirely, would that be a bad idea?

Lastly after loosening the belt, how do you tighten it back to spec? Is there an adjustment there? On my WRX I used a Gates tension tool. Not sure if the same would apply.
What do you mean by the bolts 'stick and pop' due to lack of copper paste? I mean what does that feel or look like? The copper paste under the bolt heads act as a lube. I actually used ARP fastener lube instead of the copper paste and it worked great. I also dipped the threads of the bolts in oil. Without the lube they will stick and jump instead of tighten smoothly. This is the popping sensation you will hear and feel. It will also make it more difficult to measure the angle. I used an electric torque wrench that could measure angle which worked very well.

Also grinding the pin is making me nervous. I'm thinking I'll do it beforehand so I don't waste time, as I need to work outdoors. If you could share some more pics of where you ground it, and how it's different from rollsISU's user avatarrollsISU I'd appreciate it. Some posts mentioned cutting it short entirely, would that be a bad idea?I can't really comment on the grinding portion, the tool I borrowed was cut short, but still worked. There is a collar that holds the shaft of the tool and as long as it isn't cut so short that it sits below the collar, you will be okay.

Lastly after loosening the belt, how do you tighten it back to spec? Is there an adjustment there? On my WRX I used a Gates tension tool. Not sure if the same would apply.This car uses chains for tightening so there is no belt to tension. You also aren't really messing with the chains at all. Unless you're referring to the serpentine belt? There are auto tensioners for the belts. I would remove the water pump pulley though as it gives you more room.
After watching the M359 vid, I was wishing I'd gotten the ARP assembly lube, seems less prone to popping and sticking, but by the time I knew that, I was already into it so I went with what I had. I did put engine oil on the threads as per the SOP.

What I'm calling 'pop and stick' is the same effect as a creaking door, just louder and sharper because a lot more force and the system has a much higher frequency. You can hear it at 52:30 in the M539 vid, but it was much louder when mine did it. My guess is some parts of the bolt face get dry, then you add torque until you break them loose (pop) and it moves smoothly for a few degrees until it find/creates more dry interface, then it sticks, then repeat.

As far as how my grind is different from rollsISU's grind, if you look at his pics and mine, you'll see that mine's ground on the other side from his and that its position is ~180° rotated vs his when installed. I just marked the closest point on mine after attempting a test fit, then went to town in that location, test fit again, ground off some more, repeat, until it fit with decent clearance. Mine just barely passes the pipe when installing (you have to wiggle it a little bit until it finds where it's happy and then it just falls in), and when fully in its sleeve, it's got the clearance in my installed image. Then it drops another ~5mm or so when it's in the OT or 10° slot.

Mine:
Image hosted on: www.m3post.com
rolls:
Image hosted on: www.m3post.com

Mine installed:
Image hosted on: www.m3post.com
rolls installed:
Image hosted on: www.m3post.com
Now that I'm looking closely at the pics, rollsISU is using a Neilson CT5744 tool while mine is a CTA 2896; unsure if that'll make a difference, but the look to be the same.
[
F4rmost wrote
What do you mean by the bolts 'stick and pop' due to lack of copper paste? I mean what does that feel or look like? The copper paste under the bolt heads act as a lube. I actually used ARP fastener lube instead of the copper paste and it worked great. I also dipped the threads of the bolts in oil. Without the lube they will stick and jump instead of tighten smoothly. This is the popping sensation you will hear and feel. It will also make it more difficult to measure the angle. I used an electric torque wrench that could measure angle which worked very well.

Also grinding the pin is making me nervous. I'm thinking I'll do it beforehand so I don't waste time, as I need to work outdoors. If you could share some more pics of where you ground it, and how it's different from rollsISU's user avatarrollsISU I'd appreciate it. Some posts mentioned cutting it short entirely, would that be a bad idea?I can't really comment on the grinding portion, the tool I borrowed was cut short, but still worked. There is a collar that holds the shaft of the tool and as long as it isn't cut so short that it sits below the collar, you will be okay.

Lastly after loosening the belt, how do you tighten it back to spec? Is there an adjustment there? On my WRX I used a Gates tension tool. Not sure if the same would apply.This car uses chains for tightening so there is no belt to tension. You also aren't really messing with the chains at all. Unless you're referring to the serpentine belt? There are auto tensioners for the belts. I would remove the water pump pulley though as it gives you more room.
Thanks so much for replying! Got it regarding the lube. Any reason you used the ARP one? I bought a digital torque wrench so planning to do the same.

Okay I may just cut the pin, or grind while doing the job and remove what's necessary. Someone mentioned loosening the holding bracket which would eliminate the need to mod the tool entirely. May have to look into that, but good to know on the collar.

I meant the serpentine belt. As much as I want to avoid taking stuff off, if it makes the job easier and quicker overall, then I'm all for it. What's one or two more torque specs to dig up?
You want as much space in there as possible so you may benefit from removing the belts and a few pulleys along with the radiator fan. It’s a good time to go through your tensioners and pulleys if you haven’t serviced them already.
endur0 wrote
After watching the M359 vid, I was wishing I'd gotten the ARP assembly lube, seems less prone to popping and sticking, but by the time I knew that, I was already into it so I went with what I had. I did put engine oil on the threads as per the SOP.

What I'm calling 'pop and stick' is the same effect as a creaking door, just louder and sharper because a lot more force and the system has a much higher frequency. You can hear it at 52:30 in the M539 vid, but it was much louder when mine did it. My guess is some parts of the bolt face get dry, then you add torque until you break them loose (pop) and it moves smoothly for a few degrees until it find/creates more dry interface, then it sticks, then repeat.

As far as how my grind is different from rollsISU's grind, if you look at his pics and mine, you'll see that mine's ground on the other side from his and that its position is ~180° rotated vs his when installed. I just marked the closest point on mine after attempting a test fit, then went to town in that location, test fit again, ground off some more, repeat, until it fit with decent clearance. Mine just barely passes the pipe when installing (you have to wiggle it a little bit until it finds where it's happy and then it just falls in), and when fully in its sleeve, it's got the clearance in my installed image. Then it drops another ~5mm or so when it's in the OT or 10° [...]
Thanks man for the clarification. I'm getting now what you mean by the stick and pop. That would get me worried if I felt that, so will go with the ARP lube since you seem to have wanted to use it as well. I'm curious though, the lube will affect the actual torque value no? Wonder how that factors in.

Oh I see, it looks like rollsISU removed the pulley whereas you didn't, hence the different grinding spots and pin orientation? I think it'll be best to do this once I'm at that step instead of ahead of time. Doubt I'll get it perfect, and will probably have to grind away more anyway. I'll test my Harbor Freight grinder and see if it's up to the task. Also will pick up 26mm and 27mm wrenches and use whatever fits better.
TIS calls for copper paste (antiseize) under the bolt head. ARP lube should be fine, serves the same purpose for this application. Torque values are for lubed fasteners in this case.
WRT 'loosening the belt', I mean the accessory belt. It just has a spring loaded tensioner. I just popped cap off its center screw and used a 14mm crescent to take the tension off the belt, then pulled the belt off the alternator pulley. I didn't do anything with the cam chains or their tensioners.
spammysammich wrote
You want as much space in there as possible so you may benefit from removing the belts and a few pulleys along with the radiator fan. It’s a good time to go through your tensioners and pulleys if you haven’t serviced them already.
Great. More shit to buy and replace. I love this car.
spammysammich wrote
TIS calls for copper paste (antiseize) under the bolt head. ARP lube should be fine, serves the same purpose for this application. Torque values are for lubed fasteners in this case.
Thanks! Yea I like sticking to TIS so would prefer using copper. I'm tempted to nerd out on friction coefficients etc on copper vs ARP, but I'm not gonna overthink it (I probably will).
endur0 wrote
WRT 'loosening the belt', I mean the accessory belt. It just has a spring loaded tensioner. I just popped cap off its center screw and used a 14mm crescent to take the tension off the belt, then pulled the belt off the alternator pulley. I didn't do anything with the cam chains or their tensioners.
Ah yup makes perfect sense now, thank you. I'll try going that route and hope I don't need more space. Don't really want to take off a bunch of stuff. Few scraped knuckles is fine.
I removed the radiator fan. It was a PITA to remove, as its geometry really doesn't want it to be removed with everything in place, but got a little better when I removed some screws attaching its mount hear the top of the radiator support; this allowed moving that mount out some and it could slip a tab on the fan past the location where the top coolant pipe enters the radiator. Probably a better way to remove it than what I did... now that I think about it, wonder if it'd have been happier going out the bottom...

IIRC, I removed the fan mostly for access to the crank bolt so I could easily turn the engine. And then I didn't have to remove any pullies.

Dunno if there's a difference in final stretch between using copper paste and ARP lube. My guess is it's a small effect compared with the +200° stretch which in my head makes the final stretch more a function of the bolt's metal and geometric characteristics than a function of that 80Nm.